If you've missed the recent painting and masking tutorial posts from ScotchBlue™Brand, now is definitely the time to catch-up! From learning How to Easily Update Your Space with ScotchBlue™ Painters Tape to Masking Techniques for Smooth, Medium and Heavy Surfaces, ScotchBlue™Brand posts are your one stop hub for painting and masking how tos. That's why we're so excited to share their recent project with you! Costing only $20, this thirty minute makeover will leave your old, boring side table a pin striped masterpiece!
What You Need
Materials
- A table to refinish
- 1 1/2 inch ScotchBlue™ Painter’s Tape Delicate Surface 2080
- 3/4 inch ScotchBlue™ Painter’s Tape Delicate Surface 2080
- Paint
Tools
- Paintbrush
Instructions
1. Make sure the surface is free of any dirt or dust.
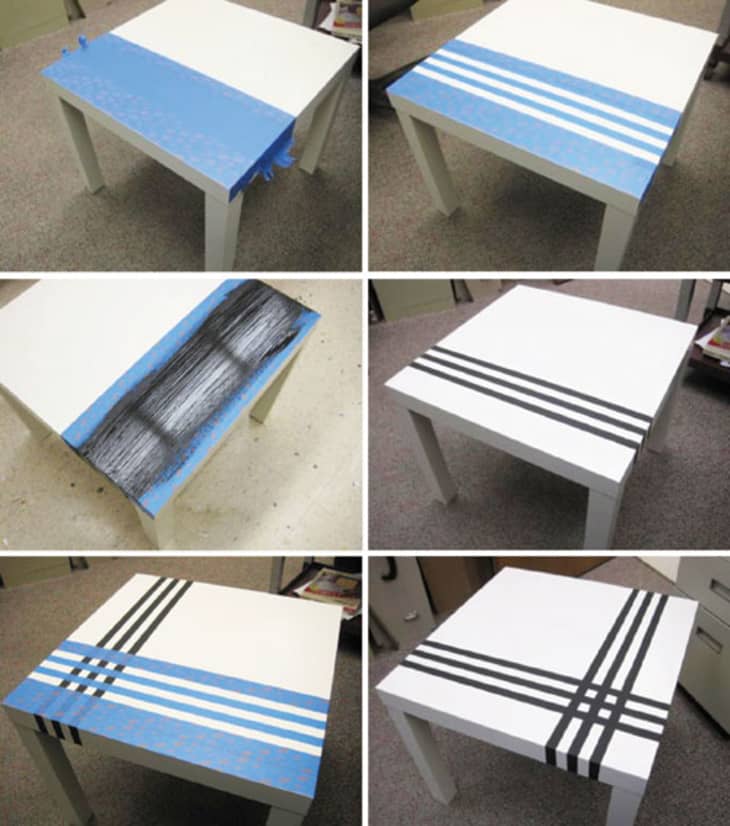
2. (Top, Left Image) Place two strips of 1.5" 2080 along the edge of the table. Then place five strips of 3/4" 2080. Finally, add one more strip of 1.5" 2080, being careful not to overlap the tape edges.
3. (Top, Right Image) Remove every other strip of 3/4" 2080. The exposed tabletop indicates where the stripes are placed.
4. Press the tape firmly and wait 20 minutes for the tape to properly adhere to the table.
5. (Middle, Left Image) Paint the table as seen above.
6. (Middle, Right Image) Be sure to let the paint completely dry before moving forward. It may require waiting a day or two before moving on.
7. (Bottom, Left Image) Repeat the same process for the striping, but this time, do so in the opposite direction.
8. (Bottom, Right Image) Success! After adequate drying time, place your newly painted, loved table where it belongs in your home. Invite friends over to celebrate your newly completed DIY!
(Images: ScotchBlue™)


Nomade Express Slee...
Am I the only person who thinks that keeping the tape--thus the stripes--perfectly straight would be a challenge?
Also, surface prep. If this is done on an IKEA Lack table (as the example shows, I think) without roughing up the surface first, won't the paint just slowly come off?
I like the idea, I just wonder about executing it.
I wondered the same thing about surface prep, SubwayKnitter. I have an old LACK table that I'd like to try this on; anybody know what needs to be done before the painting starts.
SubwayKnitter makes a good point. What type of paint would you recommend for painting over a Lack table or similar surface?
SubwayKnitter - I just did this in my bathroom and it was very challenging however if you do it as they suggest (putting all tape strips down and then removing every other one) then I imagine that will really help keep the lines straight. I however did not want my lines to be the same thickness as the tape so it was a bit more challenging. One suggestion.... make sure your painters tape is brand new, otherwise you risk the paint seeping through and then you'll have to do touch-ups afterwards. I used semi-gloss exterior paint which is holding up so far.
SubwayKnitter - Keeping the tape straight can be very easy by doing the following steps. Using a pencil, measure and make light marks across the table where you want to apply one of the edges of the tape. Then, without stretching the tape, lay the tape down keeping the tape edge just inside of the pencil marks. After the tape is applied go back over it with a putty knife or credit card and firmly rub the tape to the surface of the table making sure that adhesive makes a good bond to the tabletop.
For preparing the surface, we recommend following the paint manufacturer's directions for surface prep, applying the paint and dry/recoat times. For this particular project we made sure the surface was clean prior to taping and painting.
BruceS63 - Most any interior or exterior paint could be used on a table like this. Your local paint store is also a great resource for paint selection.
Please let us know if you have additional questions.
Thank you,
ScotchBlue Customer Service
There is a new painting tool that helps you create any design you think of without using the pencil and tape measure. It's called the U-Stripe It & Design Tool. They painted a design on an old desk on their site. It's a great idea painting over old furniture making it look new again. Check out this tool at ustripeit.com. Just trying to help everyone design with ease.