
Before and After: A Living Room Fireplace Goes from “Pukey” to Super Luxe With Amazon Items

PR pro Jessica Greenhalgh‘s Massachusetts apartment certainly has good bones, but like most rental spaces, not every feature and finish felt tailored to her tastes when she moved in. “I love my apartment — it’s an old building with lots of character like French doors, bay windows, built-in cabinets, and hardwood floors,” she says. “But the fireplace in particular was something that didn’t really vibe with my decor. I don’t think there’s any other word than ‘pukey’ to describe the color.”
She lived with that dingy, cracked fireplace surround and front hearth for a while. Once she invested in a few pieces of new furniture for her living room though, Greenhalgh decided to make a change.
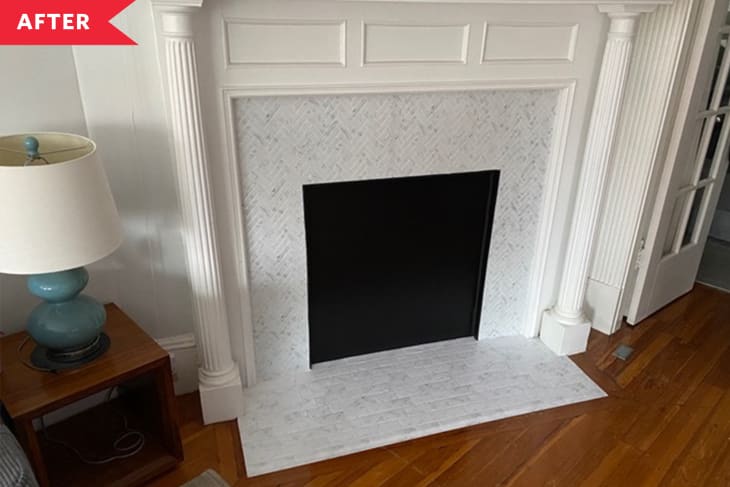
“The room has honey-colored wood floors and light walls, so the green ‘marble’ fireplace surround wasn’t really a fit for my new color scheme,” she says. As a renter, she had to find a temporary, reversible solution. So she turned to Amazon Prime for all the materials she’d need to give her fireplace a clean, Carrara marble-like look that better matches her Neoclassical style mantel: peel-and-stick subway and herringbone tiles from Stickgoo, caulk, and a wallpaper smoothing tool kit.
Over a long weekend, with episodes of “Friends” on in the background, Greenhalgh got to work. She started by wiping everything clean and then began measuring the fireplace surround and front hearth, cutting the peel-and-stick products into pieces to fit over the old green stone.
For a little variety, she went with a herringbone repeat for the surround and a coordinating classic staggered subway pattern for the front hearth. Using the squeegee tools in the application kit she ordered, she laid down the pieces, smoothing out any little bubbles that popped up and caulking where needed. “There was a bit of a learning curve, but I got in a groove and made it work,” she says. “The herringbone was much more difficult to match up, but it was also more forgiving for overlaps.”
In the end, the project took about eight hours total and cost around $160, including those extra tools she now has in her toolbox for future peel-and-stick. Now, the fireplace surround and front hearth look as luxe as the trim above it and the columns that flank it. “Honestly, I just love that you don’t notice the fireplace now,” Greenhalgh says. “Walking in the room, it looks like it belongs there and doesn’t draw any attention.”
Our Best Renter-Friendly Transformation Ideas
We have the best renter-friendly tips, tricks, and hacks to transform your rented space into a home. Sign up to get 8 days of our best non-permanent Before & After content delivered straight to your inbox.