
How To: Create A Reclaimed Wood Wall
I’d been scheming to create a reclaimed planked wall for several years, and finally got my chance when the talented couple behind Ashley & Robert’s Streamlined Bohemian asked me to help them design their new Georgetown chocolate shop.


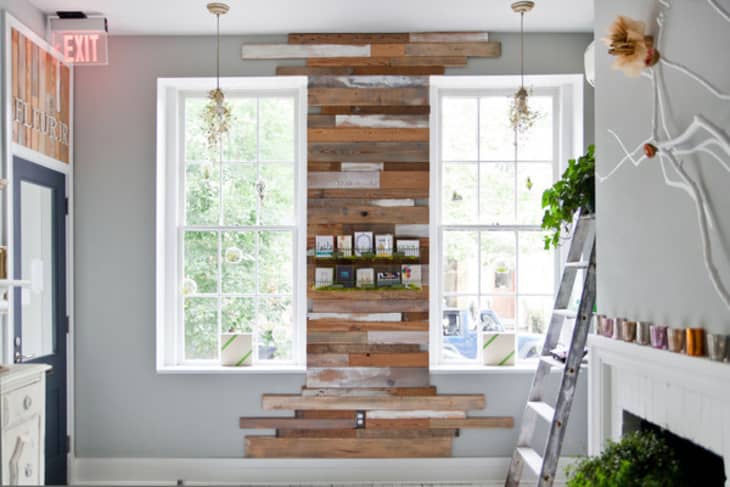
The goal for their shop, Fleurir Hand Grown Chocolates, was to create a vibe that was both clean and rustic. Robert’s parents gave them leftover wood flooring— previously reclaimed from a Southern tobacco factory— and the rest of the pieces came from Community Forklift’s mismatched flooring bins for twenty five cents a piece.
In this space, I chose to use the wood wall as more of an art installation than an architectural feature. Therefore, we chose not to cover the entire wall but rather to play up the randomness by placing the planks in a rather haphazard fashion with some spilling over longer than others. The beauty of a reclaimed wood wall is that it can achieve a variety of looks and feelings depending on the assembly process, lay out, and type of wood used.
After helping “Team Fleurir” assemble their wall, I became a little jealous, and decided to do something similar in my own home. A few years ago a tragic sewer backup forced us overhaul our basement, and the once cozy (yet dated) space has been lacking warmth ever since. I decided that the stairwell, which is visible from the main floor, was the perfect spot add the reclaimed wood. It would recall some of the basement’s previous pine paneling, but appear fresh and interesting. With you lovely readers in mind, I documented the entire process, which by the way cost under $50.
Before we start, I want to mention that there is no one-way-fits-all set of instructions for this type of project. In both the Fleurir project and my own, I wanted to use painted wood in order to make the wood tie in with the surrounding painted walls more subtly. This is a stylistic preference, so if you like the look of strictly raw wood, skip the first step. If you do opt to paint some of the planks, try incorporating some hues reminiscent of the wall color. I chose to paint my own raw salvaged boards rather than to used salvaged previously painted wood to eliminate the risk of lead contamination. Also, I arranged the boards as we went along, and did so purely by sight. Some people may prefer to have a more methodical approach, measuring the whole wall and laying out the pieces on the floor beforehand. I opted to select each next piece as we went along to cut down on time.
Materials:
• reclaimed tongue and groove flooring (look at salvage yards, Craigslist, and Freecycle)
• stud finder
• pencil or piece of chalk
• chop saw or a handsaw and miter
• hammer
• level
• drill (or nail gun)
• screws (or nails if using nail gun)
• paint, sander, wet rag (optional)
The How To:
• If painting: select pieces of wood to be painted, and paint using a variety of shades. For instance, wipe some of the paint off with a wet rag before it dries. To create other distressed looks, remove some paint around the edges with an electric sander.
• Using a stud finder, locate studs and mark with a pencil or piece of chalk
• Find and mark studs.
• Starting at the floor, screw or nail bottom plank into the studs. It is not necessary to screw in every plank since they are kept in place with the tongue and groove.
• Select the next plank, and use your chop saw or hand and miter to cut to the needed dimensions. I alternated the number of planks per level to make for a more varied look. For instance, some levels are made up of one plank, others are made up of three or even six. In my opinion, random placement makes for a more interesting look.
• Select the next plank of wood, and set on top of the previously screwed in plank. Place a piece of scrap wood on top and tap the desired plank into place. Using the scrap wood as a buffer (rather than hammering the wood directly) will prevent you from denting your wall or damaging the wood plank that you are putting into place.
• To readjust a plank once it is set in the groove of the adjoining plank, place an extra piece of scrap wood and gently tap the piece in question to the desired position. Using the scrap wood will keep you from accidentally denting your walls.
• Periodically use a level to make sure that your pieces are in place since, given the nature of reclaimed lumber, some pieces may be warped and will adversely affect the design later on in the process.
• Repeat, repeat, repeat!
• In both cases, we got lucky and happened to have our planks fit the exact height we needed. However, as you get within a few planks of the top of the wall, measure to see if you will need to saw any of your planks in half to fit the space.
Thoughts:
This is a great project for people who love texture and who embrace imperfection. Part of the beauty of reclaimed wood is the variety, most of which comes from wear and tear, nail holes, splintering, etc. I appreciated that the natural imperfections in the desired look allowed for some imperfection in the implementation. If the wall in question does not have a lot of angles, it’s a great “create as you go” project that doesn’t require you to plan out anything in advance, which means it’s not very time consuming.These small walls took under two hours.
(Images: 1: Christina Bernales, 2-8 : Leah Moss)