
Win: Your Dream Max Plexibox Gallery Wall from Simply Framed
Win: $500.00 credit toward your new Max Plexibox Gallery Wall
From: Simply Framed
Value: $500.00
I was thrilled to launch the brand new Max Plexibox with the lovely folks over at Simply Framed last week. Our new Lucite box frame is so much thinner and clearer than your typical plexi frame, giving it the unique ability to showcase keepsakes without framing distraction. This opens up so many doors for an art-lover, and most of all, it makes the Max Plexibox IDEAL for a gallery wall.
While the actual hanging of the gallery might take time and patience (it won’t be quite as fast as this GIF), picking out your pieces and framing them shouldn’t be complicated. I’ve gathered my best tips for framing in Max Plexibox so you can get started today — and one lucky winner gets to do it for free.
Tip 1: Get Inspired
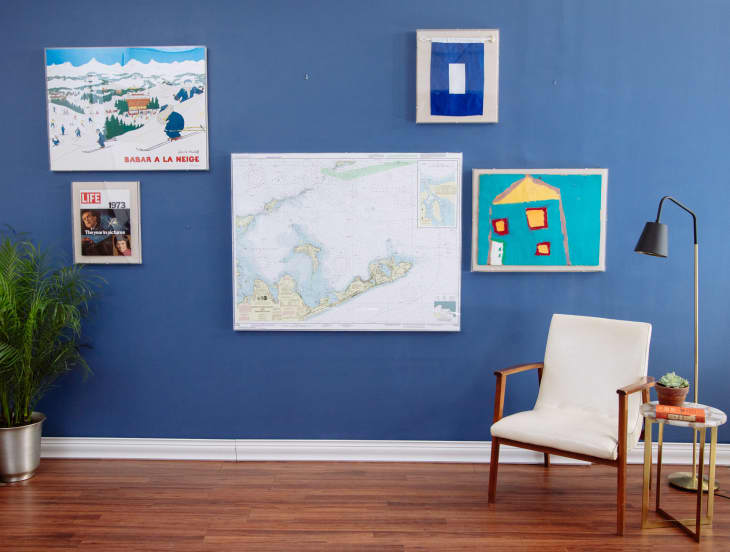
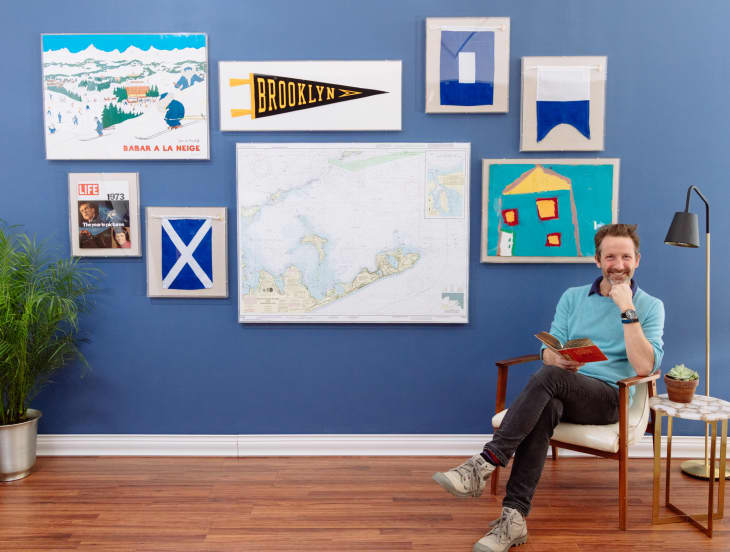
I love gallery walls. They create a cozy, homey vibe, and they make a BIG statement. But what I really love about them is how they’re super personal and can tell a bigger story through grouping.
I started mine by gathering a variety of personal items I wanted to put a special spotlight on. The thing is, not all these items were 2D. The Max Plexibox allows you to frame just about anything! Floating art of all kinds is very chic at the moment, so if you’re feeling a little scattered, there’s tons of inspiration on Pinterest right now. Create a board and start pinning!
Tip 2: Ground the Gallery with a Statement Piece (or Two)
Just because a gallery wall is a combination of numerous frames, they DO NOT have to be all small. Here’s my plan… I start with one or two larger frames that anchor the whole thing. The Max Plexibox is created in such a way that it can be used to frame HUGE pieces — up to 40 by 60 inches. I made this marine map of Long Island Sound the heart of my gallery wall.
It’s special to me because it shows the area of Long Island where my mother lives. And I just like it aesthetically. The second fairly large piece is this vintage Babar poster…it was one of my favorite books as a kid.
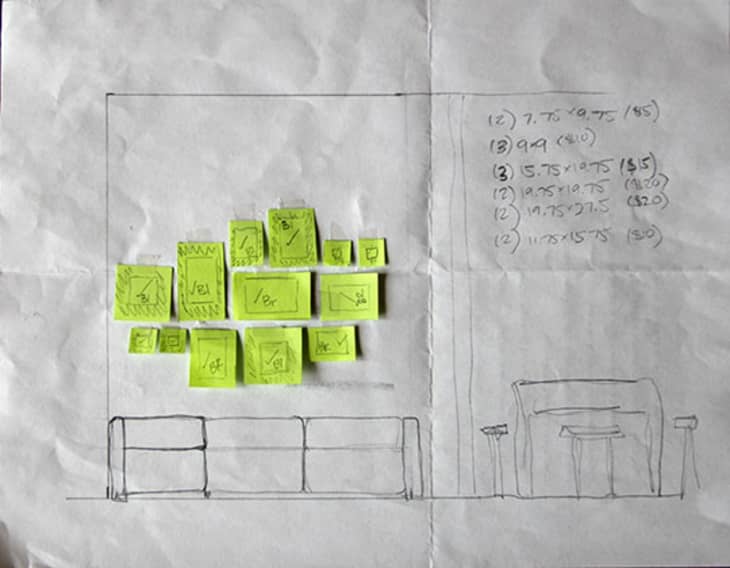
Once you’ve gotten your anchor pieces figured out, plot out how the rest of the pieces “talk” to each other. Before you put any nails in the wall, though, look at them either in a scale mockup like in my sticky-note model above or all laid out in the floor. I got more into how to shape your gallery wall in this post I wrote awhile ago.

Tip 3: Don’t Worry If It’s Not Really “Art”
The more personal things the things on your walls are, the more it’ll feel like home. But read this well: This doesn’t mean that the piece has to be created by a professional! That painting of the house kinda looks like it was done by a child’s fingers, right? It was! I painted it back in kindergarten, and my mother held onto it. The nice thing about Max Plexi is that it allows even your original pieces (like that slightly wrinkled painting you might find in the “mom archives”) to preserve its aged look. You can customize the depth of the frame to leave as much space for texture as you would like, but the ultra-thin Lucite (only 1/4 of an inch!) helps to make it feel like there’s almost nothing between you and the artwork.
Tip 4: Break Out of the Box
One of the most notable capabilities of the Max Plexibox is its framing capabilities beyond 2D paper materials — so don’t hold back! I tried to push the envelope with a variety of different pieces:
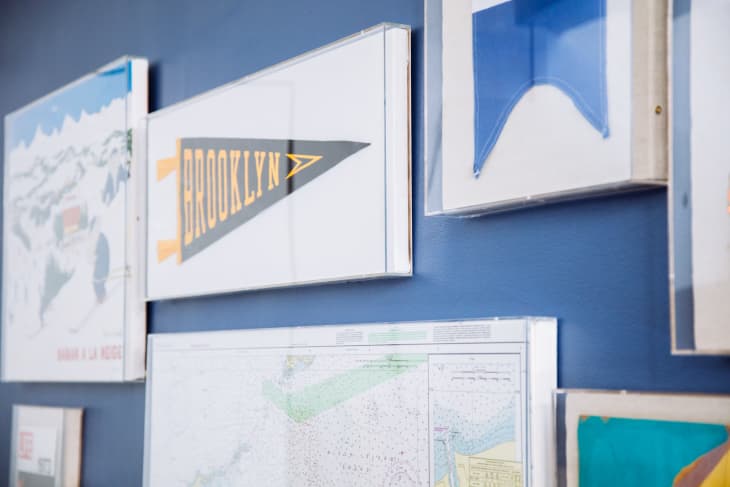
- Nautical flags: These were an especially fun experiment that paired nicely with the Long Island Sound map. Simply Framed managed to sew the flags on the natural linen in such a way that they appeared to float while still remaining stably in place. Plus, the blue and white reiterated a color motif that could be found throughout the gallery.
- Brooklyn pennant: This piece from our friends at New York Makers had everyone in the office drooling. The white linen really helped the navy to pop, and the thick felt of the pennant maintained its authentic, vintage look inside the Plexibox frame. It was especially fun for me to place this tribute to my current borough alongside all these different pieces of the past.
- Life magazine: Anyone who knows me knows that I love (and collect!) Life‘s annual “Year in Pictures” issues. Simply Framed was able to float this vintage copy in such a way that it completely maintained its look as a physical magazine.
Wooden gallery frames, step aside. You’ve officially met your match.
Feeling motivated yet? Good! Now enter below for your chance to WIN $500 to spend on the framing of your choice from Simply Framed and create your own gallery wall. You can go full-on Plexi like I did, but if that’s not totally your thing go ahead and mix and match materials. Break up the monotony of wooden gallery frames with one or two Max Plexiboxes and soon you’ll have a stunning, multi-dimensional gallery wall that will tell your story to everyone who comes into your home.
How to Enter
Enter to win $500.00 to spend at Simply Framed by filling out the form below. (Comments are great, but you have to complete the form below to enter!) The winner will receive a credit at Simply Framed to be applied toward any custom frame order on the Simply Framed site. This credit cannot be combined with any other coupons or promotions. Credit must be used by September 30, 2017. By entering this giveaway, you will be automatically subscribing to Simply Framed email list as well as the Apartment Therapy Giveaway Alert email list. The sweepstakes begins June 13, 2017 at 10:15am ET and ends June 19, 2017 at 11:59pm. By entering to win, you are accepting the official rules.
This giveaway is now closed. Thank you for entering!