A showcase for those who transform their residences into homes
via innovative intervention

Name: Olga
Location: Windsor Terrace, Brooklyn
Size: 743 sqft. Co-op
>>Enter Slideshow!
When I walked in, Olga offered me a glass of water from her energy-efficient fridge sitting in the middle of her living room. Her kitchen, at this point, exists as a mere suggestion.
Black marker drawings on the floor and walls indicate future appliance and cabinet locations. We were surrounded by lots and lots of boxes. I was worried.

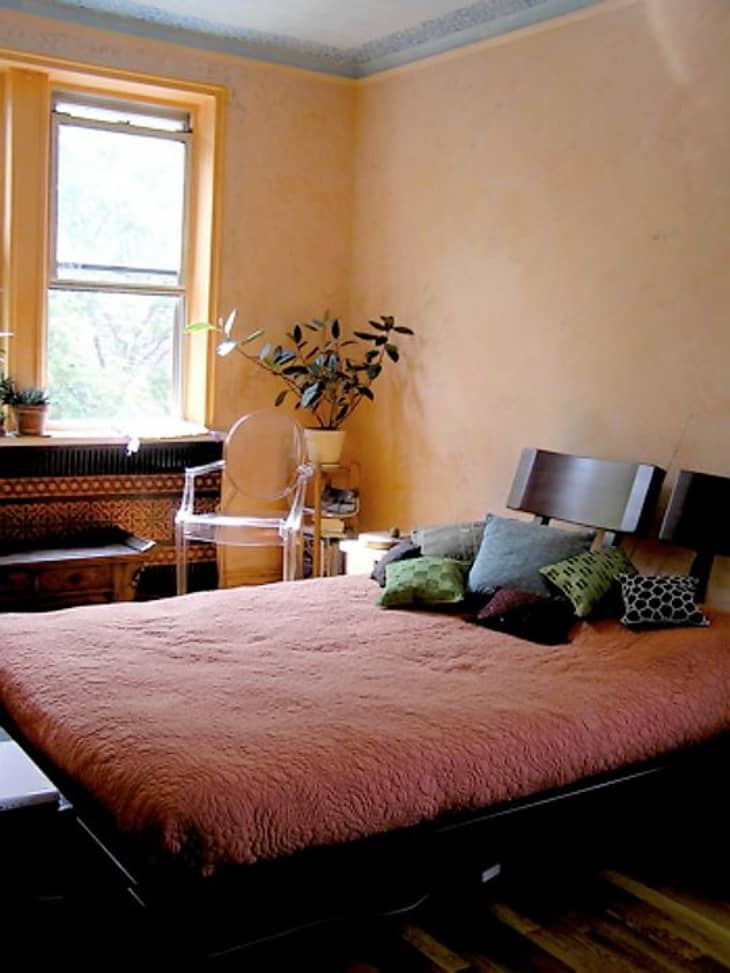
It was about a thousand degrees outside and I had just biked from Manhattan. I thought there wasn't enough done to warrant a house tour. Then I caught a glimpse of the bedroom and spent the rest of the afternoon in awe!
Feeding off her immigrant-born habits, Olga moved often and always lived out of boxes. She never unpacked! Last August, she took a great psychological leap and bought this one-bedroom apartment near Prospect Park. It's hers, all her stuff is here, and she has no excuse not to make the space exactly what she wants.
The plan was to start with the bedroom, thus creating a safe-zone for herself and her cat. From this place of retreat, she would steadily work on the rest of the apartment, and spare herself from going insane in the midst of a construction zone. It seems to be working, if at a slightly slower pace than Olga would have preferred. Olga is a perfectionist, a lover of craftsmanship and a DIY devotee. To sum it up in one short phrase, Olga has glazed and 'crackled' her baseboards!
Whether or not you ally with Olga's taste and approach to design, her efforts, skill, and patience are worthy of a great amount of honor and respect. She certainly has mine.
Years lived in: three months
Inspiration: color; light; change; other creative people, their projects and ideas
My Style: rustic, natural, zen asian, moroccan psychedelic funhouse garden
Favorite Element: the light; the color of the bedroom walls in the changing light; the architectural features/lines suddenly exposed by busting a cut-out through a living room wall
Most Talked About Element: the light, the spaciousness-- "How big is this place?"
Most Embarrassing Element: the bathroom; the fact that the rest of the place is a construction site
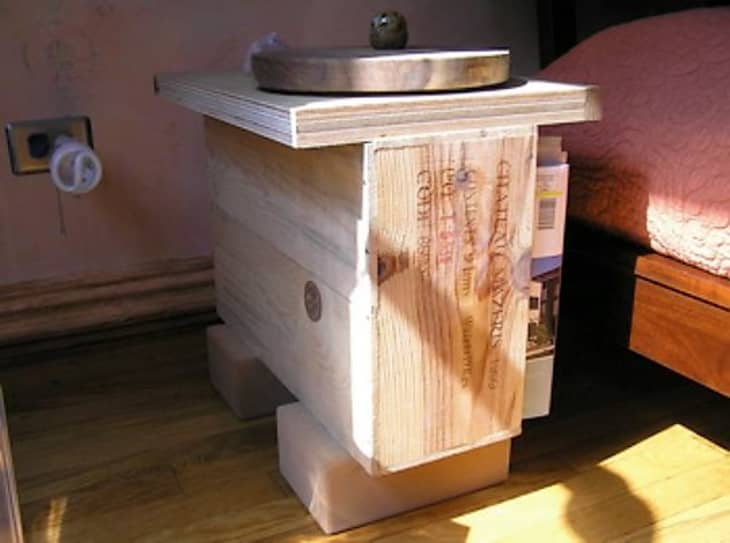
Proudest DIY: plastering, venetian plastering, glazing the baseboards and closet doors, installing and antiquing the baseboard shoe -- first time handling a nail gun
Best home-related advice I've ever gotten: take your time
Best home-related advice I've ever given: take your time
I change everything at this point (bedroom is almost done, but yes I'm still changing it on a daily basis) most frequently.
Three words to describe my home:bright, airy, cheerful
Sources for Kitchen fixtures, etc (if redone) Ikea; handcrafted copper apron farmer sink from small shop in Texas; homeclick, homecenter for the matching faucet (yeesh!), custom cabinet for said sink
Dream source: Waterworks, Room and Board, Tucker Robbins
Reality source: diy, real crusty provincial chinese antiques straight off the boat; obsessive online research and every conceivable source in the city: HD, Lowes, Ikea, every hardware store I see, every image I see I study for the little details for any info/inspiration
Originally Posted on August 2nd, 2006
For all House Tours, click here!
That is the most fascinating use of stenciling... goodness, what a source of ideas!
Love the headboard!
Olga -- I absolutely LOVE your bedroom walls! The color, the texture, the feeling they evoke -- wonderful! I'm in awe of the scope of the project and of the incredibly caring artistic way you're doing it. (love the kitty, too)
I love the stenciling on the radiator!
Ooh, ooh, great quilt! Where'd you find it?
It's lovely... a bit too much for me as I can only stand a bit of overly saturated warmth carefuly placed in a clean cool space, but that's my aesthetic...
I do like the use of stenciling and glazing to turn otherwise uncomfortable intrusions into one's space like the radiator and air purifier into seamless objects... well done...
How do you like that bed? Is it sturdy and well built? I was considering buying that model but haven't been able to find a store to carries it.
Nice job on the bedroom! Really well done...
I can't wait to see what it looks like when she's done. So far so good!
WOW. i'm overwhelmed by your ambition! the hinges alone! congratulations and best wishes for the months ahead. what a beautiful, warm, and whimsical place. i'm so in love with your radiator.
Beautiful job stripping the door hinges. What did you use and how did you do it?
Olga, your venetian walls are beautiful -- you've done an amazing job -- very creative!
Great job so far! I love the stenciling on the radiator. It's all so lovely and warm. I look forward to seeing the progress.
I also covet your Louis Ghost chair.
i'm so stealing her approach to the windowsill area of her bedroom. love the stencils, gilding, and semi-random painting of daisies. i'm not a huge fan of paint effects generally, but these are beautiful.
one question i have, though, is why exactly are we doing an Inside Out now? why not wait until the rest of the place looks just as nice as the bedroom?
Very impressive. I also like the radiator stenciling, air purifier disguising, walls and bed.
Also thanks for the shout out for the above closet storage cut outs. More ppl should do this and liberate much more usable storage space.
Hey there. Just checking out your apt. How you be ???
Conrado
Really interesting, that cutting ceiling-level access to the closets. Does one leave those open, or hang doors or shutters?
It's a great idea, and strikes me as a relatively inexpensive way to ultimately maximize my own storage, without adding new shelving!
Can't add much more to what has already been said. But the place looks fantastic. (Like everyone else, I'm in love with the stenciling.) Can't wait to see how the place looks once more of the changes have been implemented!
Although not my style, I say Olga kicks a**. It's nice to see a feature here where the person actually was hands on in the work.
Happy to see statements like "Spent days selecting tile with their Designer" or "Missed work to argue with Contractor" absent from this tour
-Bobby
WOW. What attention to detail!! Love it. The paint work is breathtaking. I hope we will get to see what it looks like when you're all done! Good luck with the rest.
i love that bed! i know i've seen it before - where can i find it?
my bed broke this morning. perfect excuse to replace it. :)
i love the venetian plaster and the stencil half hidden under it. awesome. this apt is exactly what i love about AT; it reflects a incredible level of creativity and inventiveness. i too would love to know your secret for stripping your hinges so clean; i'm stripping my kitchen windows of layers of paint (it is such an incredibly liberating feeling) and getting the hinges as clean as you did is challenging.
LOVE this place and the wall finishes, though I'd never think to do it myself. About the bed - I have the same one, and I can't say enough about it. It's solid wood, well-built, easy to put together. My pillow tends to fall out between the bed and the headboard, but it's not a big deal. There are a number of online retailers that carry it - google "Edo bed" and they'll pop up. I have it in the darker mahogany finish.
Olga's bedroom is really lovely and warm. It shows such individuality, sweat equity, and a lack of slavishness to a 100% modern design aesthetic. It's so personal. The stenciling around the window frame is striking and subtle at the same time. It will be a treat to see the entire finished apartment.
Olga,
Where did you get the stecils? LOVE your work.
hinges and hardware are pretty easy to strip clean with no chemicals. either simmer them in plain water in an old no-longer-in-use-with-food pot on the the stove, or drop them in the crock pot for about 24 hours.
brush clean with a nylon (NOT brass) brush while paint is still soft and wet. rub with beeswax finish to protect patina.
I'm not really much of one for stencils, but some of these are very cool. I like the one on the radiator A LOT. And the one on the ceiling that acts almost like crown moulding is neat.
I also have that refridgerator - it is awesome! Anyone wanting to buy a supe-low energy fridge should take note. It also has a small footprint, since it is tall and slim. I love the fridge-on-top.
Maker: Sunfrost, the genius Swedes.
Costco of all places has this bed. Click my name.
Oops!
http://www.costco.com/Browse/Product.aspx?Prodid=11031848&whse=BC&topnav=&browse=
Where can I get the refridgerator (SunFrost?)?
Hi EVERYONE,
thanks for the generous kind words. The AT crowd never ceases to surprise me. Didn't think the stencils were gonna go over this well.
As is so often the uncanny case, AT just did a posting on stencils earlier this week. My resources are listed there as well:
www.royaldesignstudio.com, stencil-library, plus a plethora of various sites that I found by searching for Moroccan stencils. I kind of lost my mind on that one, as well. There will be more coming to the rest of the apt. I was originally going for a Moroccan faux tiled look, but, as usual, it all turned into another adventure. The radiator stencils are done using modern masters copper acrylic paint over AFM Safecoat black acylic paint and the small arabic border is from stencil-library (UK) and the the larger "tile" is from royaldesignstudio (Ca) as is the Turkish border on the ceiling.
The quilt is designed by my friend Ilene of figstyle.com, origin: India. As are the pillows. Her stuff is fabulous!
THE BED: ok, unfortunately this has been an unecessarily long and traumatic saga that is only now abating. I ordered from Haikudesigns.com, the bed shipped out of Colorado or Ca. Roadway, the shipper, damaged one of the boxes badly. 2nd shipment of replacement parts, damaged again, 3rd: start putting the bed together and SEVERAL parts do not fit. Had to scream and yell and defer to another entity and threaten hell and high water to get them to ship another bed. 3 months later I have a fully assembled bed (this shipment, too, did NOT come unscathed but I had enough parts to put it together ok.) My lessons learned: try to avoid having this bed shipped and do not buy it from haikudesigns.com. There are many online retailers of this (EDO) bed. Try to find it close enough to go pick it up yourself. HOWEVER, seeing that Ron found it on Costco (that's hysterical! I wish I knew!) -- also seeing that they offer white glove delivery and assembling it themselves -- all for a total price that is lower than what I paid -- it might just work out ok. Because the issues weren't just with damages incurred in shipping, they were also inherent in the design and manufacture of the bed. I won't bore you with the details.
That said, I love the bed! They say solid mahogany -- don't believe the hype! The side rails are mahagony plywood (or veneer as one company rep said. The company that imports these beds from Indonesia is Sitcomfurniture.com in Oakland, Ca). Everything else is solid, the slats are solid and sturdy, but you don't get Chinese joinery at this price. Another lesson. It's all nuts and bolts and washers and metal brackets. But it's a beauty. That's my full disclosure on the bed story. Whew, sorry for the longwindedness, it's been a tribulation.
Stripping the door hardware: I did it in situ. I was not interested in removing the door and the hinges and all of that. I don't know which would've come out to be more challenging. The product i used: Soy-gel Professional Paint Stripper. I ordered it directly from the manufacturer, but here's what I found when I searched it: http://www.realmilkpaint.com/soygel.html
I painted it on, waited several hours and scraped and washed off. I can't remember if I covered it with plastic while waiting, I may have ...? Messy, tedious, laborious, expletive-inducing. But I love the results and that's what remains. Paint comes flying right off of steel when you tap it with a metal object (hammer, scraper) but I decided I didn't want to subject the door hinges to even more stress and movement. PS, they're not completely free of paint, but only I notice those microscopic specs.
This product I gleaned from a post right here at AT. So it's nice to give back:)
Which is exactly why my work in progress appears as a spread on AT. To share and inspire, like I've been inspired and have learned so much from others' stories. There were/are times when the daunting tasks overwhelm and I am drowning in a sea of self-doubt and tile choices. When I see posts such as "Harold is just zen about it" and it shows one individual amidst a heaving ocean of construction debris, but he perseveres, it just reignites my will to live. So I thought I'd share my pearl amidst the heaving construction debris now. Coz, at the rate I'm going, I will not be fully done for a while, people. Jill and I agreed to reconvene in 3 months. So now I have a nice deadline for the kitchen and whatever else I can muster.
Jamie pup, thanks for the inspiration to cut out the wall(s) above the closets. After your closet makeover post, I called up my contractor and had him come over immediately with his sawzall. We did it together and I plastered it. I am leaving the cutouts open for now. I intend to suspend a piece of thick canvas with grommets through hooks as a door, either painted or otherwise adorned to stiffen it. This is where the camping equipment and such will live.
Emily: we put in a large piece of plywood (on pine ledgers) as a shelf in there. It effectively acts as a ceiling for the real closet and as a shelf for the new high closet addition. One can add a hinged door to the wood framing the square gap in the wall. I just couldn't deal with that decision at the time and wanted to go with something simpler and more flexible.
The refrigerator: the oft-discussed Vestfrost, Danish, under the Summit brand here, the CP171SS. Bought at Drimmer's on Coney Island avenue, free delivery.
Hey, next time I hope to make you all a cup of tea.
a really really large cup of tea.
i can't believe that bed is at COSTCO! i bought mine at a local store for cheaper than i found it online (and therefore didn't have all the shipping issues that you had). But then they stopped carrying the line so i never got the matching dresser i was coveting. Had to substitute with IKEA.... thanks for the link.
Wow, I can't wait to see the next installment in three months.
I love the look of your plaster walls, and the stenciling is totally fab. I've got a stenciling and hand-painting project coming up, and was thinking about doing a wash over the stencil but wasn't sure if it would look good. It's looks great -- olga's done my experimenting for me!
can i just say that this is the best feedback thread i've read in a really really long time?
fabulous olga!
The stencils are going over so well because you integrate them so well.
And you are totally cracking me up with the in situ drawing of the future kitchen . . . THX
Can't wait to see the follow up. You've done an enormous amount of excellent work in rather a short time. All that since may, eh? WOW!
Olga, your home is so inspiring I've gone through the pictures at least three times. All I can say is - Wow. Your work with the plaster is incredible, it makes me want to tackle a similar project one day. I love how you've mixed furniture styles in a way that's unexpected but feels just right. Finally, that must be the most gorgeous radiator on the planet. I can't wait to see your place and the continued improvements in a few months!
Ah yes, nothing (except the once mentioned crapper-neting) beats the feel of a sawzall cutting through sheetrock and studs.
Olga -
Most of the things I love about your place have already been mentioned above, but that Venetian plastering work looks absolutely masterful. That is one technique I've never tackled and I admire your courage and skill.
ALL your stenciling looks seamlessly woven into the look of your place, but I'm just really struck by the way you incorporated the venting of the radiators into the patterns that you stenciled onto them. You don't just have a VERY good eye, you've got magic hands, too.
Looking forward to seeing upcoming "episodes" of this. Congratulations on a job (continually being) well-done.
Olga - I just completely renovated my kitchen and replaced a ceramic tiled kitchen floor with cork. I could not be happier. Not only is it easier on my back because it gives a little, but it feels warm and wonderful on my bare feet. Plus no trees are felled (enough died for the cherry cabinets). Good choice and enjoy!
olga -
thanks for the tip on the stripper - how much did you need to use for your doors?
also - kind of random request, but do you think i could borrow your moroccan stencils?
i live in williamsburg and my bedroom is moroccan style and i apparently need some stencilling!
You know when Curtis is impressed with your technique that you've done darn well! :) I love the venetian plaster too. I might try that if I ever settle into my own place. Well done! I too can't wait to see the final outcome.
I have a question on the crackle--I have a currently painted cabinet (well, painted in the areas where the paint hasn't peeled or chipped off) that I'd like to try this with. Did you have to strip the baseboards first? Any other words of wisdom on that?
Megan -- I totally agree! It's delightful, thank you.
Guido, thanks for including your bathroom again, last time the slideshow wasn't working for me and I totally love it. Very inspiring. and thanks for the confidence, but I have been plugging away since closing September 2005. I finally moved in May 2006 becausse that's how long it took me to get the bedroom and 3/4 of the living room done.
Jamie pup -- except he wound up not using the sawzall!!!!!!!!! He just chipped away with a chisel (at the plaster and rock lath) and took out chunks at a time while I scurried around underneath trashing them and sweeping up. He's such a professional! Real aggro where it needs it. Quite a marvel to watch and totally hysterically funny.
Lori -- did you use floating click together planks? If so, what brand? I'm driving myself crazy vacillating. This is an instance where a third party, such as a designer, etc., would help in getting me out of the continuous debate in my head.
Curtis -- THANK YOU! I am honored beyond belief by your compliments.
Eve -- I dipped a brush into the stripper and painted it on rather thick. I didn't use much and I did 12 hinges, 12 lock plates. Email me and we'll discuss the stencils and perhaps I can sell you some of the stripper. I bought a gallon and I don't need it all, and it is expensive.
Christine -- baseboards (so many lessons learned here) I did not strip, nor did I prime. WRONG! Next baseboards I will prime with Kilz odorless (so far my fave alkyd primer stain killer). I made a gazillion samples using the McClosky crackle product (different product than the doors, btw). However all hell broke loose on the actual baseboards and i was on hands and knees with the pva glue because the crackle had crackled itself off the paint and in areas crackled the paint off. Crackling is a very volatile, sensitive thing. Essentially you are trying to control decay and it is always unpredictable. Hence the fun and excitement! Or the expletive-inducing frustration and disappointment:(
Also Jill was really attracted to the areas where I had freaked out about the glopped on legions of paint under which can still be discerned the phone cord and the tacks pinning it in and I just applied sculptural globs of caulk. Yes, radical I know. Removing the cord and tacks proved to be fatally destructive to the baseboards as well, so I wasn't going to repeat that. I shmeared caulk across the length of the baseboard, except I used a new (to me) caulk product called "Painter's" something and guess what! it was petroleum-based or something cause the sucker didn't dry for 3 days!! Then I painted it with an acrylic color I tried to match with the venetian plaster walls. Except it kept drying PINK (grrrrrrrr). So that's when I decided to crackle and glaze it to funk it up and just go with the convoluted glopped look and yet simultaneously make it disappear.
This is what I suggest: if you are not removing the old paint (and I, for one, don't blame you -- although since it's a cab it may be easier to strip than the baseboards) give it a good scraping/sanding (get all the peeling paint off), wash with tsp surface prep (a tsp substitute I got at HD or Lowes; it also deglosses but is a "safe" product), let dry; prime with Kilz (alkyd primer stronger and will take both alkyd or acrylic paint, also you'll probably be going over previous layers of oil-based paint and you want to make sure to cover this); basecoat with acrylic paint (one or two coats, depending on the look you want), apply crackle (make sure to use whatever basecoat the crackle product recommends; there is somethiing to this, I've learned); make a glaze of whatever color you want to get "stuck" in the cracks (I combined van dyke brown, red iron oxide and perhaps some orange glaze and glazing medium -- all Golden artist acrylics) paint it on, wait a bit and wipe off so the glaze sticks in the cracks and creates an antique effect. Top with 2 to 3 coats of acrylic polyurethane or alkyd poly (chose clear effect (acrylic) or amber effect ("real" poly)) This is a cabinet and is trad painted with a hardy alkyd or oil paint to be able to take a beating and after all this work you don't want to be precious about using it. I love the non-smelly acrylics, however I am not naive about their limitations. I used AFM Safecoat Polycrylic. Do your research and decide. However, since it's a cab, perhaps you should look into milk paint! There are crackling products for it and it's a real nice authentic look -- a cracked milk paint cabinet!
here's an article to get you started:
http://dundean.com/tips_milk_paint_how_to_use.shtml
check out the other articles on this site and MAKE SAMPLES to familiarize yourself with whatever product you use.
A good online resource, besides volumes of books on decorative painting, is www.muralsplus.com
a forum by and for prof deco painters and the people who aspire to be like them. Lots of info can be gleaned by searching the site and/or posting questions. Folks are enthusiastic as punch and eager to help.
thank you for your interest and support,
schvitzy the schvitzee
I'm envious! Wonderful work, Olga. Can't wait to see your future endeavors.......
Thanks Olga for that extensive answer!!!! So much to know! I'll be sure to post pics if I ever get around to actually doing this project! It has to happen sometime, even if I don't crackle, because the peeling paint is driving me nuts!
One color that would look really great is Napery by Sherwin Williams. In fact, I'd suggest it in any room you want to be warm and cozy, it's a very creamy and warm yellow. We used it several places in our house and it's wonderful.
Is your Chinese chest one of the Arhaus antique desks? I just saw it in a flier and I love how the middle comes out and is actually a desk chair! How tall would you say the seat is?
lisa -- no
I LOVE the steel window gaurd shown in picture number three (you can see the fire escape behind the guard). This is exactly the type of thing I'm looking to buy/have designed for my apartment ... does anyone know (Olga?) where I might find something like this.
Thanks so much!
Cynthia
Olga,
Yes the cork panels float and click together over a rubber subfloor tarp. I got them at Lowes. The are Uniclic from Portugal and are approximately 12 x 36 inches.
I just noticed your "bedside tables" is that a humidifier? Just goes to show, if your room is pulled together and lovely, every stick of furniture does not have to match..or even be furniture. The effect is lovely. Very restful in the midst of reconstruction. Wise of you to do a room like this to have a place to unwind while the rest of the apt is getting an Olga makeover. You're DIY stencils are, of course, awesome. Kudos!
Cynthia -- the window gate is a one of a kind design and fabrication of my friend and local artist Linus Coraggio.
linuscoraggio.com/
That gate is an aesthetic miracle and it gives me daily joy. I gave Linus some sketches of what I had in mind and started some steel squiggles which he then welded into the design.
Lori -- thanks so much, I was just looking at the Lowes cork (again). I'm thinking of ordering online from diyflooring.com or such, it's a bit cheaper. I'll be going over a linoleum floor. I didn't think the cork planks needed a subfloor anthing due to the thin layer of cork on the bottom of the plank.
diff Mindy -- that is an air purifier and yes I'm disguising it to look like a night stand. The round piece on top now is the styrofoam it came packed with which I glazed to look like wood. I will have a 2 inch piece of cork cut to the exact dimensions to be a more permanent top. Thanks.
i saw the bed and matching furniture at Koolhaus on W 4th Ave., in Vancouver, Canada.
Olga - You may not need the rubber sheeting since you are going over linoleum. We had cement under our old ceramic tile, so the rubber was more of a moisture barrier.
olga -
thanks for the offer - would love to talk about borrowing the stencils and taking some of that stripper off your hands.
how do i email you?
eve
Olga, Incredible! Please, oh please tell me where did you find your bed???
Pls. e-mail me at staceyleichman@gmail.com
Many thanks!
Eve,
you can email me at olgaa68 at yahoo dot com
stacey,
the edo bed has been discussed to death. please refer to my comments above and I suggest you check out Costco, or if you're in Ca or Co there are local places, google edo bed (or sitcomfurniture.com)
also on these threads:
http://www.apartmenttherapy.com/ny/open-threads/open-thread-262-011781#comments
AMAZING! So beautiful. Come do it to our house!
hugs,
wsm
Apologies if this has been discussed here already, I couldn't find it if so - where did you get your gorgeous bedspread and cushions?
Re: bedspread:
ilene@figstyle.com
great place
where did you get the bed?
diane
Hi! I love to check in here every once in a while and see more comments.
For anyone curious about anything, all info (more than you need prob)can be found in the comments section above.
Thanks and Njoy!
Awesome job, I like the planning stages and perfect execution
What's happened since then? How about a current status on this awesome rehab?
Lady J,
Hi. After totally crashing from exhaustion and taking a bit of a break I've became, um, a bit distracted and have been unable to get up to full speed again. But I putter along.
I've been working on the kitchen (rather slowly, much to my consternation). Said snail-like progress can be tracked on my flickr page:
http://www.flickr.com/photos/27913133@N00/sets/72157594240769263/
BTW, everyone, I am a professional deep-tissue massage therapist and am open to barter with folks in the trades as well as in exchange for design consultation.
:)
--- Olga
Thanks Olga! Your style makes me want to buy so I can go crazy and experiment.
Good luck!
Oh my, that backsplash tile is unbelievable. I'm amazed with your patience, perseverance and talent. Incredible job you're doing!
view oakland's profile
Olga--our styles and tastes are similar, how wonderful!
I really love the look of your bedroom--the Moroccan touches are beautiful. May your creative spirit outlast the energy needed for the labor of love.
view snowflake's profile
This is too funny -- just last week, I flagged a scam rental ad on craigslist that was using these photos! I recognized the fancy radiator paintjob from this house tour.
view cindycindy's profile
Cindycindy: WHAT?!!!!
view olga's profile
Olga, it was on the Denver Craigslist and I haven't seen your photos again since I flagged that one ad. There's been a lot of made-up apt scam ads there lately, I think probably because of temp rentals for the DNC in Denver this summer. Not just using your photos, but photos from catalogs, from for sale ads, other people's rental ads all jumbled together, etc, just lots of photos that I've recognized as being from somewhere other than the supposed place advertised.
view cindycindy's profile