Ah, the gallery wall. So ubiquitous in shelter mags and on blogs, they've become a staple of modern home decor. I know several people who think the curated wall is on its way "out", and feel that individual pieces of art never get to shine anymore. But for someone like me, who accumulates art like some people accumulate paperbacks, gallery walls aren't just a necessity- they're a way of life.
This liking for art-stuffed walls seems to be a family trait. A couple months ago, my sister asked for my help in hanging some photos on the large, empty wall behind her dining table. I happily obliged, and decided to photograph my process for AT readers.
1. Prep Your Wall
I started by prepping the wall; patching, sanding and painting where necessary to create a smooth surface. Then, since I'm a follower of the 57 inches rule, I marked the wall with a piece of masking tape, 57" from the floor and centered horizontally. Doing this will help you center your arrangement on the wall. If you're working with a particularly large space or with many pictures, adding a few other pieces of tape at regular intervals will also help guide your arrangement.
2. Gather Your Art
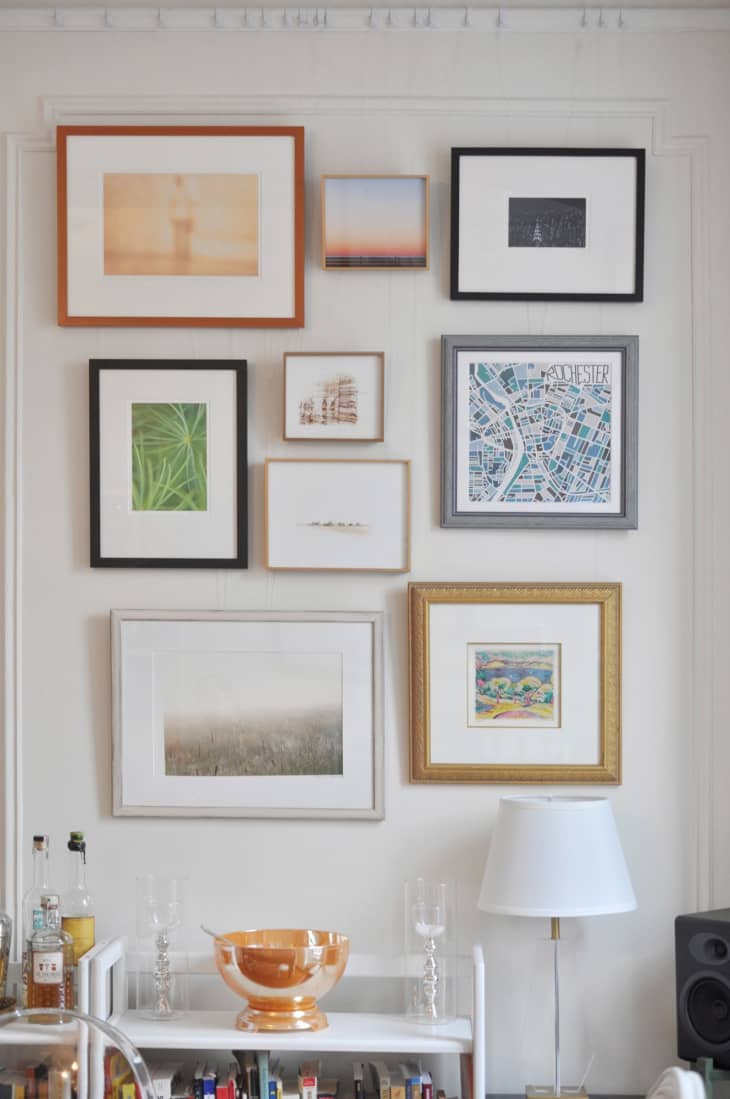
The easiest way to make a gallery wall feel unified is to pick a theme- my sister wanted to display photos she'd taken on her holidays over the past few years. Other ideas are vintage portraits, antique maps, or pop-art prints.
Of course, a whole collection of similarly-themed art isn't necessary. You can also create groupings based on color, type of media or even frame style. Generally, it's best to avoid too much matching, so choose to match either the artwork or the frames, but not both.
3. Create Image Templates
This is one of those ideas which seems a bit unnecessary and over-the-top, until you start to use it. Using some old newspaper or bits from your recycling bin, create a paper template the same size as each piece of framed art. It's helpful to also indicate frame thickness, color, or anything particularly impactful about the artwork on the template, as this will help you balance the arrangement later on.
4. Make Hanging Marks
Flip each piece of art face-down and look at how it will hang. If it's on a string or wire, stretch it vertically as high is it will go, and make a small mark on the template where the string stops stretching, centered horizontally in the frame. This is where the nail or picture hook will go.
If there's a metal hook or a hole to work with, you'll have to flip the template face-down to match the picture, and use a pin to pierce it where the hook is. Flip it back face-up, and make a more obvious pen mark on the front.
5. Arrange, Hammer, and Hang
Here's the fun part: play around with different arrangements using the paper templates and some masking tape, until you find one you like. Remember to step back from time to time and view your work from other areas in the room, and pay attention to balancing things like color, size and finish within the arrangement.
When you're happy with your layout (which can take anywhere from ten minutes to several days), you'll be ready to hang the originals. This is where you'll be grateful for the previous step: simply place your picture hooks or nails to match up with the hanging marks, and hammer directly through the paper. Remove the paper, replace with the artwork, and voila!
Images: Eleanor Büsing


Z2 iPod Dock and Wi...
You have no idea how helpful and timely this post is for me! In fact, it's sort of like a sign. Can't thank you enough -great info too! Happy weekend!
Actually I think I might like the templates so much, I'd leave them hanging instead. I'll try not to get too attached.
i saw a similar idea but with a large sheet of paper, and tracing each frame on it.
i opted for the lazy route, and just taped lines at the upper and lower most parts of the wall that i wanted to go, then just eyeballed it and it turned out great.
I was literally rolling my eyes when I saw the title of this post -- but, wow, the image templates is an original and HELPFUL idea! Thank you so much, I wish I had known of it in the past, and I'm going to definitely use it in the future!
Very helpful! As a side question - where did you get your table and chairs? I kinda love them, and I'm in the market for a dinning set.
I hit a motherload of vintage frames at Goodwill last fall and decided to hang them salon-style like this in my living room. Instead of the paper templates, I arranged them on the floor several different ways, photographing them all until I found my favorite. Then I used the photograph for placement, starting with the frame in the center and working my way out. Easier than making templates (and drawing them in - though that was very creative and cute!).
btw my sister also recently used my method to hang an art wall in her home, which proves A) that it works, and B) that galler style art walls may in fact be overdone. Doh!
This is helpful in principle, but I can't get behind the popularity of hanging numerous small pictures in a group--it almost always looks untidy amateurish. I think groups of larger art are more aesthetically pleasing, or a mix of large and small.
I'm glad you guys are (mainly) digging the template idea! I admit, it's not the simplest way of making an arrangement (I've done the arrange-on-the-floor and wing-it methods too, to varying degrees of success) but it works for me. There's also the added bonus that you can keep the templates - my sister filed these away after I was done, to use in future homes/walls.
@Norrey - My sister's table and chair set is from a UK site called Rose & Grey. Unfortunately they don't seem to sell them anymore, but the collection is called "Stockholm Oak Furniture" and can be found on several other websites, at least in the UK.
I always hang to a 60" centerline. I can't find the post right now, but I believe this is what AT recommends. I think the gallery standard is 57", but some people find 62" works for them.
or you can go overboard like me haha
http://img64.imageshack.us/img64/6994/wallfh.jpg
@MNTNGR Wow! Very, very cool gallery wall you have there. :)
I kind of like step 5 the way it is!
The only problem I see with arranging the paper templates is that it gives no indication of the visual weight of each piece, for example a thick black frame has more presence than a thin white frame. In the end you may find the arrangement is visually unbalanced. I'd still use the paper templates for putting the nails in the wall, but would arrange the actual pictures on the floor first.
You lost me at making paper templates. I have no patience for that. However, I do arrange all my pictures on the floor first to decide what goes where.
I'm a bit obsessive compulsive... I arranged the actual framed pieces on the floor and then used that for placement of templates. Also, I noticed that every time I dusted the pictures would get crooked (which bugged the heck out of me) so I put small pieces of self adhesive velcro on the bottom rear corners of each frame (using a level before sticking them to the wall). I realize this may leave marks on the wall, but as long as you're happy with the arrangement (e.g. you've lived with it being crooked for a few weeks) it shouldn't matter, but command makes some non marking velcro strips in case you're worried.
Thanks! I like the template idea, and possibly reusing the templates. But I'm trying to stay uncluttered, so maybe I won't save them. I was imagining using repositional adhesive on the backs anyway for easier placement.
I find 57" terribly low. Maybe if you are a hobbit. Gallery standard is 66" to the centre of a frame (for single pieces) but I find that it works well for the "central" item in a cluster, too.
Shouldn't the height vary with the height of the ceiling? Hanging things on 8 foot walls is very different than on 12'
gallery walls are the worst. ugh
i'm into gallery walls a lot but a majestic painting would have complimented this amazing set of table and chairs. And the paper templates look much better with the room than the actual pictures.
too much work.
I agree with RexRayFan and Tequila Red. When we did our gallery wall on the stairs it took me a long time to figure out not only the positioning and sizes of frames but the fact that we had 2 mixed colors and you need to ensure that if you're using a dark one, the eye will be drawn to it and how to juxtiposition it on a wall so that it's balanced. I did the photo thing + sketched out several options to see what I thought would flow best.
Thanks Eleanor.
Check this also:
http://www.apartmenttherapy.com/day-19-hang-artwork-the-2020-h-129709
@MNTNGR ~ fantabulous!
Another tip that I've read is to make one large item the focus.
I prefer mass hangings with some alignment. For instance, I have one grouping of six pictures with the top three aligned along their bottom sides and the bottom three aligned along their top sides.
If you're doing a gallery wall I think this is a great way to do it. Even if you're just putting up a few pieces I think this may be very helpful.
Instead of following the 57" rule why not hang artwork so the center is at YOUR eye level? I'm 6'1" so I hang artwork at 69" inches on center. I'm the one that sees it the most, it should be comfortable for me.
The template idea with 1 giant sheet of paper is the easiest thing EVER.
Here's my step-by-step:
http://thenestinggame.com/2011/11/21/how-to-hang-a-gallery-wall/
In? Out? Really? Trend followers never develop their own style.