
How To Remove a Light Fixture
Changing out a light fixture can be an easy, relatively quick way to update a room, and it can often make a dramatic difference. Here’s a quick guide on removing the old fixture, leaving just what you need to connect your new one.
How to remove a light fixture
What You Need:
• safety glasses
• circuit tester
• screwdriver
• step stool or ladder
Instructions
1. First, shut off the power at the breaker or fuse box. If yours isn’t labeled, it may take a few tries to be sure the correct part of the room is shut off; if in doubt, you can go ahead and shut the power off in the entire house just to be sure. If you have a fuse box, unscrew the proper fuse and set it aside.
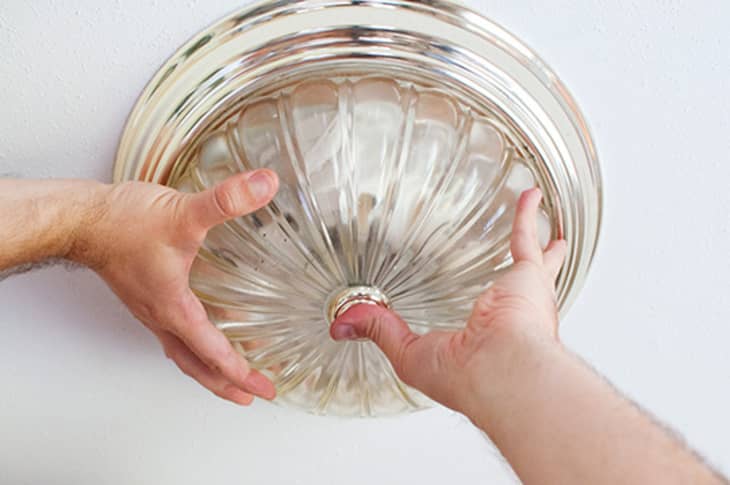
2. Time to remove the light. The steps to remove your fixture will vary according to what type of fixture it is; today we are removing a standard flushmount light — most have a knob that twists off at the base of the fixture. In most cases, you can just unscrew the knob, but this fixture required us to twist the glass bowl around — be sure you have a good hold on the glass to keep it steady!
3. Get sprinkled liberally with dust and dead bugs.
4. After the bowl is off, you can see your bulbs and fixture base. Unscrew the bulbs and set aside.
5. Use a screwdriver to loosen the two screws holding the plate to the mounting bracket in the ceiling. Gently twist the base of the light to free it from the screws and the mounting bracket. You may need to also unscrew the threaded post that runs through the base of the light into the mounting bracket.
6. Now that the light is free of the ceiling, it’s time to disconnect your wiring. If you can see some bare wire between the insulated part and the plastic wire nuts, now would be a great time to use your tester to be sure there is no current in the wires. Follow the instructions on your tester, and keep in mind that the black wire is hot, the white wire is neutral, and the green or copper wire is your ground wire.
Finishing up installing your new light
After making certain there is no power flowing through your wires, unscrew the wire nuts holding the wires together. You should be able to do this easily by hand. Use a screwdriver to loosen the green screw holding the grounding wire, or if your grounding wire is wrapped around your metal bracket (as ours is), unwrap it.
Carefully disentangle the wires of the fixture from the wires in the junction box, and pull it free from the ceiling. You’ve successfully removed your old fixture and are all set to wire up your new one! You may want to remove the mounting bracket if you need to use a different one for your new fixture, or you may be able to leave it as-is, and connect the new fixture to the old bracket.
Important note: If you don’t feel confident about doing an electrical job yourself, don’t hesitate to call a pro! However, having said that — mastering the task of removing your own light fixtures is an empowering feeling; and it can save you some money as well!
Now that you’ve removed your unwanted light fixture, here is a step-by-step on how to install the new one:
(Images: Breaker Box: Shutterstock, all others: Sarah Dobbins)