
Make Your Own Resin Agate Coasters
From A. Wagner: I’m absolutely in love with agate slices. My great aunt had a huge collection of them in a beautiful display case and I spent hours looking at them as a kid. Yes, hours. I was a little quirky, yes, but the beautiful swirls of color and speckles of glimmering crystals were mesmerizing. Now that they’re everywhere and mostly as coasters, I want them! All of them! But that would be crazy and also really, really expensive. Also, they’re breakable and I wouldn’t do well with an expensive, breakable coaster. Or breakable anything, actually.
So, I came up with an alternative. This would be especially great if you like the look of the agate coasters, but have a little one with grabby fingers that would love to see what one of those pretty things looked like on the floor. In pieces. Or, if you have friends that would act like children with grabby fingers when they were imbibing the drinks that sat on the coasters.
Enter: resin faux agate slice coasters! You get to play with resin, you get to swirl and drizzle and be creative. You get to match the coasters colors exactly to your decor palette. They won’t scratch your furniture. They won’t break. Best of all, though, they’re much less expensive than actual agate coasters, which is why DIY is so great!
Skill Level: Easy
Time Required: 1-2 hours and about 2 days cure time
Project Cost: $20
What You Need
Materials
- Clear Casting Resin
- Silicone Caulk
- Craft Paints or inks in your color choice
- Dark Craft Paint
- Clear varnish
- Gold leaf or gold paint (optional)
Instructions
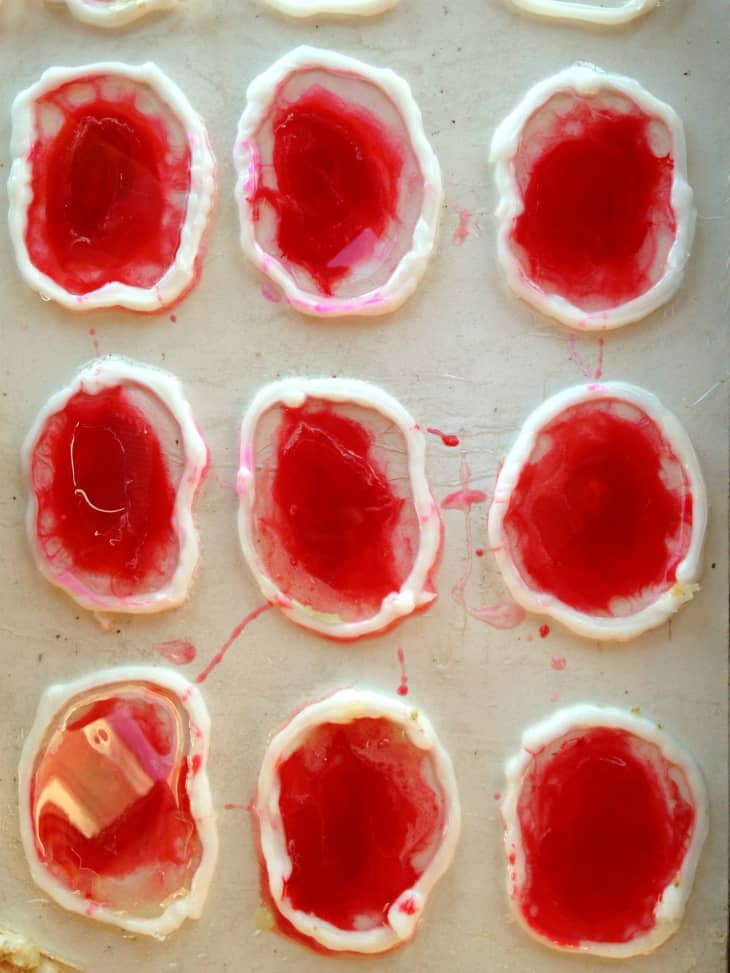
- Start with a hard, flat surface, such as a wide board. Wrap it with plastic wrap tightly. Use the caulk to make a freeform outline of an agate slice onto the plastic wrapped board. If you’re unsure about your freehand skills (although it’s pretty easy- don’t be scared!) just print off some pictures of agate slices in the size that you want and slip them under the plastic wrap to use as trace lines.
- Allow the caulk to dry overnight. Next, you’ll want four disposable paper cups and at least four wooden popsicle sticks for stirring the epoxy. For eight coasters, I used 8oz. of epoxy. Just pour the epoxy bottles into your paper cup and stir thoroughly to mix. Working quickly, pour about 1/4 of the mixture into each cup, reserving some in the mixture cup. Keep one cup clear, one cup dyed with a few drops of inks or dyes, one cup with a few drops of craft paint, the last cup colored with a few drops of white paint. Stir each one to mix the color into the epoxy.
- Alternating the colors, drizzle rings of epoxy into each of the silicone shapes, starting with the outside edge and working your way into the center. They don’t have to be perfect, just have fun!
- Once you’ve filled the silicone shapes up to the edge with epoxy resin, allow to dry for at least 24 hours. Once dry, peel the silicone caulk from the edges and peel the coasters from the plastic.
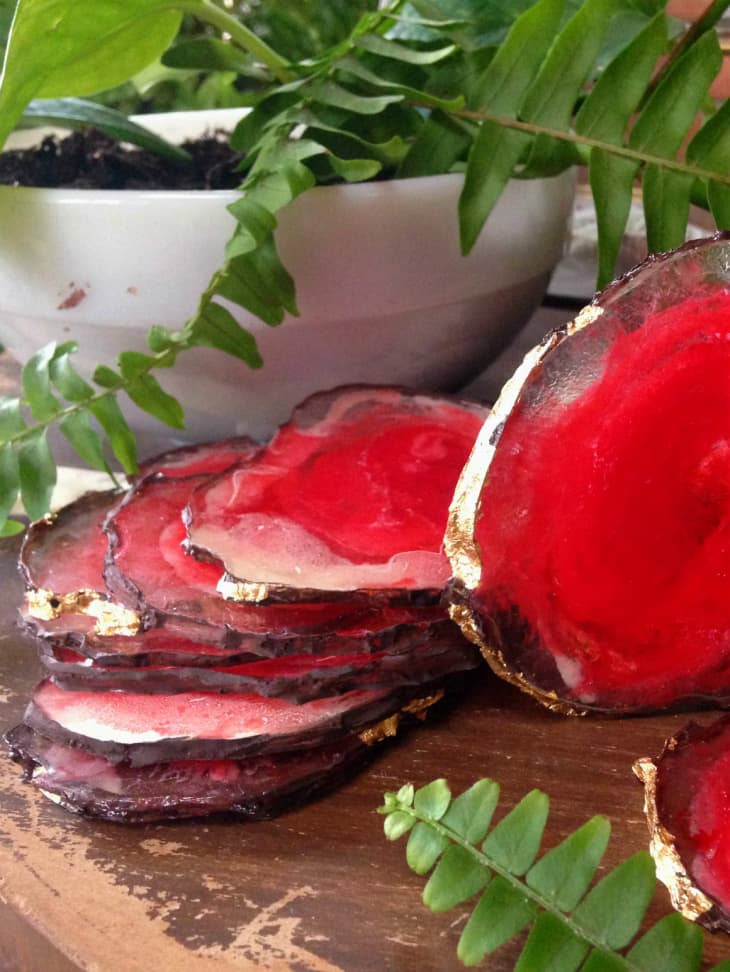
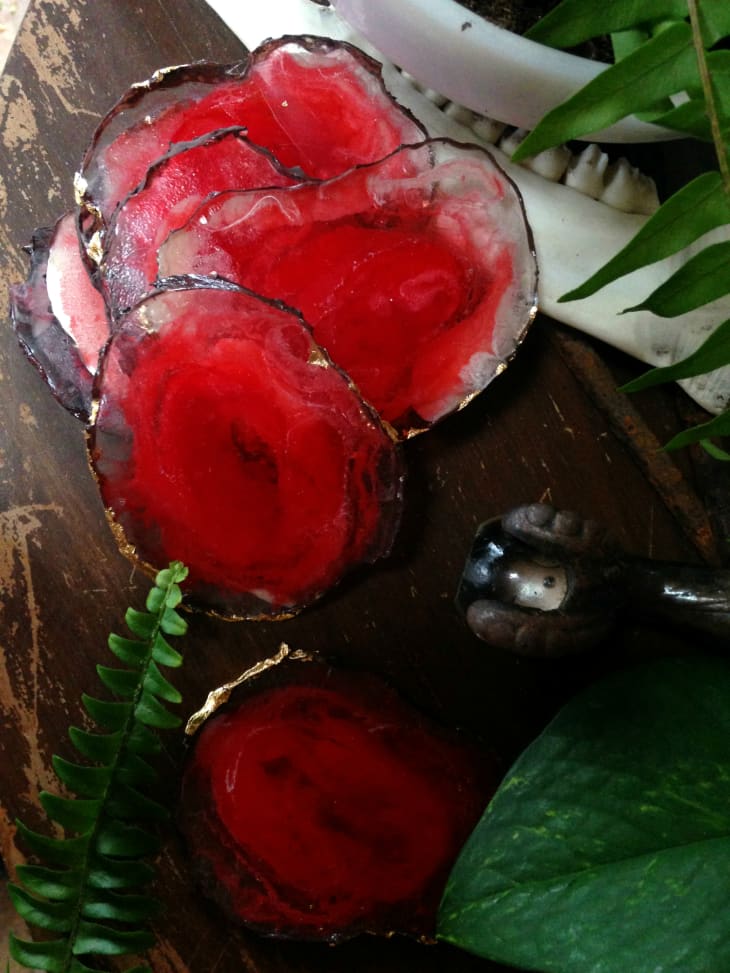
- Use a small paintbrush and some brown craft paint to paint the edges of the coasters for a more realistic look and seal with clear varnish or mod podge. If you’d like, apply a little gold leaf to the edges, too. Seal with some mod podge or clear varnish and let dry.
Enjoy your unbreakable, inexpensive, and perfectly color-coordinated agate slice coasters!
Thanks, A. Wagner! You can see more on Oil & Blue.
Have a really great DIY project or tutorial that you want to share with others? Let us know! We love checking out what you’re making these days, and learning from our readers. When you’re ready, click here to submit your project and photos.