
Spring Refresh: 3 Simple Garden Projects That Work in Small Spaces

Despite any residual chill, it is finally spring! Which means that now is the time to prep your garden. In warmer climates, you can start planting right away. In colder zones, start your plants indoors and transplant them outside when the weather warms up. And regardless of where you live, this is a great weekend to get started on some easy DIYs to pot your plants. We asked the experts at Lowe’s to teach us how to build porch planters, vertical gardens, and raised garden beds — so you can soak up some sun and get your hands dirty, however small your outdoor space may be.
1. Build a Porch Planter

The best argument for DIY-ing your own planters is customizing them to fit whatever space you’re working with, from a tiny stoop to a full veranda. And it’s an easy project! Build them now, and once the threat of frost has past, plant them with peonies and Asiatic lilies to boost your home’s curb appeal. For detailed instructions and video tips, visit Lowe’s project page.
- Make your measurements. The beauty of this project is being able to adjust measurements to fit your space. The planters above were built using the dimensions and cuts noted in this plan for a planter that measures 32.5″ by 15″ wide by 16.5″ high. To customize, read through all the instructions first, then change your measurements accordingly.
- Build the interior box. Referring to your measurements or the project diagram, use 3/4-inch-thick plywood to cut the ends and sides of your planter box. Drill them together with 1/8-inch pilot holes and exterior deck screws. (Use a cordless drill to make working outside much easier.)
- Cut the cleats and slats. Using 2″x2″ treated pine board, cut a pair of interior cleats (or rails) to support the floor of your planter. Use the remaining plywood to cut slats for your planter floor.
- Attach the cleats and slats. Center your cleats 6 inches from the top, along the long walls inside your planter. Attach them to the plywood box using 1/8-inch pilot holes and drive screws. Next, evenly space your slats along the cleats (or rails), leaving a 3/4-inch gap between each slat. Drill and screw the slats to your cleats.
- Cut and assemble the legs. Cut eight 1″x4″ cedar boards to length. Build four corner legs, using two boards each. To assemble a corner leg, attach two cedar boards at the seam using exterior wood glue and 6d galvanized nails.
- Flip the box and attach the legs. Flip the box upside-down and attach the legs with screws. (Don’t use wood glue or construction adhesive at this step since it can mess up your final paint job.) Check that the legs are flush with the top of the box and sit flat and evenly on the ground.
- Trim the siding. Use cedar siding to finish your planter. (See the project diagram for detailed cuts. You can use a carpenter’s square to draw and check your cuts.) It’s a thin material, so you can use a straightedge and a utility knife to trim the siding. Score it lightly and repeat your scoring several times until the siding is almost cut through. Then snap off the edge. Cut it to fit between the legs of your planter, so that it covers the sides and ends.
- Attach the siding. The thick edge of the siding always goes at the bottom. To attach the siding, work from the bottom up. Apply construction adhesive in two strips, near the top and bottom edge of each siding piece. Place the siding against the plywood so the bottom edge is flush with the bottom of the planter, then use 4d nails to attach it. (Don’t drive nails into the top edge of the siding. If you do, the nails will penetrate the interior of the planter.) Repeat, working upwards, until the sides and ends are clad in cedar.
- Create the top frame. Cut four 1″x4″ cedar boards to length. Glue the parts together to create the top frame, then reinforce the corners with straight mending plates along the outside edges and corner braces along the inside corners.
- Paint your planter. To make painting easier, unscrew your planter legs. Since paint and adhesive don’t mix, use painter’s tape to mask off any places where you’ll adhere parts: on the inside face of the legs, the corners of the box, the top edge of the box, and the underside of the top frame. Prime all exposed surfaces and apply two coats of paint. When the paint is dry, remove the tape.
- Adhere the corner legs and top frame. Apply construction adhesive to the box corners in the unpainted areas, and reattach the legs with screws. Attach the top frame using adhesive.
- Line your planter. When the adhesive has cured, line the inside of the box with plastic sheeting and secure with 1/4-inch staples.
2. Build a Vertical Garden
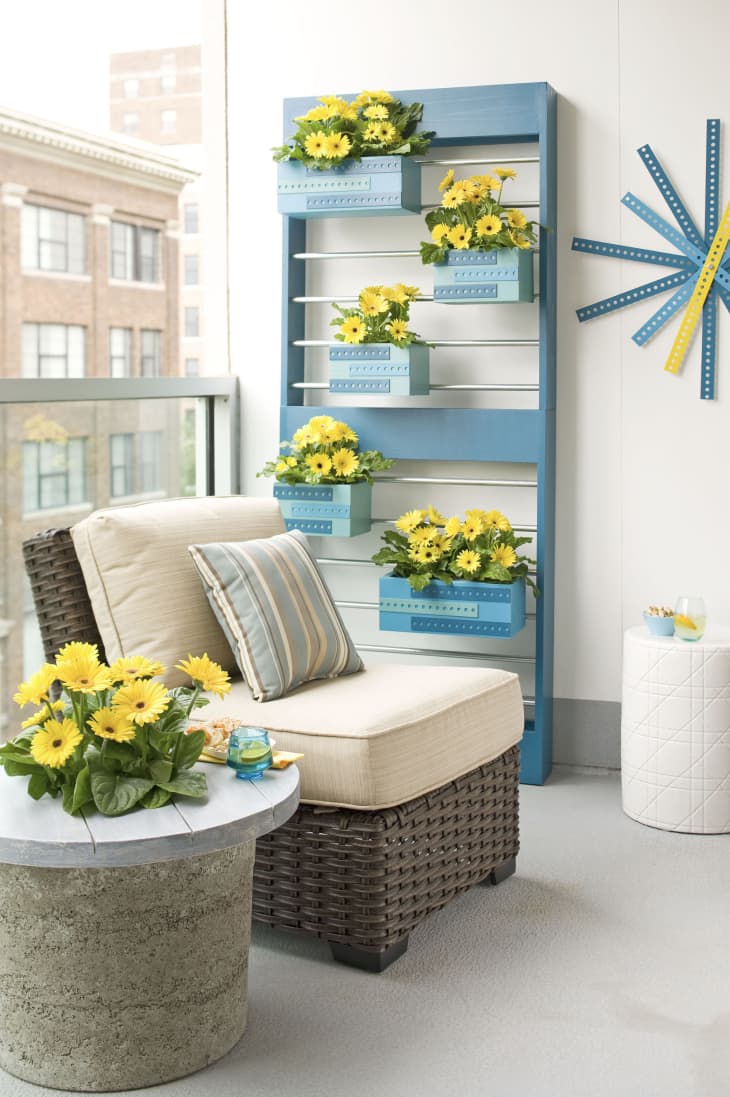
If you’d rather think outside the box, create a whole wall of greenery by building a hanging planter rack from cedar boards and conduit pipes. It’s customizable to fit your home, and you can use it on a balcony, patio, or even indoors — just plant with sansevieria and Monrovia Potted Flame Bush Lily, which are easy to care for and do well in low light. For detailed instructions and video tips, visit Lowe’s project page.
- Make your measurements. You can adjust the measurements to fit your space. For reference, the photo above measures about 30″ long by 5-1/2″ deep by 73″ high and was made using the dimensions and cuts in this plan.
- Cut your boards. You’ll need seven 1″x6″x8″ cedar boards, sanded with 120-grit sandpaper. Referring to your measurements or the project diagram, cut your boards to length. You’ll need to make separate cuts for the lower sides, upper sides, and rails. For a stable plant rack, it’s essential that all like parts (such as the sides and rails) be cut to identical lengths. Stack multiple parts on top of each other and cut them at the same time — this improves accuracy and saves time.
- Cut your conduit pipes. Using a hack saw, cut 12 29-inch-long pieces of 1/2-inch conduit. Clean up the conduit ends with a metal file. To avoid pipes slipping out of the mounting holes or bowing the sides, it’s essential that you cut the conduit to identical lengths.
- Drill your pipe holes. Using the project diagram, mark your cedar boards with holes for your conduit pipe. Remember to mark mirror-image versions of your holes on the right and left sides of your boards. Using a 3/4-inch Forstner bit, drill conduit holes 1/2-inch deep into your boards. (You can wrap tape around your drill bit to visually measure a 1/2-inch drilling depth.)
- Build the upper unit. Build the upper unit by attaching two rails to the side pieces using clamps. (You can use a wood spacer at the bottom as a placeholder until the lower unit is ready.) Use 2-inch screws, but no glue, to attach the sides and rails.
- Build the lower unit. For the lower unit, remove the spacer and add the lower rails; attach them with screws. Then unclamp both assemblies and remove the screws to take one side off of the upper and lower units.
- Connect the conduit pipes. Fill each hole — on both sides of the unit — halfway with construction adhesive. Place pieces of conduit into the holes on the partially assembled frame. One piece of conduit at a time, slip the pipes into the holes on the loose side. When all of the pipes fit, re-attach the side to the rails using 2-inch screws in the holes you created earlier.
- Plan and cut your planters. Decide how many large and small planter boxes you want to hang from the rack. Using the project diagram, measure and cut the fronts, backs, and bottoms of your planters from the cedar boards.
- Assemble your planters. If you’ll plant directly in the boxes (not in pots), drill drain holes. For both large and small planters, first drill pilot holes, then glue and screw the fronts and backs to the bottoms. Next glue and screw the sides to the front, back, and bottom of each planter.
- Decorate your planters with metal strapping (optional). Use a hack saw or jigsaw with a metal-cutting blade to saw metal strapping into three, 6-3/4-inch-long pieces for each small planter or three, 10-1/2-inch-long pieces for each large planter. Use a metal file to smooth the cut ends, and then wash the pieces with a degreasing dishwashing liquid. Paint the outside face of each metal strap. Once dry, apply a fine bead of construction adhesive to the unpainted backs of the metal strips, clamp them to a planter box, and allow the adhesive to dry.
- Paint your planter racks (optional). Use painter’s tape to mask off the conduit, then prime the planter racks and let them dry. Apply two coats of paint and allow the planter racks to dry overnight.
- Install your rack and planters. Attach mending plates to the top back edge of each lower rack side, drill pilot holes, and secure with 1-inch screws. Set the upper assembly in position and secure the mending plate to the upper assembly with screws. Position the rack against a wall and secure with screws and angle brackets attached to the top of the rack. (Be sure to use screws that reach a wall stud or wall anchor). Then add flowers to your planters and hang them on the conduit rods.
3. Build a Raised Garden Bed

For small-space vegetable gardening, a raised bed can’t be beat. As soon as your garden bed is complete, start planting frost-resistant seedlings, such as lettuce, broccoli, cabbage, and winter peas just in time for warmer weather. For detailed instructions and video tips, visit Lowe’s project page.
- Choose your spot. Keep in mind that many types of plants — most vegetables included — need plenty of sun. Research what you plan to grow and consider the amount of sunlight you’ll get in the areas where you plan to garden.
- Measure and cut. You can adjust the measurements of this project to fit your space. For reference, we’re quoting the specs for building a 4-foot by 6-foot by 10-1/2-inch bed with 2″x4″ untreated lumber. Mark the length of your walls and cut the boards. Measure and cut 2″x4″s for corner posts to support the walls. They should be the height of the garden bed wall. You can also cut posts to install along the walls for additional strength.
- Attach the corner posts. Clamp together the boards for each wall. Set the corner posts on top of the wall boards, flush with the ends of the 6-foot walls and set back 1-1/2 inches from the ends of the shorter walls. Drill pilot holes and attach the posts with screws. If you cut additional posts, attach them as well.
- Build your box. Drill pilot holes and connect all the sides with screws to form a box (with the posts on the inside).
- Outline your location. Place the frame in position and outline it with a shovel. Setting up the bed on the ground rather than a hard surface — such as concrete — allows proper root growth and drainage.
- Prep the ground. Set the frame aside to remove the grass. Loosen the dirt with a spading fork to help your new plants’ roots grow deeply into the ground.
- Make a mesh barrier. Before you set the bed in place, staple wide-mesh hardware cloth to the bottom of the frame. The mesh helps keep weeds out, but earthworms can still get in to enrich the soil. Instead of hardware cloth, you can use landscape fabric or even newspaper to block weed growth from below, but keep in mind that weed seeds can still fall onto the soil and germinate.
- Weather-proof the walls. If the wood isn’t rot-resistant, staple heavy-duty plastic along the inside walls before adding the soil.
- Add soil. Fill the bed with a mix of nutrient-rich soil and compost. Use this mulch and soil calculator to estimate the amount you need and see this soil guide to learn more about enrichment.
- Plant. Set the plants in holes and lightly fill in with soil. Keep the soil loose around the plants to allow water to reach the roots. The best time to water is in the morning, when less water evaporates in the sun. Read these watering tips for more ideas and check the plant tags for additional recommendations.
Ready to get your garden started?
Lowe’s has a how-to for almost every endeavor.