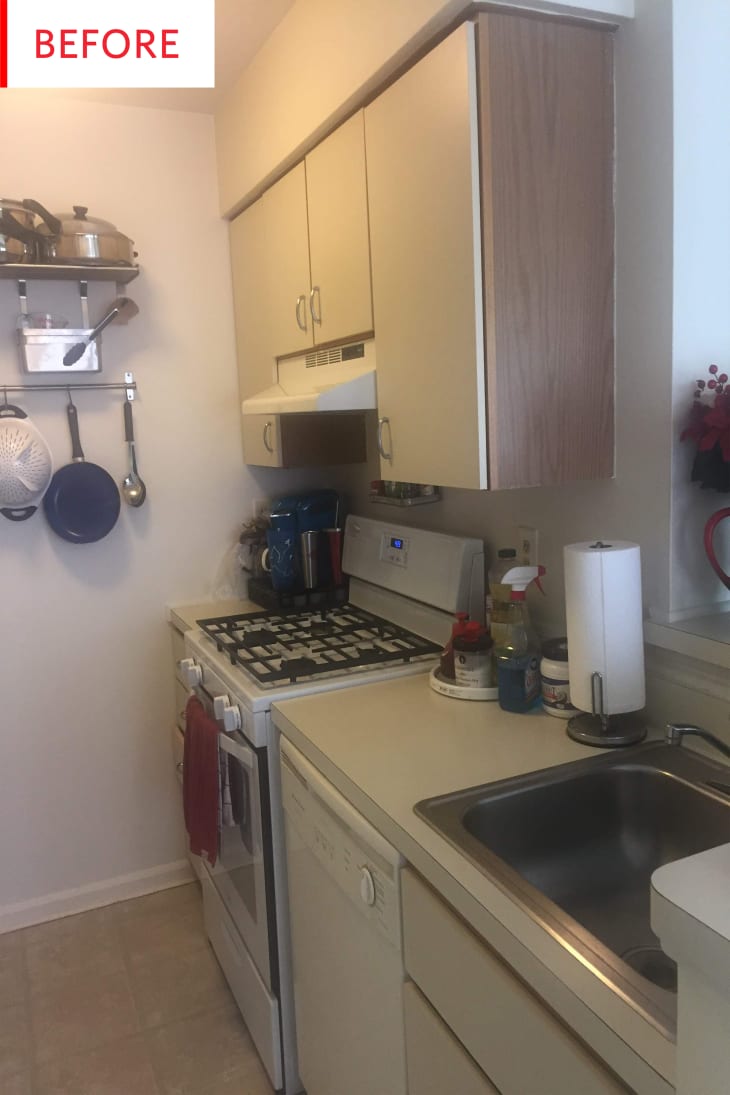
Before and After: This Rental Galley Kitchen Gets a Total Transformation for Just $400

This yellow and brown cooking area felt outdated and not aesthetically pleasing to tenant Gabrielle Delaney and her boyfriend Dan Scura, who share a one-bedroom apartment in New York. Although they are renters and therefore limited with what changes they can make, this didn’t stop Delaney from transforming the kitchen that made her “unhappy.”
For about $400 (not including the dishwasher replaced by the landlord), the galley kitchen went from definitely dated to chic black and white. See for yourself:
Gabrielle describes the space and also what made her pursue the refresh:
I decided to make a change because I wanted to actually enjoy being in my kitchen and cooking. The old design was making me want to avoid cooking and inviting people over. Even though I couldn’t do a full gut renovation since I didn’t own it, I found ways to make it my own for less cost and double the beauty!
Here’s a look at the mismatched drawers and countertops up close. In the after below, not only are the cabinets the same color, but the marble contact paper also creates depth. The oil rubbed bronze hardware adds a modern touch.
This is how Gabrielle feels about the subtle yet drastic color change that occurred throughout the entire space:
I LOVE how much brighter and more inviting it is. It’s a wonder what a little white can do to a space, making it feel open and airy despite its small size and closed off layout!
On the floors, the existing ceramic tiles were covered with peel-and-stick vinyl flooring in a slate color. This created a stronger black and white theme throughout the space, connecting the floors to other touches like the marble-patterned countertops.
They took down the metal shelf and utensil rack and replaced it with a hanging wall shelf that now holds up patterned jars and coffee cups, plus a small potted plant that contributes a pop of color.
Here’s the budget breakdown:
- White contact paper (cabinets): $20
- Marble contact paper(countertops): $14
- White paint for walls: $30
- White wash wood finish stain (cabinets): $11
- Paintbrush, roller, and tape for walls: $10
- White appliance epoxy paint for fridge: $18
- Cabinet hardware in warm chestnut: $44
- Caulk, caulk gun, and sink sealant: $10
- Peel and stick vinyl flooring: $40
- 2×3 rug: $26
- 2×4 rug pad: $5
- Wooden/brass wall shelves: $32
- Peel and stick backsplash subway tile: $43
- Spice bottles: $13
- Blue pattern coffee mugs on shelves: $8
- Storage containers: $11
- Kitchen towels: $12
- Canisters: $40
- Kitchen utensils: $14
There was only one setback throughout the entire process (which was 14 days over the course of four months). Gabrielle explains:
After sanding and staining, I realized the white stain for the cabinets was not opaque enough to cover the orange color since it was not real wood. After wasting that night, I used the white paint I used for the walls to paint over the stain and that worked perfectly!
But with that being the only bump in the road, we’d say this renovation was a success serving up some major inspo.
Enjoy your kitchen, Gabrielle and Dan. And thanks for sharing!
