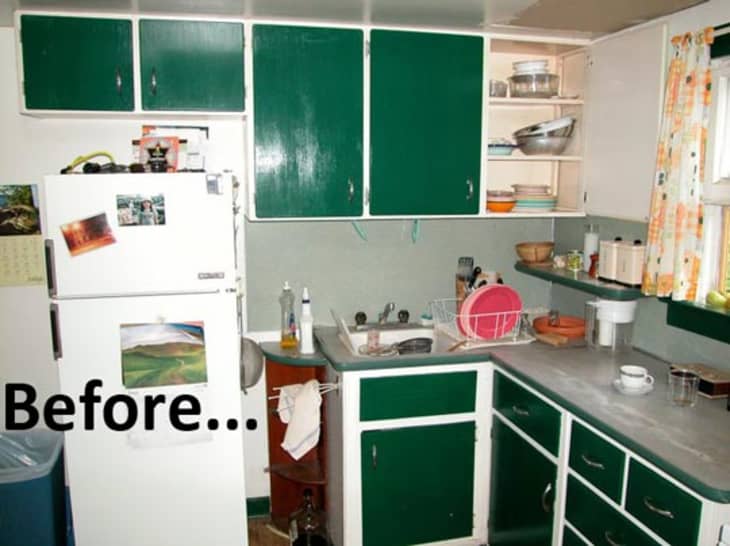
Before & After: Kitchen Reno on a Near Zero Budget
Late last year, Edgaroso shared his “Brave Bathroom Renovation” with Apartment Therapy. Well, he’s back with another room makeover in the small home he inherited from his grandmother — this time he tackled the sweetly retro kitchen on a truly miniscule budget.
Here’s the whole renovation story and few more photos from Edgaroso:
When we moved into my Grandmother’s house, the kitchen was probably the worst room in the house – except for the bathroom which I recently renovated. While the kitchen was functional, it needed some sprucing up. Being on a tight budget I knew it had to be cosmetic and not structural – although I did take a few little shelving units out.
My Grandfather worked for All-Steel where they manufactured office desks. He brought Formica and rubber desk edging remnants home from the factory and used them for the back splash, counter top, and counter edges. The kitchen really never changed over the 40 years they lived in the house. After my grandparents passed away, my cousin moved in and made very few changes to the house. He did however paint the cupboards hunter green – which was probably the worst thing ever perpetrated on this humble little kitchen.
We decided to paint the entire kitchen in semi-gloss white and the cupboard doors a pale sage which matched the color of the 2″ x 2″ satin finish mosaic tiles we bought for the back splash.
We decided to replace the sink, the fixtures and the entire counter as well. The original items were well used, leaky and not in good working order. The existing counter was short on the left hand side of the sink, so we decided to extend the counter on the left, make it a tad deeper and extend it a bit on the right end as well.
We removed the existing Formica back splash that my grandfather installed over 40 years ago. Even back then my grandfather (bless his heart) was thinking about reusing items from the factory dumpster – why let it go into a landfill?
We cleaned the wall and prepped it for the tile back splash.
Once the tile was in place and set, we cut two planks of marine grade plywood for the counter top, cut a whole for the deep aluminum sink, and covered the counter with the least patterned sheet vinyl we could find.
I am surely going to get shrieks from the folks here at Apartment Therapy, but at the time of this renovation our budget was pretty much zero. So in my grandfather’s spirit of using whatever is at hand – but in good taste – we opted for an inexpensive but tough alternative to Formica – sheet vinyl was the ticket!
After the counters were mounted I used retro-aluminum edging to finish them off; giving the kitchen that vintage look.
Since the house is built on a floating slab of concrete, the floors are cracked in places. The kitchen had a pretty big crack, one that needed some leveling – but we couldn’t afford to rent a commercial concrete sander. So instead we cut and installed 1/4 MDF sheets and covered the entire kitchen floor surface, primed it, and porch painted the floor in a darker shade of sage.
If I recall I think 20% more black was added to the original sage color to arrive at this darker floor color.
We added two rag rugs we snagged at Target on sale. They are nice and warm for the winter since the floor is concrete. They are also small enough to take to the local laundry mat for a good industrial washing – anything larger would be a hassle to clean.
Personally I never thought it was a good thing to have carpet of any kind in a kitchen. But on a cold winter morning it’s not a bad thing to have some rag rugs underfoot!
Behind the camera is our small crushed ice vintage chrome kitchen table, that we later flanked with two light teal vinyl covered chrome tube kitchen chairs. So the kitchen ended up looking as period as we could get it on a near zero budget! And yes I made the curtains!
Thanks for sharing the project, Edgaroso!
RELATED LINK: Before & After: Edgaroso’s Brave Bathroom Renovation

