Before & After: An Amazing & Cheery Up-Cycled Recycling Center

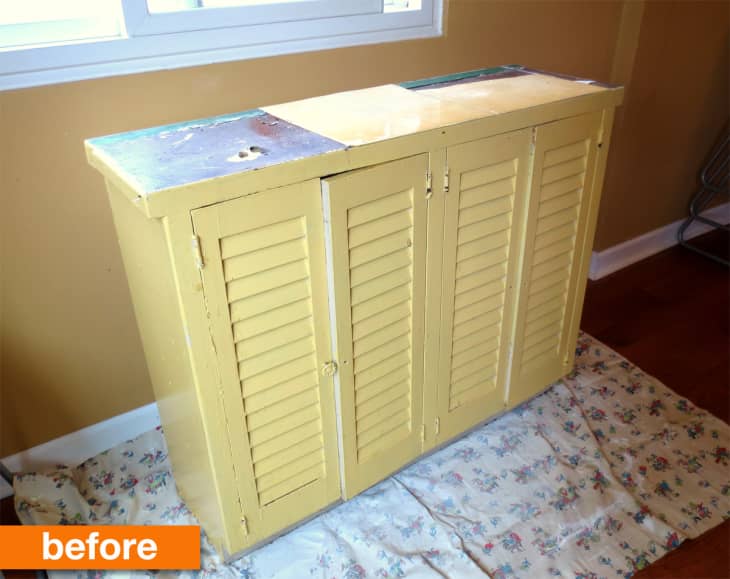
Tired of seeing stinky stacks of recycling take up residence in the corners of your cramped kitchen? So was Claire. In fact she had been dreaming of finding a structure that could contain her recycling bins stylishly. So when she came across this kind of rough but sturdy and free cabinet in an alley a few blocks from her apartment, she got creative to give it a new modern and functional look! Even more impressive? She made this transformation for exactly ZERO dollars. See how after the jump.
From Claire:
There’s a dark corner of our kitchen that I sarcastically call the “recycling center:” One or two cheap plastic trash bins full of junk mail, beer cans and yogurt cups.
For months, I’d been dreaming of erecting a formal structure to contain all this ugliness. Then I stumbled upon this messed up little cabinet in the alley two blocks from our apartment. It was the perfect size for our kitchen nook, and could snugly hold two small trash bins. And like all great treasures from the alley, it was ugly, but solid.
To transform this cabinet into a proper “recycling center,” I used a jigsaw to cut two openings in the top panel, a smaller round one (for cans) and the other larger and oval. I couldn’t figure out how to remove the inner shelf without completely dismantling the cabinet, so I used the jigsaw to cut two trash-bin-sized openings in the shelf.
Since this cabinet was mostly thick plywood under 3 or 4 coats of paint, I decided to paint over it rather than get down to the raw wood. First, I pried the cracked floor tiles (!) off the top, then stripped off enough paint to remove the doors from their painted-over hinges. After a decent sanding, I gave the cabinet and doors a coat of oil-based primer, followed by two coats of white latex paint and three coats of polycrylic finish.
Personally, I don’t like the look of horizontal slatted doors, so I decided to create a “distraction” in the form of bright yellow vertical slats. The wood slats were salvaged from a renovation project next door, sanded, cut, painted bright yellow, and glued on in a dynamic, uneven pattern.
Since the cabinet had no door pulls, I salvaged some gold-toned hardware from a busted mid-century dresser I had also just found in the alley, which I soaked in vinegar and scrubbed to a shine.
Finally, to give the Recycling Center a touch of airy modernism, I snagged the legs off of yet another busted mid-century shelf from the alley, and drilled them into the bottom of my cabinet.
I’m proud to say that every part of this recycling center – including the cabinet, decorative slats, door pulls and legs – were all salvaged from the alley. Using paint and tools I already owned, the total cost of this project was $0.
See the step-by-step instructions on how Claire did this project on her blog. Thank you Claire!
