
Before and After: I Helped My Mom Transform Her Plain Stairs Into a Blue Herringbone Statement
My mom has wanted to give her blah basement stairs a facelift ever since she moved in. It’s a newish townhouse with lots of possibilities for adding personality. Unexpectedly quarantining together gave us the perfect opportunity to liven them up—with plenty of time to do it. When I was growing up, we did tons of mother-daughter crafting projects and played with interior decor, so we were both excited to be in the same place and get creative together again.
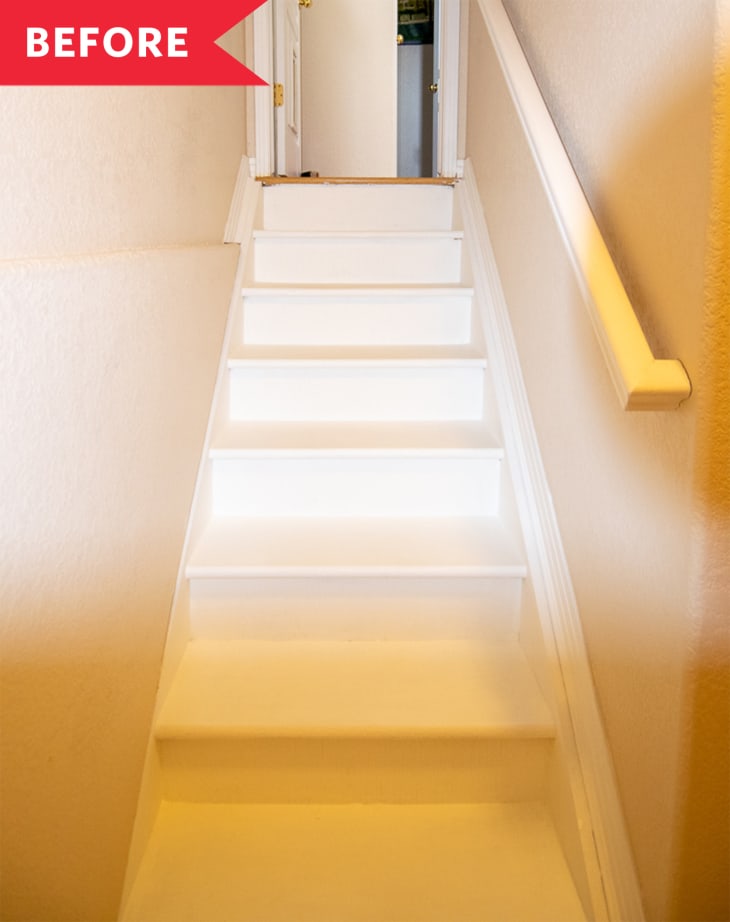
The stairs, tucked away between the first floor and basement, were not a focal point, so a mistake wouldn’t ruin her whole aesthetic. They were already primed white and the perfect blank canvas for us to flex our creativity.
We considered multiple geometric and stripe patterns for the risers, but herringbone stood out to both of us. Two years ago, we road-tripped through the Scottish Highlands. What better tweed souvenir to keep the memories alive than painted herringbone stairs.
The “how” proved a bit trickier. A quick Google search provided no templates or clear how-tos specifically for stairs, so we were forging ahead into new decorating territory. We welcomed the challenge considering we had nothing but time on our hands. So, I grabbed graph paper, a pencil, and measuring tape.
I sketched out the design—a blocky, barely herringbone pattern—that we would trace on the risers. I used a herringbone wall from Thistlewood Farms as inspiration to help imagine the end result. My mom is more of a wing-it person with design, but she stuck with me and trusted my process.
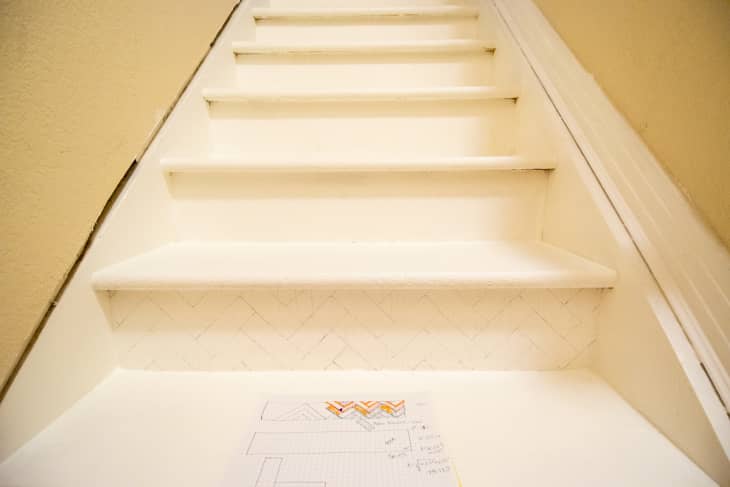
Next up: Measure ten times, paint once. Using a homemade stencil cut from a Trader Joe’s paper bag, I traced out the zig-zag pattern a few rectangles at a time. It was slow-going, to say the least. I’m a perfectionist, which solidified our decision to paint every other riser for a total of seven.
As a word of warning to anyone planning to paint stairs: it requires perching on an individual stair for extended periods of time. Perhaps this is obvious, but it’s something I didn’t fully realize until I was the one crouched and lost feeling in my feet multiple times. Thankfully, my mom’s staircase has a larger landing in the middle, making more stairs easier to reach. I gave my mom the stairs on the landing and at the base so she had the more comfortable spots.
After hours of tracing (and some re-tracing), it was starting to take shape. It was faint and in pencil, but we could see a hint of herringbone coming through. Now it was time to tape. (Note: Three full rolls of .9-inch width painters tape was plenty to cover all the rectangles. We learned when the first round of taping was done and had to order more.) I went back to my graph paper sketch, now filled with colorful highlighted rectangles, and taped around the first set of rectangles.

The design allowed for no two rectangles of the same color to touch using three different colors: the dark blue latex paint my mom had on hand and two at-home mixed lighter variations (more on that below). My mom and I both carefully outlined all the shapes for the first coat of paint with bright blue painter’s tape. There were tiny triangles and odd shapes on the edges, and we didn’t crack open the paint until every stair was prepped and ready for color. Then came the easy and fun part: painting.
It only took about 10 minutes to fill in all the outlined shapes with a small paint brush. The white primer still showed through, so a second coat was in order. We learned something new during each step. Thankfully the paint dried quickly, so we swiped on coat number two within an hour. (Pro tip: Start painting from the top stair and work your way down, so you don’t end up with a knee or toe stuck in the paint from the wet stair below.) Then we let it dry overnight.

The moment of truth: the tape came off smoothly, leaving mostly crisp edges. A few bits of blue bled into the white rectangles, though, due to the uneven wood texture. It wasn’t enough to derail the project, though. Once all the tape was off, we repeated the taping process for the second and third set of rectangles. We knew the drill and the next two go-arounds went much quicker and smoother (also thanks to fully-loaded rolls of tape).
I eyeballed the amount of white paint and mixed up a large amount of a medium blue shade before brushing it over the new set of shapes once and again until it was thoroughly covered. I saved the extra and lightened it one more time for the final round of painting.

A busy week delayed the third round of painting, but we finally covered every other stair riser in full. The time had come for the big reveal. My mom and I tag-teamed to pull off the tape. It wasn’t perfect, but we agreed looked pretty darn cool and much better than she expected. What really mattered was that she liked the finished look, and we made the process fun.
Whenever we hit an obstacle, like running out of tape on the third stair, we laughed through it and found a solution. In fact, my mom said her favorite part was working on a project together. Usually I’m holed up in the office writing furiously all day, popping out for a quick hello and snacks. Teaming up to complete something creative helped ease quarantine tensions and get our minds off of current events.

Now, every time she pops down to the basement to do a load of laundry or grab something from storage, she has a bright reminder of quality time spent together, both working on the stairs and exploring the Scottish Isles.