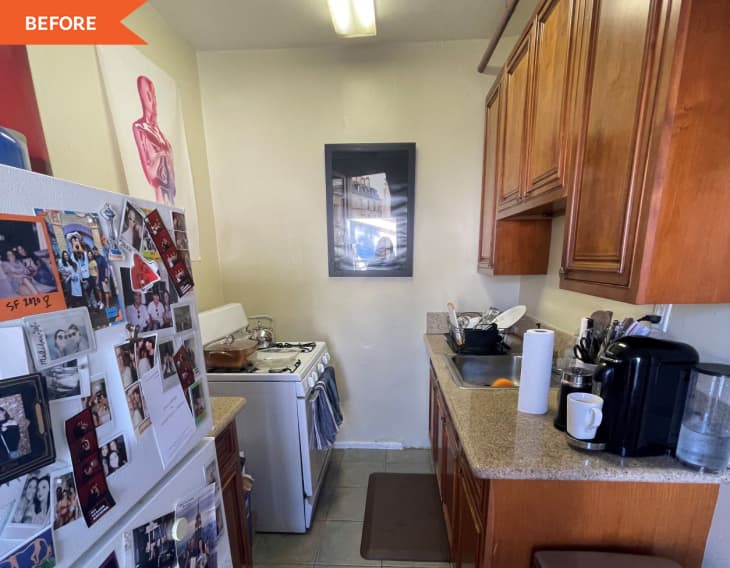
Before and After: A $3,000 Vintage-Inspired Redo Gives This Tiny LA Kitchen a Big New Look

Breakups are awful, but at least sometimes they beget good design. (See: This fabulous post-breakup Brooklyn studio, this crash landing so-called “Cougar Den,” and finally, see: How to Reclaim Your Space Post-Breakup.)
Reclaiming a space after a split is exactly what renter Jacqueline Hall did in her LA apartment’s kitchen. After all, she says, “you can’t cry on freshly painted cabinets!”
She says three things led to the change: “TikTok, Pinterest, and being dumped.” Jacqueline and her ex spent a lot of time in the small kitchen together, so she was looking for a fresh start and fresh style because kitchen before “was just plain ugly,” Jacqueline says.
“My building is considered a part of the historic district of West Hollywood (it was built in the 1930s), and I love it to pieces, but with charm comes decades of grime and old trends, and it needed a makeover,” she says.
Jacqueline hated the butter yellow-hued walls, floors that never looked clean, and the random cabinet between the fridge and the stove. She also felt like she didn’t have enough prep space.
With the help of her grandparents, parents, a friend, and one handyman, Jacqueline reinvented the space in a $3,000 redo — appliances included! The result is a budget-friendly black-and-white kitchen with a somewhat retro feel.
“The process took me eight months,” Jacqueline says. “Every paycheck I would buy more supplies.” She started with the cabinets and walls, where white paint made a world of difference. Then she moved on to the checkerboard floors, her favorite part of the space.
Jacqueline used ready-mix concrete to fill in the grout between her old tiles, created a chalk line in the center of the room, and then worked in quadrants laying down self-stick tile primer and then stick-on black and white tiles.
“I was going for a Parisian/Old Hollywood cafe, more or less,” Jacqueline says. To make sure the tiles were crease-free, she used a rolling pin to smooth everything out, and to create straight cuts at the edge of the room, she used a craft knife, box cutter, and ruler.
To transform her counters, Jacqueline first tried to use contact paper, but it didn’t look the way she wanted. Instead, she went with Amazon epoxy kit to take the counters from dated brownish beige to dramatic (and classic) black. And in place of the ill-fitting cabinet between the stove and fridge, Jacqueline now has a butcher-block-topped utility cart from Home Depot, which offers a larger prep space. She says she got lucky with how well it fits between her appliances.
And speaking of appliances, Jacqueline’s minor changes to hers give the kitchen a whole new look. Although the range remains the same, Jacqueline had a handyman install a new, ductless vent overhead — one of her favorite finds. “I mean, who knew they had those?!” she says. She used white cord covers along the wall to conceal where the hood plugs in (in the middle of her gallery wall), and she found her black vintage fridge on Facebook Marketplace.
Jacqueline also had the handyman install floating shelves to give her kitchen even more functionality.
“The more minor things like the stick-on backsplash and the pull-out trash in the cabinet came later, but each detail really made a difference,” Jacqueline says. The details include a hanging paper towel roll, a soap dispenser, and an IKEA pendant light that feels much more cozy-yet-contemporary than the florescent lighting before — plus mother-of-pearl drawer pulls and a brass light switch plate that add some vintage charm to the kitchen.
But one of Jacqueline’s favorite features of her finished space is the artwork. “The gallery wall was made of all things I had from jobs or random parties, and instead of collecting dust in the closet, they make the room feel a lot larger,” she says. “I got lucky that they all went together.”
Her takeaway from transforming her space is that it was more challenging than she thought it would be. “For some reason, I had an inaccurate idea of how hard DIYing is,” she says. “It’s so aggravating when your blue tape isn’t lined up straight and your epoxy gets on the white walls.” But, she says, online tutorials are always there to help, and patience with yourself goes a long way.
Her hard work was worth it to create beautiful space for new beginnings. “It’s beautiful and efficient!” she says. “I didn’t think I would be in this apartment for so long, but now I can’t imagine ever leaving (until my big break, of course).”
Inspired? Submit your own project here.
