Before and After: Clever DIYs Make a Once-Dingy 1960s Bedroom a Cozy Coastal Escape

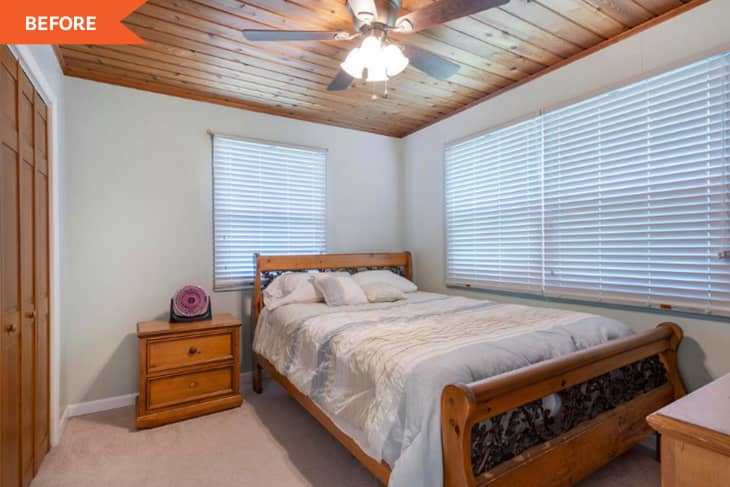
There’s nothing like orange-stained wood paneling (or wood furniture, or wood closet doors) to make a room feel dated, and the guest bedroom in Brooke Russell (@brooke.casa.del.sol)‘s lake house had all three when she first moved in.
“The walls were covered in the original paneling from 1964 that had been painted,” Brooke explains. But believe it or not, she managed to make two of the three look brand-new during the Spring 2022 One Room Challenge.
The big structural changes to the space are the window wall and the wall with the bedroom door. During early renovation stages, Brooke and her husband, Brandon, found mold. “We had to replace the big window and much of that wall,” she says. During the demo to address the mold issue, they decided to change the layout of the space a bit. They took out the bedroom closet but gained back space by the door by eliminating a portion of the hallway.
In the alcove by the door now is the same oak dresser from before. It looks built-in because she matched the measurements of the new wall to its exact dimensions. “The built-in dresser nook is my favorite view of the room,” Brooke says. “I visualized it in my head for so long and to be able to built and paint it with my own hands is so rewarding.” (She used Sherwin-Williams’ Krypton for the blue-gray dresser and door.)
“I love the diamond accents above it, and the round wooden mirror just makes the space!” Brooke adds. She found the mirror at Hobby Lobby for about $60, and she added texture (and faux texture) throughout the room by adding moulding in a diamond pattern above the dresser, panels of diamond-patterned wallpaper behind the bed, and couple of faux beams (painted white) to match the freshly painted white ceiling.
“This 1960s original knotty pine ceiling gave me quite a workout,” Brooke recounted on Instagram. She filled in the knots and nail holes with wood filler, sanded it down, cleaned it, primed with a shellac primer for a solid white base, and painted it with a satin finish.
Brooke’s advice for refinishing ceilings like hers? Make sure to wipe them clean before you paint or prime. “This is where I went wrong the first time, and I was just pushing orange dust around with my paint roller,” she said on Instagram.
The bed is also a DIY project. Brooke, again, used the same oak furniture from before and painted the headboard white; then she added cane to the open slats. “I saved a lot of money flipping the dresser and headboard,” she says.
Her second bit of DIY advice? “I truly believe that you can breath life into a rundown space or piece of furniture if you just look at it from the stand point of what it could be instead of focusing on the ugly staring back at you,” she says.
Thanks to DIYs and sponsorships, Brooke estimates she spent about $1,000 revamping the room. She replaced the flooring with an LVP option, purchased new bedding and nightstands from Target, upgraded the ceiling fan, added new wall lamps above the nightstands, and bought a new rug.
“I love the coastal blue and white and all the texture that the ceiling and decorative mouldings bring to the space,” Brooke says of her revamped room. “It’s cozy, inviting, and has just the right amount of interest and charm to make you not want to leave!”
This project was completed for the Spring 2022 One Room Challenge, in partnership with Apartment Therapy. See even more of the One Room Challenge before and afters here.
Inspired? Submit your own project here.
