Before and After: This $20K Boho Farmhouse Kitchen Renovation Only Took Three Weeks

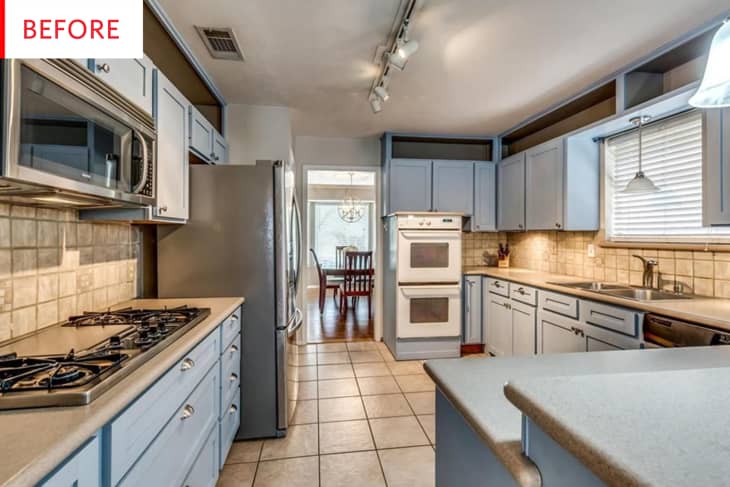
This is a nice big kitchen with tons of storage, lots of natural light, many ovens, and a cute baby blue and tan color scheme. However, it had some issues and some awkwardness that its owner was determined to rectify.
Here’s a little insight into those issues, according to Lauren Yacht of Minimal Domesticity (who’s responsible for this renovation):
The house was built in 1957 but the kitchen had been renovated—based on the tumbled tile backsplash and speckled Corian counters, I’m guessing it was in the ’90s. The layout was awkward and the painted cabinets were in bad shape. The unattractive tile floor continued into the family room and didn’t match the original wood that ran throughout the rest of the house.
The ovens and cabinets have been removed from the far wall, opening up the room and creating more counter space. The peninsula from the end of the room has been removed, the cupboards on the right have been replaced with open shelving, and the cooktop was swapped for a stove with an oven.
It seems that everything in this kitchen is new other than the refrigerator, and yet the room has a cozy, established feel thanks to the vibrant rug, leather seats, wood island, shiplap wall, and all of the other elements that add texture and warmth (the filigree shelf brackets, the intriguing framed piece, the marble counters, and of course the stunning wood floor).
We often see microwaves over stoves that are eventually removed, but they tend to hang really low, making it difficult to reach the back burners. This microwave, which elegantly coordinates with the fridge and dishwasher, is set higher and therefore doesn’t create a cramped cooking area. Here’s what Yacht had to say about the newly renovated space:
I love how open and bright the kitchen is now. Removing the upper cabinets, removing the wall oven, and installing open shelving really opened up that side of the room.
I also love how everything feels “lived-in.” It’s a new kitchen, but it doesn’t feel sterile—the different natural textures (honed marble, wood, cast iron), cream cabinets, and vintage details help to warm things up.
I wouldn’t change anything about the design, but if I could do things over again I’d definitely hire out texturing the ceiling. It’s a swirl texture, and even though I gave it my best shot, it was really hard to match. I’d also reconsider the farmhouse sink—it looks beautiful, but it’s impossible to keep clean and scratch-free.
This photo shows that the cupboards that were on this wall blocked some of the light coming in through this window, in a way that the new shelves don’t. The old ovens jutted into the room a bit, and it seems like it might have been difficult to access the cabinets that were above them. All of these issues were remedied in under a month:
The renovation took about three weeks. We subcontracted all of the major work and we took on several smaller projects ourselves—drywall repair, painting, installing hardware and floating shelves, and installing appliances. The kitchen itself cost around $14,500 and installing hardwoods throughout the kitchen and living space was an additional $4,500. Everything went pretty smoothly, but when we went to install some extra outlets we were surprised to discover that everything in the kitchen was wired to one circuit. We had additional circuits installed to ensure that we wouldn’t keep tripping the breaker, but it was an unexpected expense.
Now that the kitchen is complete, Yacht had this advice to share:
Spend more time planning than renovating. Purchase your materials and get your professionals lined up, your space planned, and everything priced out in advance so that the renovation process will go quickly and you’ll stay on budget.
Yacht also shared an amazing insider tip: If you’re doing a large renovation, Habitat for Humanity will demolish and remove your old cabinetry and appliances for donation. Did you know that? So helpful on many different levels.
Thank you, Lauren Yacht and Minimal Domesticity!