Before and After: This Kitchen Wound Up Costing $20,000

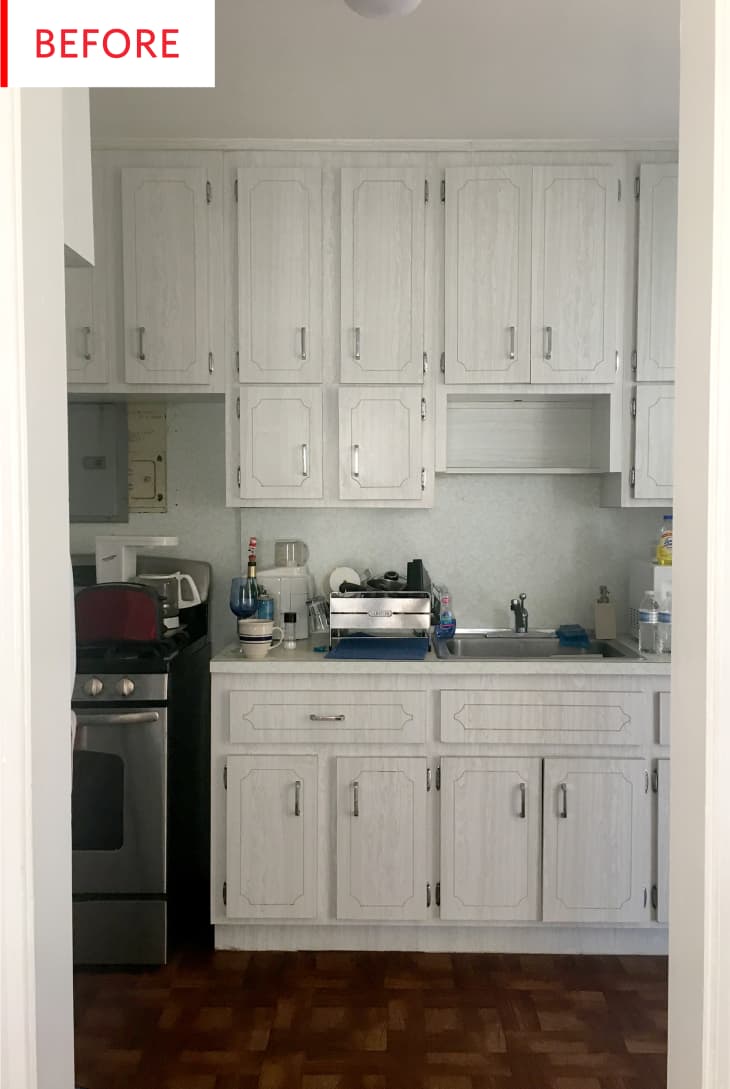
This kitchen was pretty cute and had a ton of storage, but it was sadly cut off from the rest of the home. Enter an interior designer–architect/contractor power couple armed with a clear vision and $20,000.
Look how incredibly open and airy this room is now! The light from the window can now flow into the next room, the dining room is now conveniently integrated into the kitchen, and it all looks lovely. This project was designed and executed by Ana Mari Portuondo Cabrera of The Archive Studio and her husband, and they’re pretty satisfied with their work:
We love how bright, open and inviting it is. Since this is the first room you see when you walk into our house it was really important for us to have it feel like an extension of the house and not look too kitchen-y. We’re absolutely in love with the way our kitchen turned out and really wouldn’t change the design at all. However, the one thing I’d say I would have done differently was make the shelves inside the under-counter doors on either side of the range pull-out shelves as opposed to adjustable shelves. It’s a bit of a pain having to bend down and reach toward the back of the unit to get your pans.
According to Ana Mari, the before space was not planned out well:
The kitchen felt very secluded from the rest of the house and was laid out inefficiently. The upper cabinets were far too high for us to use, the range was located right below the electrical panel, you couldn’t open the oven because the refrigerator was too close. Both the kitchen door and dining room door led to the Florida room [sunroom] behind the house, taking away from any potential counter/appliance space in the kitchen.
The floating shelves offer a real amount of storage without looking cluttered or feeling overwhelming, and they’re shallow enough not to block the ample counterspace. The refrigerator is positioned perfectly to basically disappear, and the integrated ASKO dishwasher is basically invisible. The shelves echo the wood of the floor, and the range hood lines up exactly with the top shelf.
Here’s what it took for Ana Mari and her husband to completely transform this space:
We started demo in the beginning of December 2017 and finished in mid February 2018 (approximately two and a half months from start to finish). We anticipated being done much earlier, but starting so close to the holidays really set us back a few weeks because everyone stops working ’til the new year.
Both of us are designers. My husband is an architect and contractor and I’m an interior designer. We designed the kitchen as well as demo-ed ourselves to save on costs, but brought in a team of electricians to relocate outlets and place our track lights, drywall guys to reframe and smooth our walls and a carpenter to build and install our cabinets. Having said this, it still came out to just over $20,000 (not including design fees or cost for demo since we did those ourselves).
The setbacks we encountered were mainly because of the time we were able to start working on the kitchen. We started demo in the beginning of December (something we really tried to avoid), and when it came time to bring in the professionals, most of them were closed till the new year. If I had to do it over I’d try my best to either start earlier or start after the new year to keep the momentum of the project going.
That sleek, unobtrusive range hood is from Whirpool, the wall paint is BEHR Ultra White, and the countertops are quartz from Quartzology.
Ana Mari already gave great advice regarding the timing of renovations, but here are a few bonus tips:
Don’t try and tackle a kitchen renovation unless you have a very realistic sense of your budget. We always resorted back to it throughout the process and it truly determined what we could or couldn’t do. Also, don’t overlook the importance of hiring a designer, project manager and carpenter. It’s totally worth the investment to ensure a cohesive design, smooth process and overall great quality work. In my opinion, it’s worth estimating beforehand and getting your numbers to a realistic amount and save up from there until you’re really ready to renovate!
Thank you, Ana Mari Portuondo Cabrera of The Archive Studio!
