
The Under-$5 Pro Secret to Making Your DIY Built-Ins Look Like a Million Bucks

A lot of people enjoy the functional and aesthetic value of built-ins, but with the national average cost of $2,500 for a built-in bookshelf, it’s no wonder there are plenty of DIYers looking for clever ways to fake the look.
Like those intrepid DIYers, you can get the professional look at home by using off-the-shelf furniture and materials. IKEA is a popular starting point — their BILLY bookcases are a go-to pick — but nearly any flat-pack or pre-made furniture can become a faux built-in with a little creativity.
But there’s one thing that can instantly take a built-in from obviously DIYed to pro-level: caulk. It’s the secret to making all those disparate furniture pieces look like one pro-made assembly, and this $5 buy can make your built-ins look like a million bucks.
Caulk is a polymer-based material (either latex, silicone, polyurethane or rubber-based) used by pros and experienced DIYers alike to seal joints, gaps, and seams in every part of your home — around windows, sinks, tubs, showers, and (of course!) built-ins. Your house naturally shifts as it ages, so the flexibility of caulk is ideal for long lasting finishes across a variety of projects.
When it comes to crafting built-ins — faux or real — caulk comes in handy for masking the seams between sections. Those small gaps in a build are like sweater fuzz on your favorite pullover — sure, most of the time you could live with them, but once they’re gone, the entire look is much cleaner and you’ll wonder why you didn’t deal with them sooner. This simple step can be the difference between your bookcase or closet looking like a stand-alone furniture piece or a built-in that looks like it’s always been a part of your home.
When to Caulk Built-Ins
Before you caulk, you’ll want to get all the framing of your shelves in place, including any crown moulding, baseboards, and trim. Prep your total build with a good sanding and dusting, then prime. Now it’s time to caulk. The reason? Caulking after priming gives the caulk a better surface grip to your piece.
Make sure to choose a caulk that’s marked “paintable” so that it will grip the paint that you add later.

Where to Caulk Built-Ins
Use caulk anywhere two or more pieces join. Consider these areas for caulking:
- Between the ceiling and crown moulding
- Between the baseboards and the built-in’s frame
- Where decorative trim meets door or drawer faces
- Mitre cuts (even if you have perfect 45° cuts, your walls might not be plumb and force a small gap)
- Between shelves and the frame
How to Caulk Built-Ins
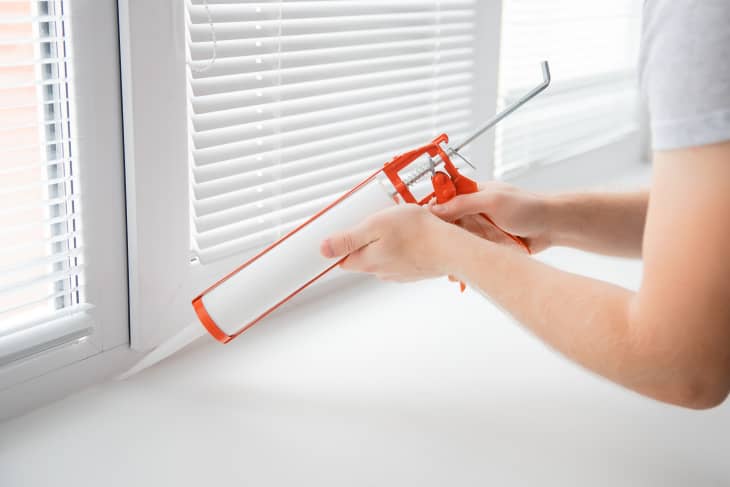
To apply the caulk, cut the tip of the tube at a 45° angle to make an ⅛” to ¼” opening, depending on how large you want your caulk bead to be. Some caulk tubes have measurement markers on the nozzle to help you decide. Pierce the interior foil a few times with a long nail or the piercing rod to create a hole for the caulk to come out.
To make things even easier on yourself, get a caulk gun with a built-in nozzle tip cutter and a seal puncture rod. The cutter will look like a hole on the side of the handle and the puncture rod will look like a long, thin metal tine tucked under the main body of the caulk gun. A good caulk gun can make the process much smoother.
Once you’ve created a hole, insert the tube into the caulk gun and align the plunger to the back end of the tube. Give the trigger a few squeezes until the caulk begins to flow. Wipe off the excess and hold the tube tip to your gap at a 45° angle. Pull the trigger slowly as you drag the tube against the gap. Maintain steady pace and pressure. Work in sections to keep the caulk from drying out.
With the caulk line in place, and before it hardens, run a slightly damp lint-free rag or tile sponge over the caulk line to smooth it out.
Once the caulk is completely cured, you can paint. Apply your paint of choice, let cure, and you’re done — with a high-end finish to boot. Adding that one extra step is the difference between a DIY look and a pro-level finish.