Before and After: 5 Budget-Savvy Paint Projects Give This Decades-Old Kitchen a New Life

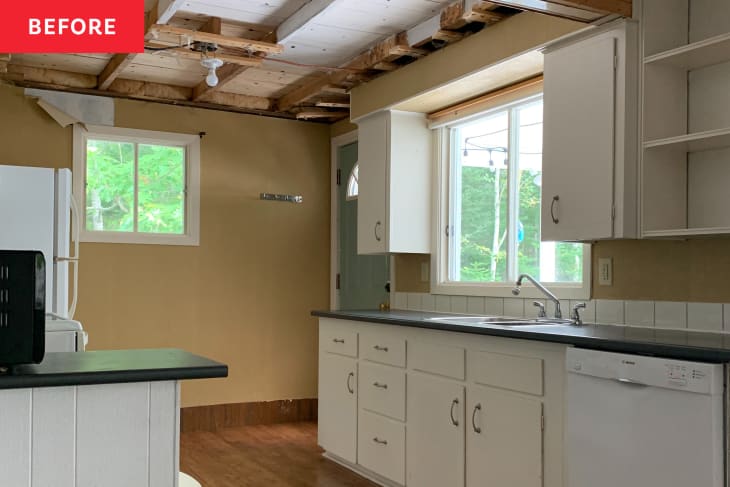
It’s never great to hear a sentiment like this from a homeowner: “Every day since day one of purchasing this home, I have disliked the kitchen space.” But that’s exactly what Megan Isenor (@makeitlikemegs) said about her decades-old kitchen, which once had drop-tile ceilings, mustard yellow walls, and at one point, wallpaper. Beyond that, the cabinets were old and bulky and sometimes blocked the light coming through the window on the right-hand side.
“Our home was built prior to 1970 and was primarily used as a very small family cottage that had been added onto over time,” Megan explains. “Even with the newer updates, it wasn’t brought up to current style. I always hated how small it was and how dark it felt, even on a sunny day.”
Megan wanted to make the kitchen feel more contemporary, welcoming, and sunnier. She says she grew up in a home “where a kitchen gathering is common every time you have company over,” and her kitchen “never felt like the ideal space for this.”
“I really wanted the kitchen to feel more like the heart of the home and do a budget-friendly renovation that made me fall in love with cooking, entertaining, and creating not only a beautiful space, but delicious meals for me and my family,” she says. So Megan took on a completely DIY renovation to give herself that dream kitchen.
The first step of the project was to demo the old kitchen, and the first things to go were the upper cabinets on the sides of the sink.
“Even though I would be losing storage, I wanted the natural light to come through the window, and removing these would make the space feel so much bigger,” Megan explains. “Truth be told, there were a lot of unused items in these cabinets, so I really don’t miss them at all.” The free space made room for more fun projects, she says, like adding patchwork square tiles in shades of white and installing floating shelves on one side of the sink to display dishes and some simple decor.
Megan says she was nervous about drilling into the new tile for her new shelving at first. “I didn’t want to wreck the beautiful tile that had just been installed,” she says. But her floating shelves came with instructions, so she just had to research the best drill bit and anchors to the wall, watch a few YouTube videos, consult a DIYer friend — Krista of @georgestownonmymind — and take things slowly. “I was so shocked at how easy it was to drill into the tile with no damage — just like buttah!” Megan says. “It felt so good to get over that DIY fear and know I can install shelves that easily!”
Removing the ceiling tiles and exposing the wood ceiling added over a foot of height to the kitchen, “which also made a huge difference to the overall feeling in the room,” Megan adds. Painting it white helped the ceiling seem even higher.
To save money, Megan worked with all of the cabinets that remained. She gave them a new life by adding trim to the door fronts for a Shaker-style look, painting them, and spray-painting the drawer hardware gold. On the upper cabinets, she added knobs she scored for a low price at IKEA. Her biggest takeaway from the cabinet transformation is a common refrain among DIYers: “Never underestimate the power of paint!” she says. “It may not be a permanent solution, but if you are looking to fall in love with your outdated space without spending a lot of money, you can add paint to so many things to elevate your home.”
After the cabinets, Megan worked on the countertops, which she also revived with paint. “Would you believe that I only paid $125 CAD to transform them?” she says (that’s about $92 USD). She used an epoxy kit plus paint she already had on hand to create a marbled effect. “I was truly so impressed with how this project turned out,” Megan says, but she does recommend tackling the project with a DIY partner to ensure a smooth, level finish.
Megan also zhuzhed up her refrigerator with paint by giving the handle a coat of gold spray paint. “I really love the look of the Cafe appliances that are white with gold accents,” she cites as her inspiration. Lastly, Megan installed more gold and brass accents with her new Delle Rosa faucet (similar one here), three new sconces, and a new pendant light.
Megan says her new kitchen feels much brighter now, and she’s proud that she kept so many existing features and worked within a tight budget. “By keeping the existing cabinets and countertops, I was able to budget for a more expensive backsplash that I loved and also add the floating shelves to the room,” she says. “I’m so proud of the methods I used to repurpose the items that were already in our home and just elevate them with paint and a bit of elbow grease. Looking into the room at the different elements each day and getting to say, ‘Hey, I did that with my own two hands,’ is really special.”
Inspired? Submit your own project here.
