Before and After: A Dining Room Goes from Beige to Breathtaking in 5 Days (for $370!)

If you ever have the lingering feeling that your space looks good, but not great, turn your attention to the walls. Often, they just need a bit more oomph. Giving the walls a dose of texture with moulding or a coating them with rich, moody paint color is a surefire way to make an entire space look more sophisticated and meant-to-be.
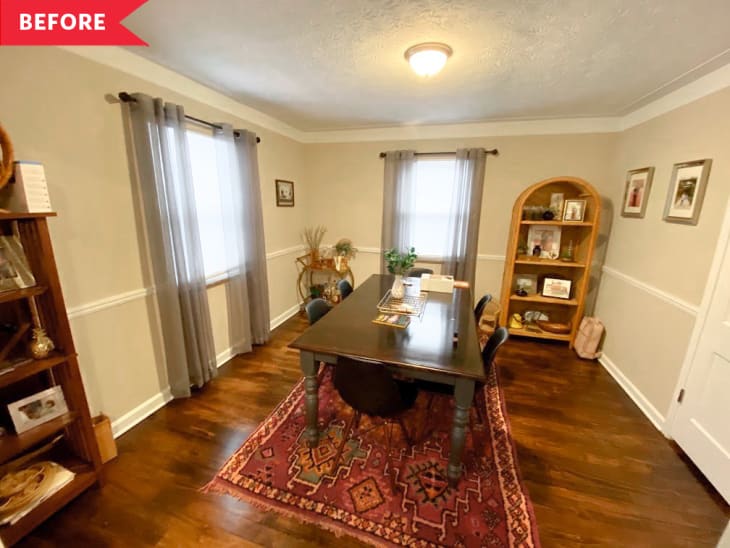
This dining room is a great example. Ohio-based homeowners Chelsea and Jason Scott’s dining room had a great table and set of chairs and a super-stylish vintage rug to boot, but its beige walls made the space feel impersonal.
“Our 72-year-old home has a lot of charm, but when we moved into the recently renovated home, everything was beige — including this dining room,” Chelsea (@interiordesigndropout) says. “Because the dining room is directly off the kitchen and the place that we gather for game nights with friends and family, I wanted it to be more aesthetically pleasing and a place people would want to spend time in.”
And with an all-in cost of $370, Chelsea and Jason proved it doesn’t take a big budget to add finishing architectural touches to a space. They opted for a faux board and batten treatment using primed MDF. The lumber cost about $140. Chelsea had added the same textural treatment on a smaller scale in her bathroom and decided to give it a try on a bigger canvas — this time, with more knowledge (and tools).
“Power tools are your friends,” Chelsea says. “This project was so much easier to do compared to my bathroom wall I had previously done just because I had a power nail gun and miter saw.”
She and Jason started out by removing the chair rail and original baseboards in the dining room — a daunting first step. “Because the house is so old with lots and lots of layers of old paint and caulk, it took a lot of work to sand down and spackle the area where the chair rail previously ran,” Chelsea says. “I think if I were to do it again, I would probably use drywall mud versus spackle.”
But, as Chelsea puts it, she and Jason “trusted the process and kept going.” With the old baseboards out of the way, they installed new craftsman-style baseboards to match their incoming wainscoting. Next, they measured and marked the spacing for the vertical battens around the room, cut the wood with a miter saw, and nailed them to the wall with a battery operated brad nailer.
After the baseboards, battens, and the top rail were all nailed to the wall, Chelsea caulked all the seams for an extra luxe-looking finish. (Her pro-tip for caulking: Use a baby wipe to clean up excess.)
Finally, it was time for paint samples and cosmetic changes. Chelsea knew she wanted to use a dark paint on the faux board and batten and bright white on top; she landed on Sherwin Williams’s Grizzle Gray and Pure White.
“Once everything was painted, I reinstalled the curtain rods to hang much higher than originally installed and ordered new 96-inch curtains from Amazon, which look much higher-end,” Chelsea says. Her gray curtains from before were a temporary fix when they first moved in, but swapping them for white panels that are hung higher and pooling a bit at the bottom makes the room look both brighter and taller.
The new curtains and swapping the dated and too-small flush-mount light for a more statement-making boho pendant fixture from IKEA were the finishing touches to a project all about finishing touches. Now the room feels much more complete and welcoming, not to mention personal.
“I am looking forward to hosting in this newly designed space,” Chelsea says. “You can see this room from almost every point on the first floor, so I am pleased with how all the changes — both big and small — opened up the space.”
Inspired? Submit your own project here.
