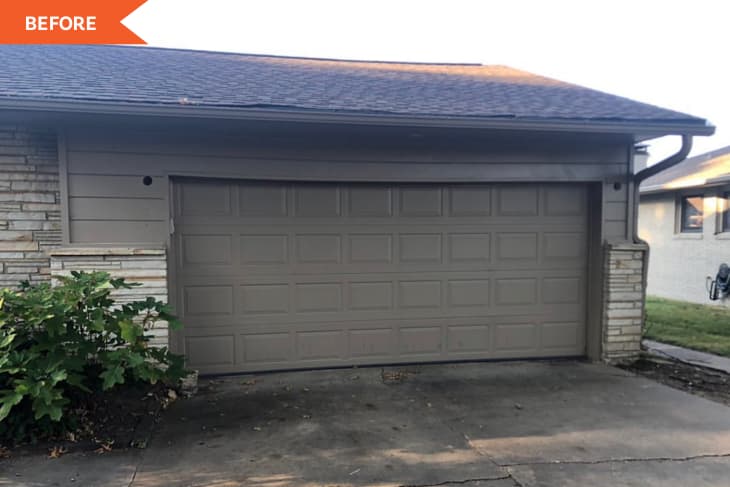
Before and After: A 1957 Ranch’s Warped Exterior Gets a Modern Facelift with Mid-Century Appeal

With cooler weather on the horizon comes the opportunity to work outside. Giving the gutters a quick rinse, adding an autumnal doormat, wiping off summer pollen from patio furniture, planting mums — the possibilities abound for end-of-summer outdoor projects that’ll boost your home’s curb appeal in time for fall.
And Katie Teel’s (@teelspaces) garage door and driveway refresh should give you some curb appeal inspiration, too.
“When we purchased our home in February of 2012, it had giant dark wooden shutters that overpowered the windows, and the garage door was painted to match the shutters,” Katie explains. “It sucked your eye to that side of the house like a dark cave, and there was a significant dip in the header over the garage.”
Something you can’t see in the “before” photos that was equally bad? The garage door was warped and made a loud bang when it closed. It even scared neighbors and dogs walking by, Katie says. The driveway also had a large crack running the whole width where water would pool up when it rained, and the paint was starting to peel a little on the western-facing siding due to exposure to the sun.
“When we had painters out to address the peeling paint, I had them go ahead and paint the garage door to match the siding,” Katie says. “The lighter door color helped, but we still had a dip in the header and a cracked driveway. We changed gears for a while to focus on updating the interior … over the next several years. When we noticed the paint was starting to peel again after only six years, it was time to turn our attention back to the exterior.”
This time around, Katie researched materials that would last a long time. “My husband suggested painting the stone to give it a fresh look, but that was a hard no for me,” she says. “Our 1950s ranch had a beautiful cream-colored sandstone that is no longer available in our region. I wasn’t about to paint it and have more maintenance to deal with. I also didn’t want to have to paint the siding every five years, so I started researching materials that could withstand the heat.” Katie says stucco stood out as a clear winner because it’s heat-resistant, doesn’t fade in the sun, and doesn’t need new coats of paint unless you want to change the color.
She hired a pro to re-surface the house. “Stucco can be prone to cracking, so I knew it was important to find someone who really knew what they were doing,” she says. “It was the perfect solution to give the home an updated look while maintaining the ranch character.”
While they were adding stucco, Katie and her husband also decided to address the dip in the header above the garage. “We decided we could ‘Band-Aid’ the dip with a wood beam,” Katie says. “That got us thinking about a new wood garage door. We considered a fiberglass “wood” look door to save cost, but having it next to the real wood beam didn’t feel right to me … Real wood seemed like the way to go.”
Once the new materials were decided on, Katie and her husband wanted to add more lighting to that side of the house. They love the look of gas lanterns, but running a new gas line was going to be too expensive, so they decided on some gas-looking lanterns with electric bulbs that mimicked flames. “Adding the sconces probably made the most impact,” Katie says.
During the lantern install, the existing trim around the garage was removed, and they discovered a problem: “The header had been eaten away at one end by an old termite infestation,” Katie says. “To add insult to injury, it wasn’t even resting on the 2x4s that were supposed to be supporting the header and in turn the roof! No wonder there was a dip. Obviously we had to replace the header.” Although this added $1,000 to the project cost, Katie says it was worth it as they ended up with a much straighter finished product (and peace of mind).
Katie’s trim carpenter installed a cedar board on the front and bottom of the header to get the beam look. “I did not want to risk getting any stain on the stucco, so we went ahead and finished the beam and new door before moving on to the next step,” Katie says. They tested stains on leftover cuttings from the cedar boards and landed on an Aspen-inspired tan shade.
Katie says choosing the right color for the garage door was critical in bringing the whole exterior look together. “I wanted the garage to be beautiful but still maintain a supporting actor role,” she says. “Keeping it light added the impact with out directing attention away from the front doors.” The stucco was applied after the stain was painted on, and then it was time to repair and re-pour the driveway.
“Ranch homes around here barely fit two cars, especially a truck/SUV combo,” Katie says. “We also had a 7- and 9-year-old, and, if it goes as fast as everyone says, they would be driving before we knew it, so extending the driveway to three cars wide was a no-brainer.”
“We added a small amount of grey coloring so the driveway didn’t scream ‘I’m new here” and threw on some rock salt for a pitted look,” Katie says. “We were done!” (But not without planting the oak leaf hydrangea first, of course!) And now, the house has a handsome new look that still feels fitting for its 1950s roots.
Inspired? Submit your own project here.
