
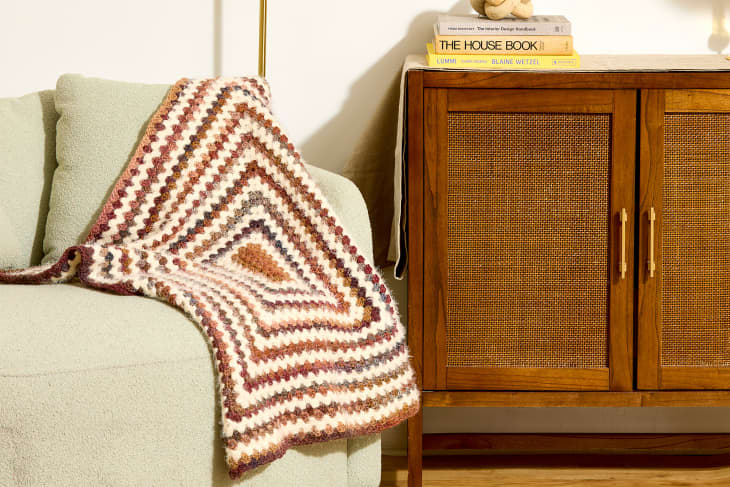
Even a Total Beginner Can Crochet a Blanket with This Easy Guide
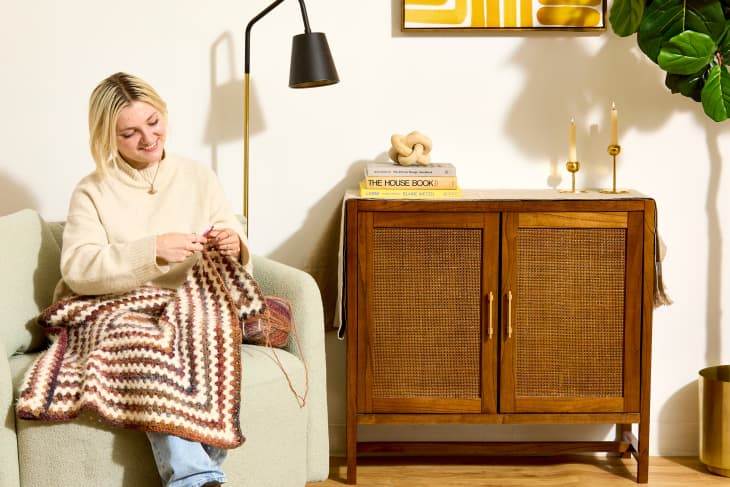
Many crafts and DIYs require a lot to get started: a lot of space, a lot of materials, a lot of money. But crochet is one DIY that you can do with less. Unlike bulky crafts like arm knitting and creating your own DIY wall art, all you need to crochet is enough room to sit — no table surface required! — plus a crochet hook and a skein (or bundle) of yarn. With those basics, you can learn to crochet a blanket and other cool handmade decor.
For beginners, learning how to crochet a blanket is a pretty easy starting point. You’ll need to learn how to do a few basic stitches, but once you nail those all you need to do is repeat them over and over. Plus, a basic crochet blanket made with granny clusters comes together pretty quickly, making it a satisfying DIY. You’ll be able to see progress in no time — and you can make the end result as big or as small as you’d like. Here’s how to crochet a blanket for beginners.
Tools and Materials Needed to Crochet a Blanket
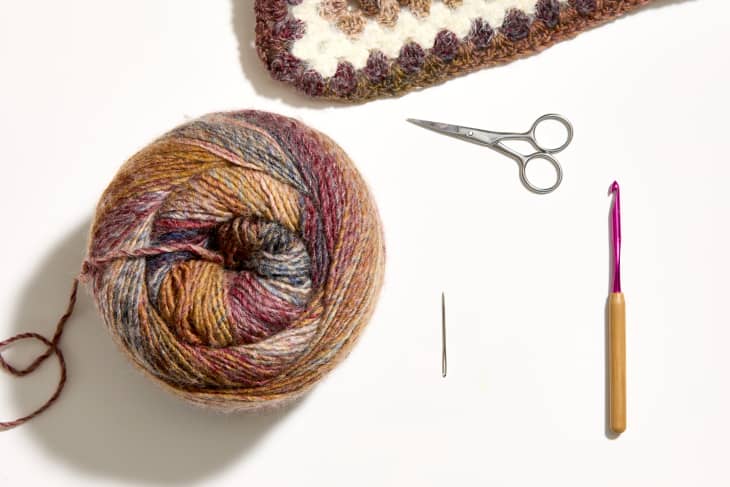
This is an affordable craft to pick up as a total beginner, requiring minimal materials. Here’s what you’ll need.
- Yarn
- Crochet hook (you’ll need the size that corresponds to the number indicated on your yarn’s label)
- Scissors
- Yarn needle
How to Crochet a Blanket: First Steps
If you’re a crochet beginner, you’ll need to master a couple of skills before you can get to work on your blanket. The first is tying a slip knot, which you’ll need to do to get yarn on your crochet hook. The second is crocheting a chain stitch, which you’ll use to start your project.
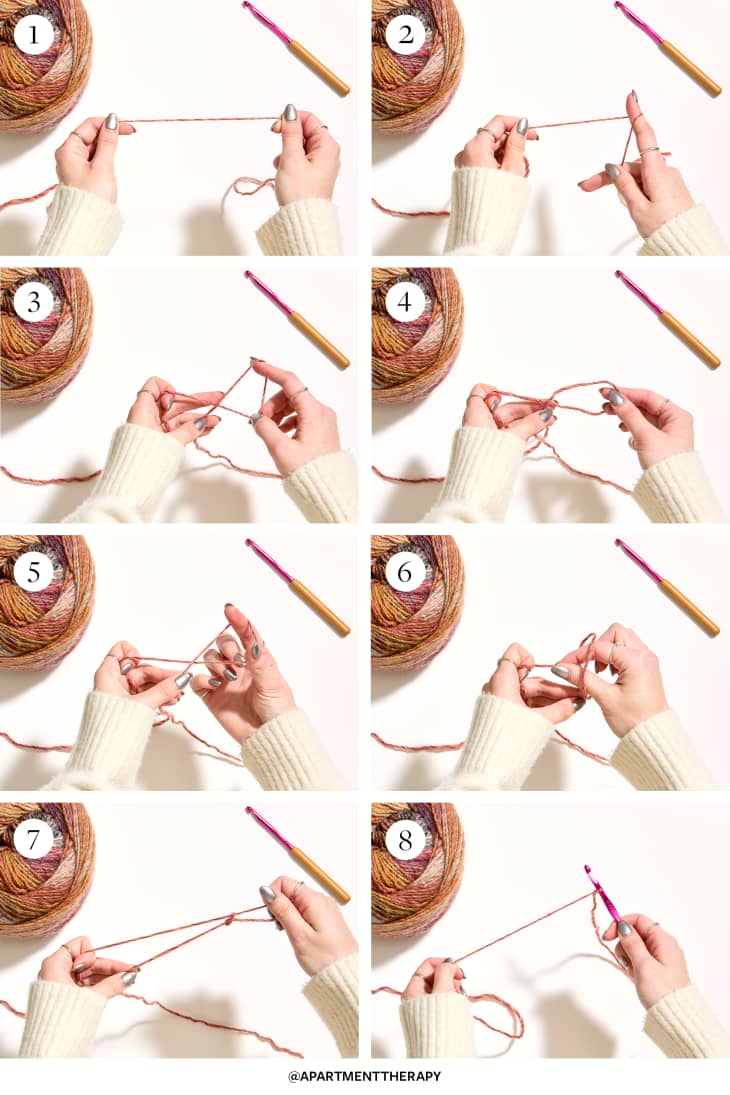
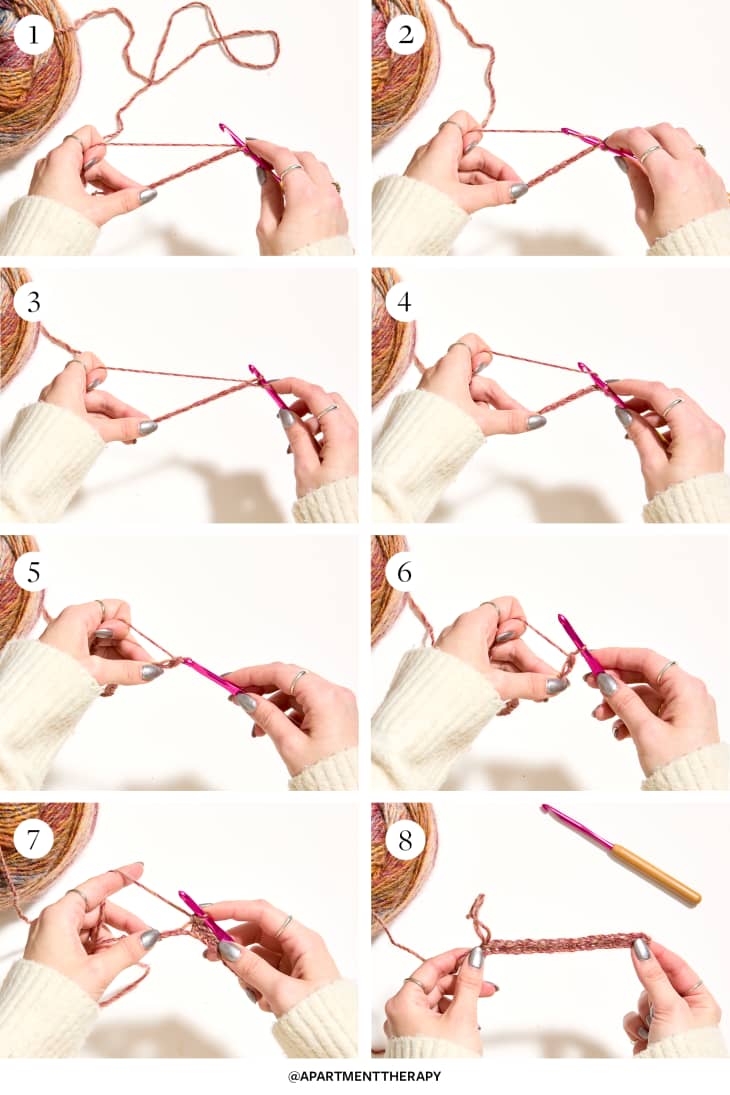
How to Tie a Slip Knot
- Hold the loose end of the yarn in your right hand, and the working end of the yarn (the yarn that’s attached to your skein) in your left hand. Keep about 4 inches between.
- Start to twist the yarn around your right finger.
- Use your right thumb to grab the working yarn, creating a loop.
- Pinch the spot where the working yarn and loose yarn cross with your left hand. Pull the loop off your right index finger. At the end of this step, you should be holding a loop of yarn in your left hand with the loose end crossing above the working end.
- Insert your right pointer finger and thumb up through the bottom of the loop to the top.
- With your right fingers, grab the working yarn from above.
- Pull the working yarn through the loop you’ve created. You’ll have a loose knot.
- Put the knot on your crochet hook and tighten the loop until it fits securely. You’ll end with a loop of yarn knotted around the hook with a couple inches of extra yarn on the loose end.
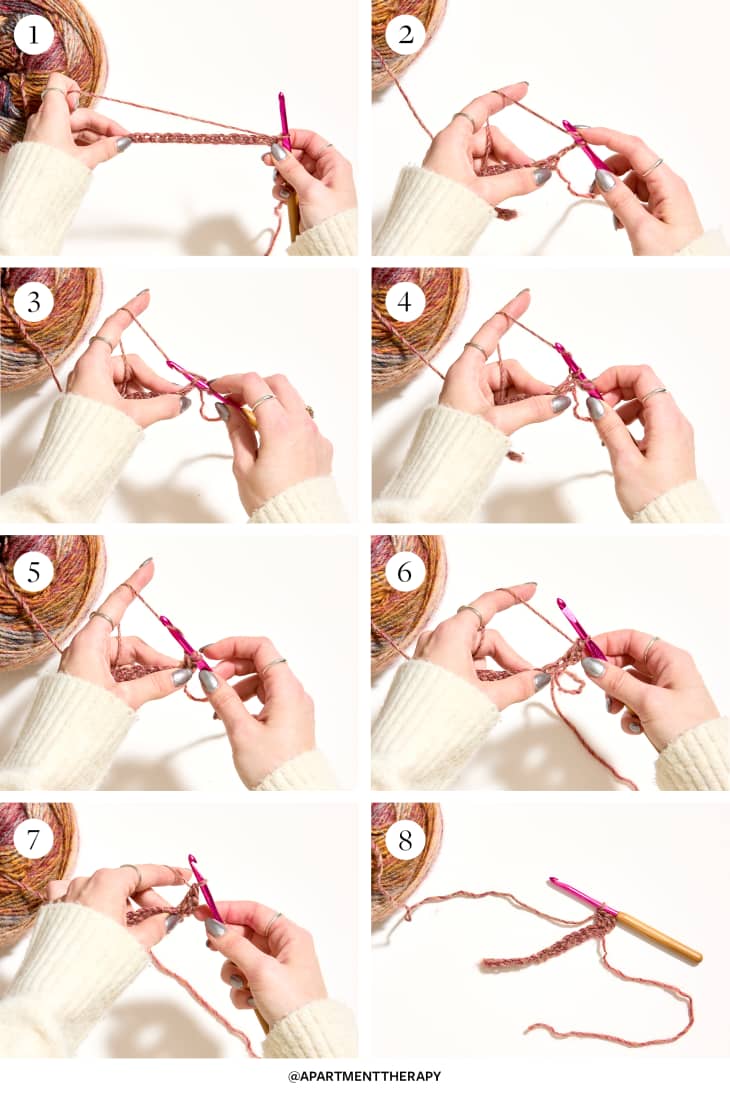
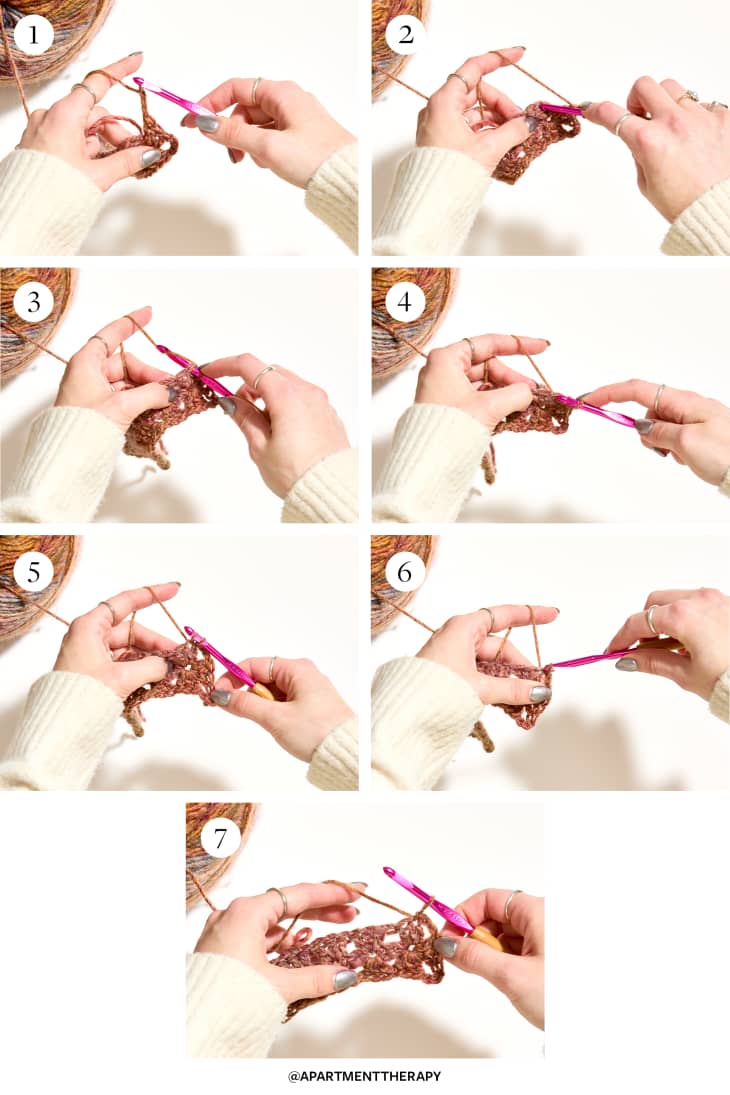
How to Crochet a Chain Stitch
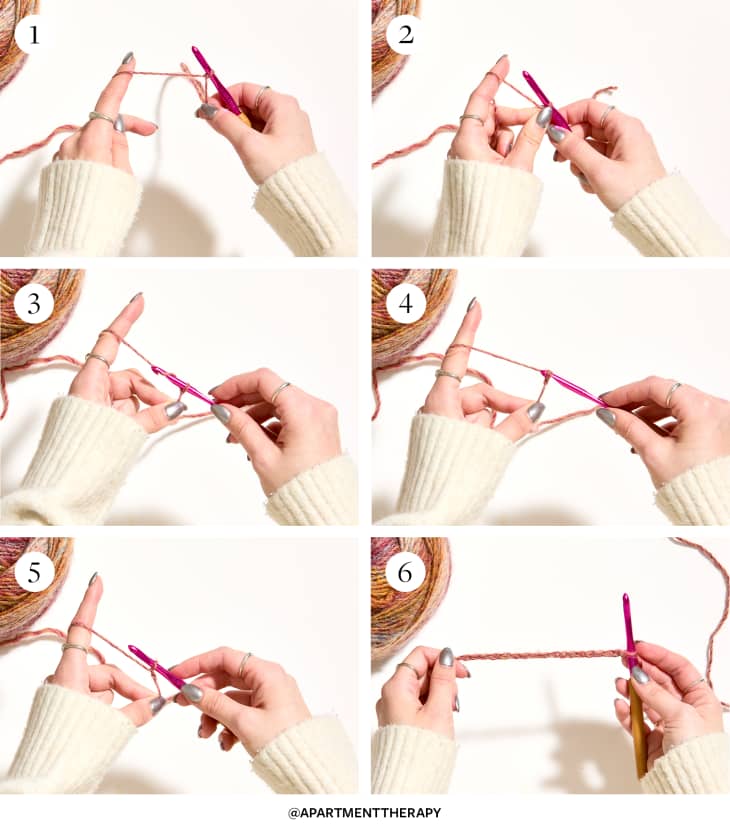
Your blanket will start with a row of crochet chain stitches. Here’s how you’ll create them.
- Hold the crochet hook and the loose end of the yarn in your right hand. Pull the working yarn taut with your left pointer finger.
- Pinch the base of the slip knot with your left thumb and middle finger to keep it from sliding off the hook.
- Next, you can pull the yarn over the hook in one of two ways: either by wrapping the working yarn around the hook using your left pointer finger, or wrapping the hook under the working yarn on your left finger. Choose whichever way feels easier to you! This step is called a “yarn-over” and is labeled as YO in crochet patterns; you’ll see it labeled that way below, too.
- Grab the hooked yarn and pull it through the yarn loop that’s around the hook, slipping that loop off.
- You now have chain 1. Repeat 15 times, so you have a chain of 16 links.
- Once you have 16 links, chain one more. You should now have a total of 17 chains — the last chain stitch, which is on the hook, will be your first single crochet in the foundational row.
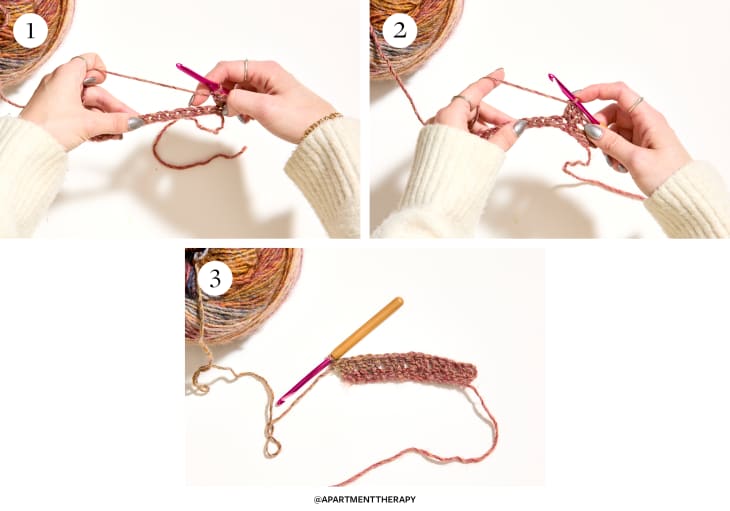
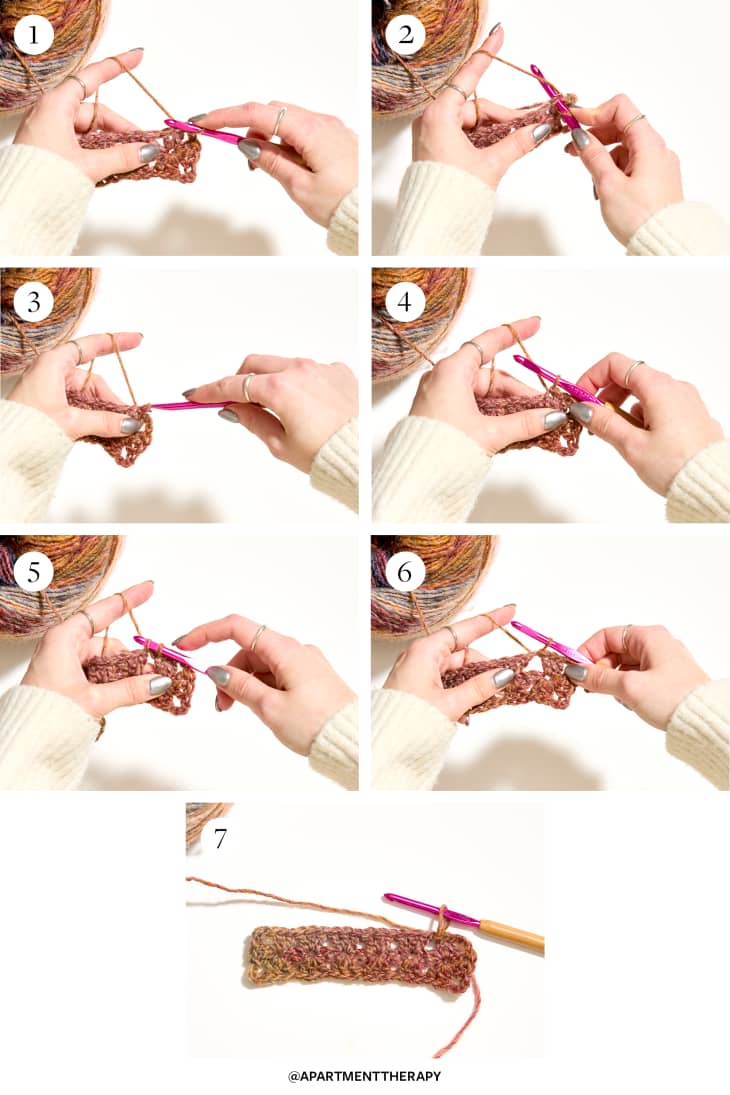
How to Crochet Your Foundational Row
Once you have your chain of 16 + foundational 1, you’ll need to stitch a single crochet (SC) into each of the chain stitches you’ve made to create your foundational row. Here’s how.
- Count two chains in from your hook (remember, the loop that’s currently on the crochet hook doesn’t factor into this number). The second chain from the hook should be the 16th chain. You’ll be “working into” this chain, which means you’ll be crocheting a stitch into it. Insert your hook through the chain from front to back. You will have two loops visible on your hook.
- Yarn-over (YO) just as you did above, and grab the working yarn with the crochet hook.
- Pull the loop back through the chain stitch. You should end this step with two loops on your hook.
- YO again by pulling the working yarn over the hook from right to left (or by wrapping the hook under the working yarn). Grab the yarn with the crochet hook.
- Pull the yarn through both loops that are on the crochet hook, pushing them off.
- You should end up with one loop still on the hook. You’ve just completed your first single crochet (SC).
- Repeat that single crochet stitch into each chain stitch, 15 more times, until you reach the end of your first chain.
- When you reach the end of the chain, your foundational row is done!
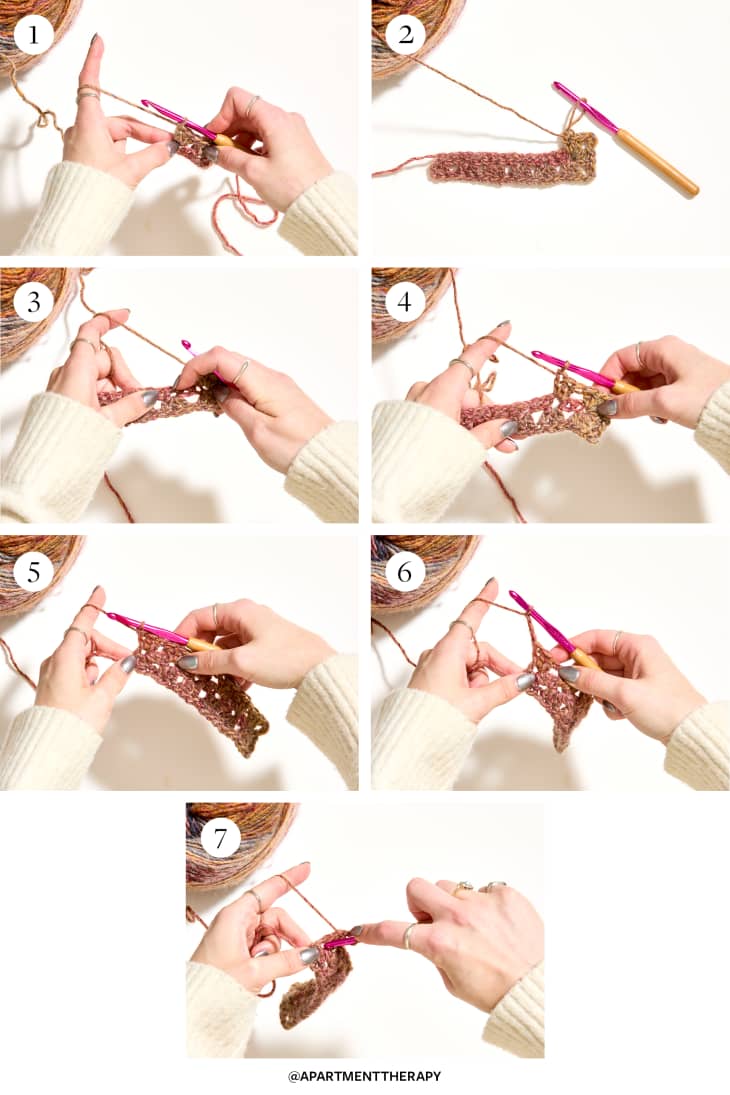
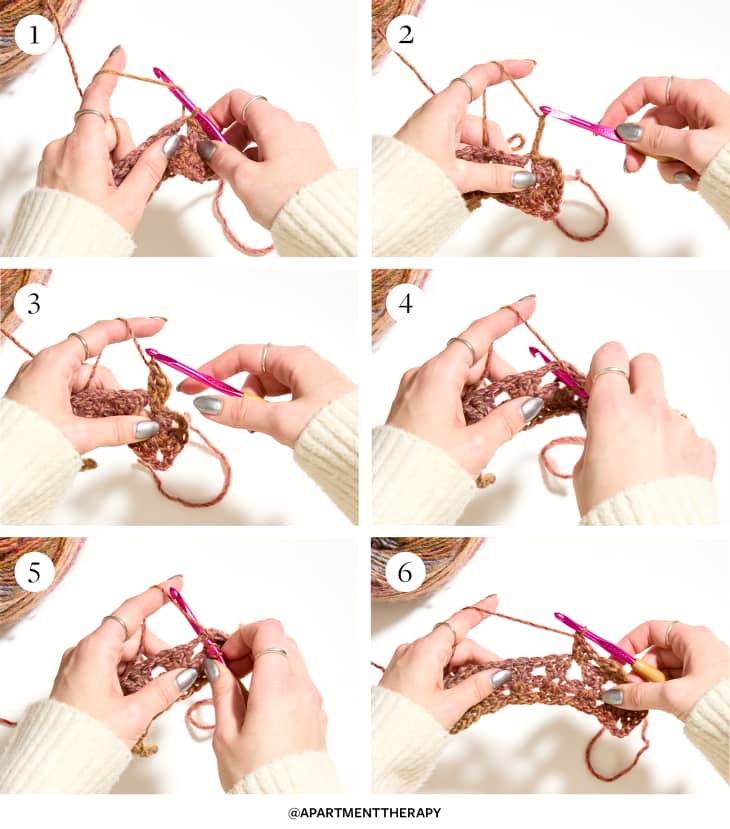
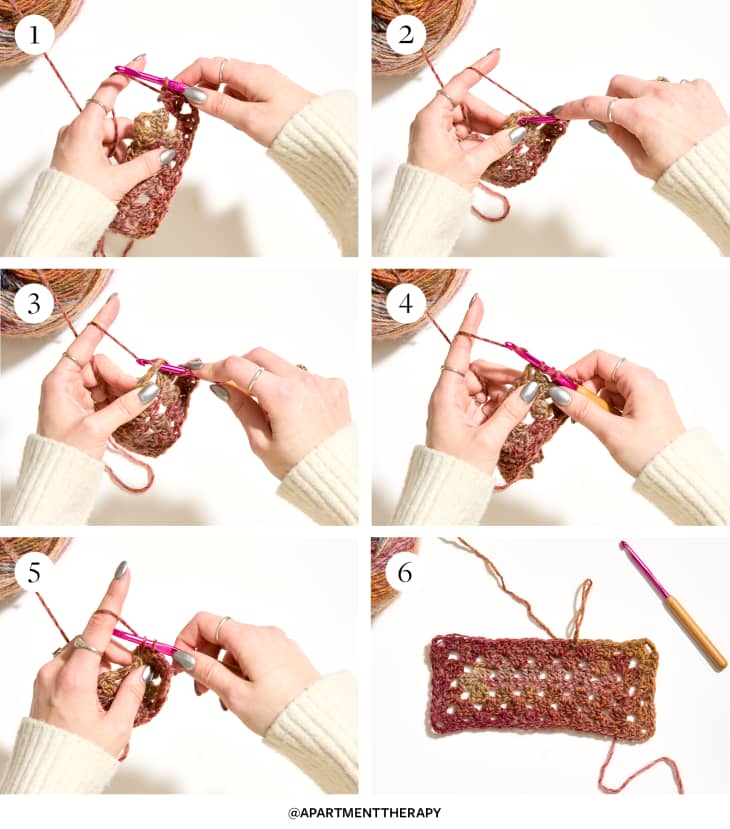
How to Crochet a Granny Cluster
This blanket is built on the granny cluster or granny stitch, which is repeated over and over to create a checkerboard-like pattern. A granny stitch is made using three double crochet (DC) stitches all worked into the same spot. Here’s how to crochet your first granny stitch.
- Keeping your yarn on the crochet hook, turn your work so that your foundational row is on the left side of your crochet hook. The yarn tail from the original slip knot will be on your right.
- Start by chaining three. If you need a refresher, see the How to Crochet a Chain Stitch section above. Then, begin your first double crochet (DC) stitch. For this, yarn-over (YO) again so that the crochet hook has two loops on it.
- Insert the hook (with its extra yarn loop) from front to back into the first single crochet (SC) stitch of your foundational chain. You can tell the SC stitches apart from the chain stitches you worked into last time by looking at the shape on your hook. When you insert your hook into an SC stitch, it will create a “V” shape. The working end of the yarn should be behind the chain of stitches. YO again with the working yarn, and pull through.
- You should have three loops on the hook now. YO again and pull through the first two loops only.
- You should now have two remaining loops on your hook, just like you did with the SC stitch. YO one more time and pull through the final two loops.
- Now you have a double crochet (DC) stitch! Stay in the same spot for the next stitch; you’ll repeat the DC stitch one more time to complete the granny cluster.
- Now, “working into” the same SC stitch from your foundation row, repeat this process.
- You will end with a cluster of two DC stitches plus your chain of three all coming from the same “link” in the chain. That’s your first granny stitch!
How to Crochet Your First Row
- Count three chains down from where you are to find where you should start your next granny stitch. (You’ll skip two chains, and work into the third.)
- Double crochet (DC) three stitches into this spot. You’ll be making three total DC stitches in each granny cluster from now on. (In the last step, the starting chain of three counted as one of the DC stitches.)
- Repeat this process — count every third chain and then DC three times into that same spot — until you get to the very end of the row. You should have six granny stitches now!
How to Turn the Corner and Crochet the Other Side
To create the rectangle shape of this blanket, you’ll need to turn the corner once you get to the end of your first set of granny stitches, then create another line of granny stitches on the other side. Here’s how.
- Once you reach the end of the row, you’ll need to create a corner. You’ll be working into the same single crochet (SC) where you ended the last granny cluster.
- To create the corner, start with a chain of three. Work another granny cluster — that’s three sets of double crochet (DC) stitches — into that same single crochet (SC) where your last granny stitch of the row was. To make the next corner, chain three again. Make another granny cluster with three DC stitches worked into that same SC again. You’ve now turned the corner and are creating granny clusters on the opposite side from where you started.
- Now, we’re working back down the other side. Skip two SC spaces and work a granny cluster into the third. This granny cluster should be in the same space as the one opposite it.
- Continue this pattern, working a granny cluster into each third SC, or in the same SC as the granny cluster opposite it.
- At the end of the row, you will have aligned granny clusters on both sides of the rectangle. It’s time to create a corner again.
- Chain three.
- Then, work one more DC stitch into the same SC space where you ended your last granny cluster. Now you should have a total of three granny clusters in the first and last stitches of your foundational row.
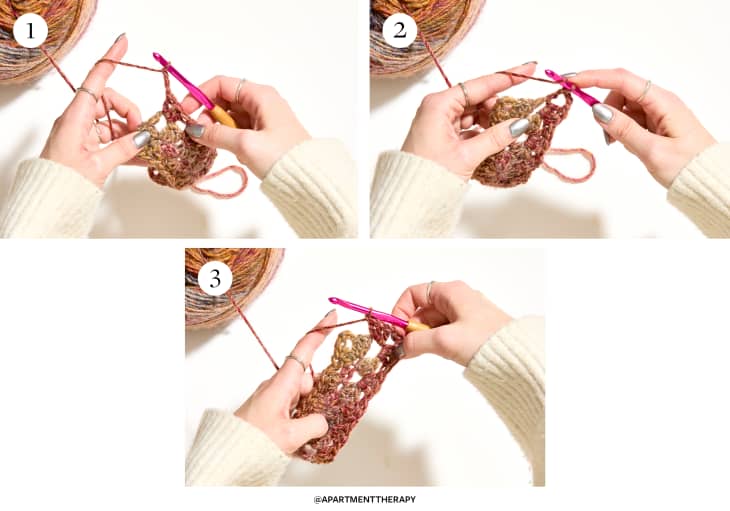
How to Close off the First Rectangle with a Slip Stitch
The final piece of the first round of granny stitches in this blanket is closing the rectangle up so you can begin the next row. You’ll do this using a slip stitch. Here’s how.
- Now, you’ve just completed the last granny cluster of the round. Just like you did for the corners, chain three.
- Insert your crochet hook into the first stitch of the rectangle — or the top of the first double crochet (DC) of the first granny cluster — from front to back.
- You should be able to see the “V” shape on top of the stitch on your hook — that’s how you’ll know you’re in the right spot. Yarn-over (YO).
- Pull through.
- You’ll have two loops on your hook at this point.
- Now you’ll keep going and pull the first loop right through the second one, “slipping” it off the crochet hook. That’s a slip stitch.
- At the end of this process, you should have only one loop of yarn left on the hook, and the two pieces of the rectangle should be connected.
How to Start a New Row
Now that the two sides of the first rectangle are connected, you’ll need to create the transition to start the next row. Here’s how.
- For the next row of granny stitches, instead of working into the stitches directly below, you’ll be working into the chain spaces (CH SP). These are the wide open spaces left between each granny cluster. Locate the first CH SP of the row; it’s the one next to the space where you added your most recent stitch. The next couple of stitches are designed to move you to that spot.
- You’ll do that by creating two more slip stitches, like you just did to connect both sides of the round. Start by inserting the hook front to back into the stitch directly next to it, or the top of the second DC in the granny cluster. Yarn-over (YO).
- Grab the yarn and pull through. Just as before, instead of completing a single crochet (SC), you’ll pull the first loop of yarn all the way through the second one (slip stitch).
- At this point you’ll have just one loop on your crochet hook again.
- Repeat for the final stitch of the granny cluster you’ve been working in. Push the hook through, front to back; YO; pull through.
- Pull the first loop through the second one, “slipping” it off the crochet hook. You’ve completed the final slip stitch needed before you start your next round of granny clusters.
How to Make the Second Round of Granny Clusters
It’s time to begin the next round of granny clusters. These will be worked into the spaces staggered between the granny clusters of the first round, giving a checkerboard effect. Here’s how to do it.
- Begin with a final slip stitch into the chain space.
- Chain three.
- Working into the gap between the granny clusters, create two double crochet (DC) stitches. That’s your first granny cluster of round two.
- Work into the next chain space (CH SP) gap between clusters, pushing your hook in from front to back.
- Create three DC stitches this time to form the next granny cluster.
- Repeat until you get to the end of the row.
How to Turn the Corner on the Second Round
Turning the corner on the second round is just like turning the corner on the first. Here’s what to do.
- Chain three.
- Create three double crochet (DC) stitches in the same space where you anchored your last granny cluster.
- Once that middle cluster is complete, chain three again.
How to Crochet the Other Side of the Second Round
- This time, you’ll need to crochet two granny clusters before you turn the corner, as the rectangle is bigger. Locate the space where this next one should go. You’ll need to create three double crochet stitches (DC) here — here’s a refresher.
- Yarn-over (YO). Insert hook into this space, front to back.
- YO.
- Pull through. You’ll have three hoops on your hook.
- YO. Grab the yarn, pull through, and slip the top two stitches off. YO again. Slip the two stitches left on the hook off. You’ll end with two loops on the hook. YO. Slip the two loops off the hook. That’s one DC. Repeat two more times to create a granny cluster.
- Chain three, then repeat another granny cluster in the next open gap. Continue this pattern until you reach the end of the row, then repeat the corner steps before using a slip stitch to join the pieces of the rectangle and begin a third round. Repeat until you have a blanket in your desired size.
Once you’ve reached a stopping point, you’ll do a few more slip stitches to secure your blanket. Then, cut the working yarn so that you have a few inches of tail. Use your yarn needle to weave the yarn into the blanket and hide the cut end.