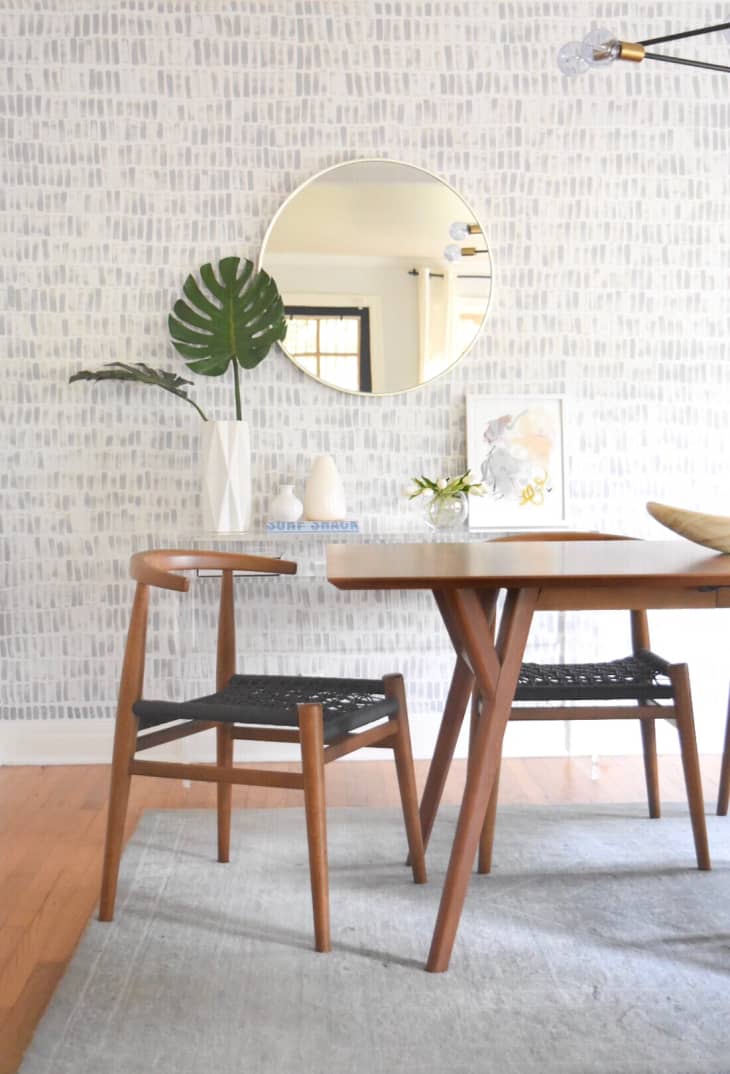
DIY Handpainted Faux Wallpaper: Easy & Beautiful, Even on Textured Walls

Meet Katherine Freeman Hocke, a Texas-based artist who specializes in mixed media, layering textures and colors to get her signature look. While she primarily practices her art on canvas and paper (check out her shop here), with her recent purchase of a 1930s home she has begun translating her painterly visions and passion for interiors into DIY-able projects in and around her home.
I don’t know about you, but I have been on a total wallpaper kick lately, and this project was the easiest two-hour masterpiece that I have ever created. With our home being built in the 1930s, our walls are textured making it nearly impossible to apply self-adhesive wallpaper – and yes, I tried. Therefore, I decided to create my own faux wallpaper accent wall for my dining room. Not so artistically inclined? Not a problem. This tutorial is simple, and with a few helpful tricks you’ll be well on your way to transforming your space one blank canvas (or rather, blank wall) at a time.
What You’ll Need
- Flat 1-1/2 inch paintbrush
- Paint roller
- Paint pan
- Paint cup or container
- Paint & primer of your choice, for wall color
- Paint & primer of your choice, for pattern color
- Painters tape for walls
- Ruler or straightedge
- Painters cloth or plastic floor covering
- Ladder or step stool
- Pencil
Step 1. Paint Your Base.
Since I did my hand painted wallpaper as an accent wall, I started by taping off the corners and baseboards of the room so I only got paint on the actual wall where I wanted it. If you want to be extra cautious, put a painter cloth or plastic floor covering down before you start painting. I then began painting one coat of plain white primer as my base, and gave it ample time to dry. You might not want a white background; it’s whatever you like best, and whatever suits your unique space.
Step 2. Add Your Pattern.
After your base layer is dry, grab your second paint color and flat paintbrush. If free-handing an entire wall scares you, you can use your ruler or straightedge to plot out 12-by-12 inch areas. Each line will be about 2 inches long. Make sure as you’re painting your strokes, you paint some lines top to bottom, and others bottom to top, to make sure that you are creating a more worn in and organic pattern. That also means you shouldn’t re-dip your brush for each stroke. It looks best when the paint on your brush starts to run out before you go back for more. It’s okay if your lines aren’t perfect – they look better that way anyway!
FAQs
How did you get your rows of lines so straight?
I did it free-hand; however, if you want to measure off certain areas with a ruler you can always do that. The key is to focus on one square-area at a time. For example, I started painting my pattern from bottom to top, beginning in the bottom left hand corner, painting a 12-by-12 square area, and then moving to the right after each square was completed. I continued to do the same onto each row above until the wall was completed.
How long did this accent wall take?
Outside of painting the base layer and drying time, the pattern took altogether about two hours. For larger walls or full room, expect to tack on a few extra hours.
Like this look and want to see more Do-It-Yourself ideas for your walls? Let us know!
Thanks to Katherine for sharing her expertise, and her tutorial! To see more of her work, or to purchase one of her art pieces, visit kforiginalart.com.
