
Here’s What You Need to Know About Painting Your Cabinets

Sometimes, all it takes to feel like you have a totally new space is a little color. If spending a lot of time at home has you considering your kitchen’s possibilities, a new coat of paint may be just the thing you need. And while painting kitchen cabinets may sound a little more intimidating than, say, painting a plain old wall, we’ve got some expert tips for making it more manageable. Plus, see how a new coat of paint can transform this standard-issue kitchen into something really spectacular.
Regardless of what color you might go with, the secret to making it look its best is to start with the right primer. KILZ® Brand primers will ensure that your cabinets deliver color the way you envision it for a kitchen you’re happier with for a long time. KILZ® Kitchen & Bath Primer is designed for surfaces in high-humidity and moisture-prone environments, creating a mildew-resistant film that protects the primer from mildew growth. It also offers excellent adhesion and blocks most medium to heavy stains.
We spoke to Josh Wiener, professional builder and president of NYC contracting firm SilverLining, to find out what you need to know about painting your kitchen cabinets.
AT: How long should you plan on painting your cabinets to take?
JW: It should take a week to do properly. Here’s how your week may look, roughly:
• Day 1: Prep your kitchen and work area. Protect all the surfaces around your cabinets; remove hardware from your cabinets; lightly sand your cabinets so they’ll have a good grip.
• Day 2: Fill in any dents with wood putty and then prime your cabinets. You can paint your first coat today once your primer is dry.
• Day 3: Paint the second coat.
• Day 4: Return your hardware to the dry cabinets. Don’t reinstall your cabinets today, though; let them hang out for about 12 hours (overnight) so they are thoroughly dry — even if you’re using paint marked as “fast-drying.”
• Day 5: Reinstall your thoroughly dry cabinets.A note for this kitchen: These cabinets are high, and the underside is exposed, so don’t forget to paint the bottom. That’s a good rule in general for a more finished result.
AT: If you’re doing the job yourself, what materials do you need?
• construction paper to protect floors
• painter’s tape
• screwdriver to remove hardware
• sandpaper: different levels, rough to fine
• wood putty to fix dents
• small paint buckets: so you don’t have to carry cans around your job site
• paintbrushes: one for primer, one for paint; more if you’re working with other people
• paint
• primer
• a paint cleaning product to clean splatters
• garbage bags
Now that you’re ready to tackle the job, there’s still a big question: What color should you paint your cabinets? Color is a deeply personal thing and has a lot to do with your space. With that in mind, we will show how a kitchen with a relatively common color scheme (warm wood cabinets, beige walls) could be transformed by the addition of a little color (and, in this case, tile). For color advice, we turned to Architectural Color Consultant Amy Krane, founder of Amy Krane Color.
AW: This kitchen’s key features are the glossy white subway tiles, the white farm sink, and the pale earth tone floor. Since all the walls are tiled, we’re focusing here on the color of the cabinets.
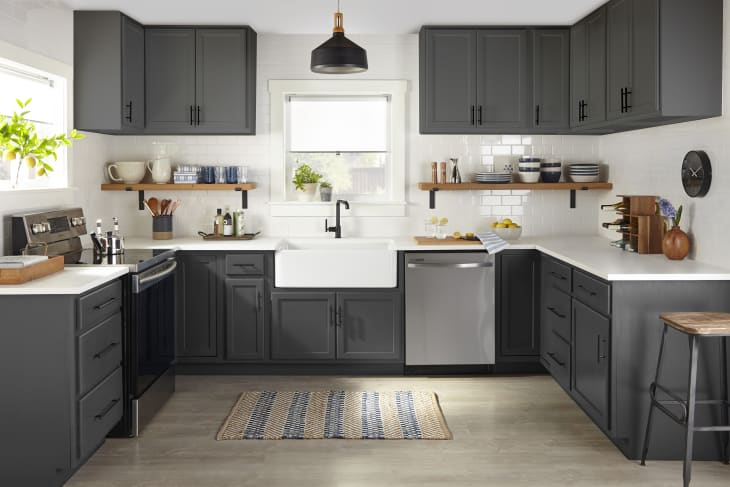
Option 1
Here we work with the classic black-and-white palette, but the twist is that the black is not stark — it’s an “almost-black.” The dark cabinets acknowledge the matte black light fixture, and the window trim is white. Simplicity reigns.
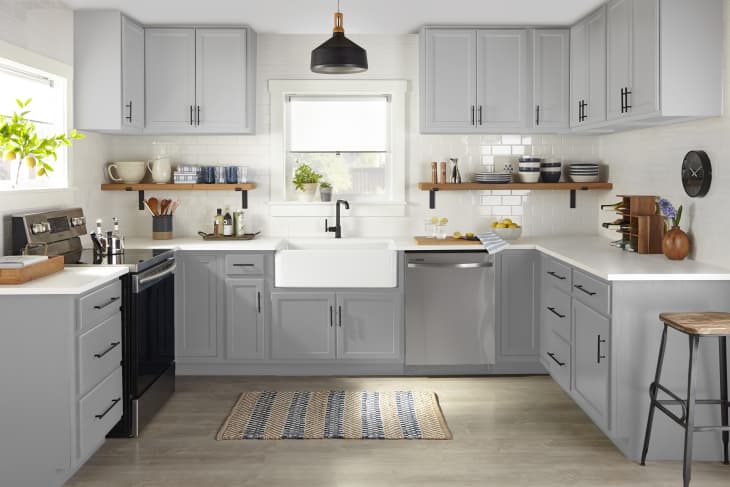
Option 2
Here, a mid-toned gray creates a softer look and feel as we mix light neutrals with the browns in the floor. The window trim is white.
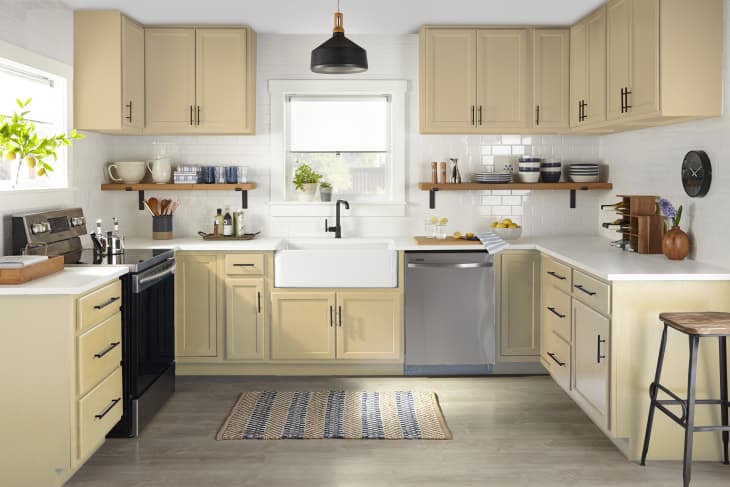
Option 3
Cabinets: Pale Ale by KILZ Complete Coat®
Trim: White Wing by KILZ Complete Coat®
We add warmth to the kitchen palette using a saddle tan on the cabinets for a less mono-toned effect. We create a blend of woody tones as we combine the natural hues of the wood shelving, the floor, and the cabinets.