
A Boring Kitchen Gets a DIY Update with Nancy Meyers Vibes — for Under $6,000
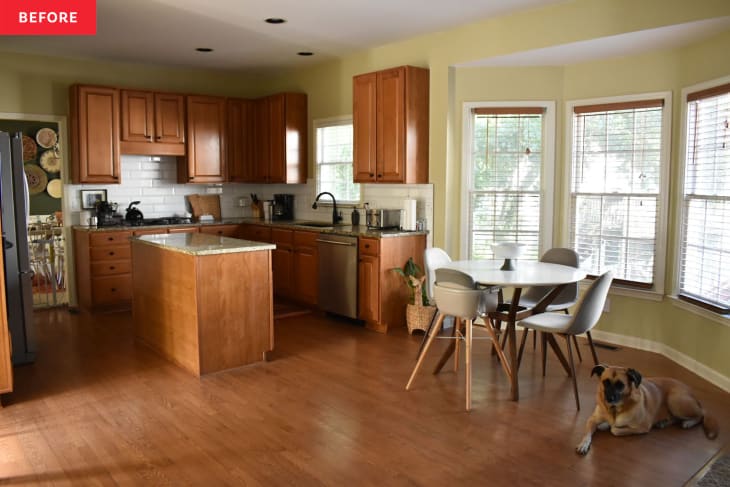
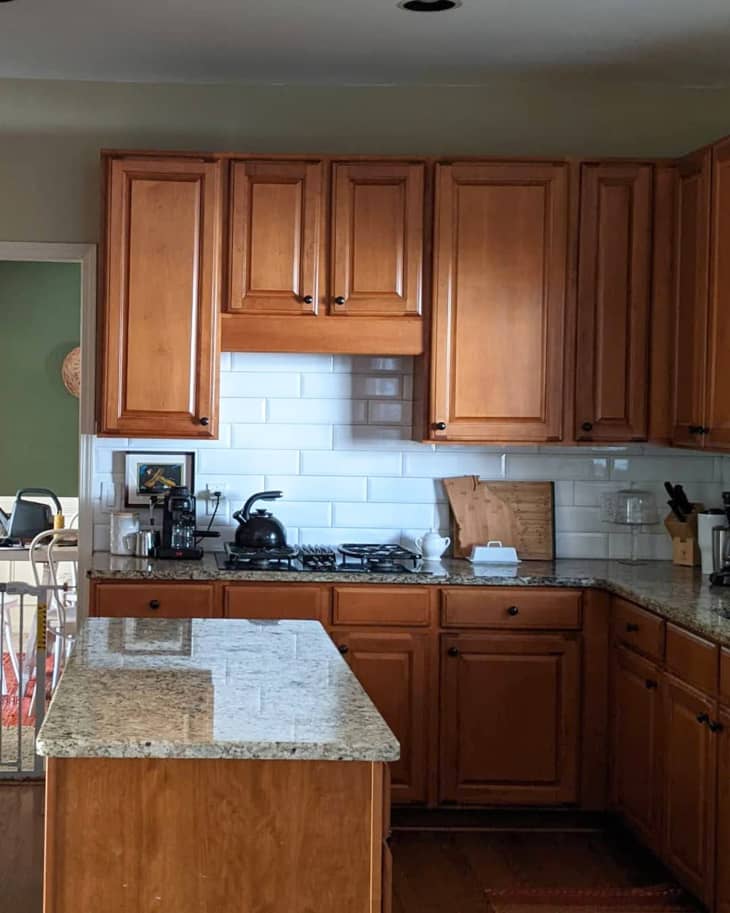
When Lauren Comer and her husband, William, purchased their home in 2017, she had a very obvious least-favorite room: the builder-grade kitchen. The honey-oak cabinets, speckled countertops, and brown wood floors made the whole space feel, well, brown. “I was like, ‘I hate this kitchen, but it’s the center of the home,’” recalls Comer, who runs a DIY blog called Pinch Plate Party.
The kitchen renovation would have to wait, though. The couple had stretched their budget to the max to buy the home, so it would be a couple of years before they saved up for a renovation. Lauren made a few quick changes to the 265-square-foot kitchen just to make it livable in the meantime. She knocked out the travertine backsplash and put in simple 12” x 4” subway tiles to make the space look less like a “brown mess.” After that, she completed a few other projects around her home, including a big laundry room update, before she was finally able to turn her attention back to the kitchen for a total redo last year.
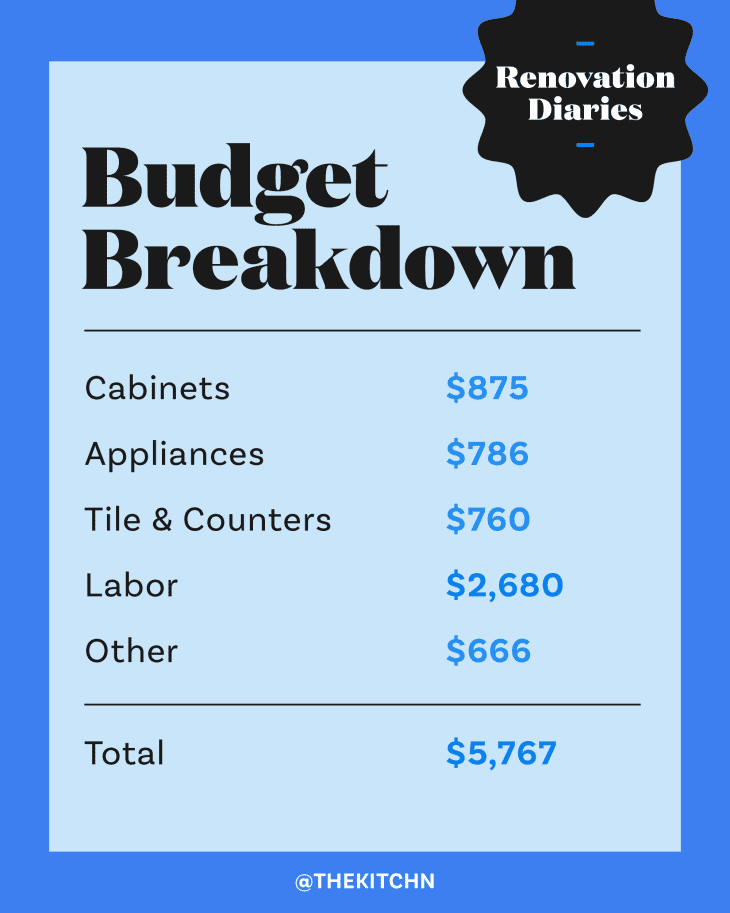
See the couple’s full budget breakdown:
This DIY Blogger Created Her Very Own Dream Kitchen for Less than $6,000
By the time Lauren and her husband had saved enough money to start their big project, they had been selected to participate in the One Room Challenge event for bloggers and Instagrammers. They used the challenge as a motivator to get the job done. The timing was spot-on. “There was a very big shift in kitchen trends,” Lauren says. “So, I thought it was a good opportunity to shift my kitchen to be trend-forward.” Plus, after tackling a bunch of other home projects, she felt like her DIY skills were more than ready!
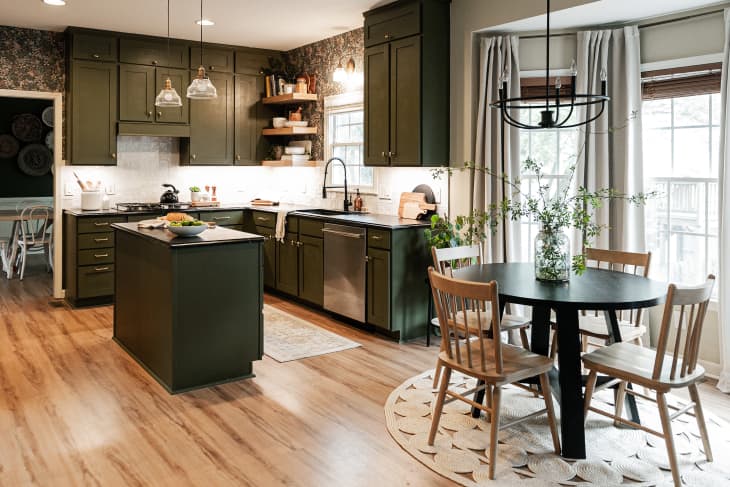
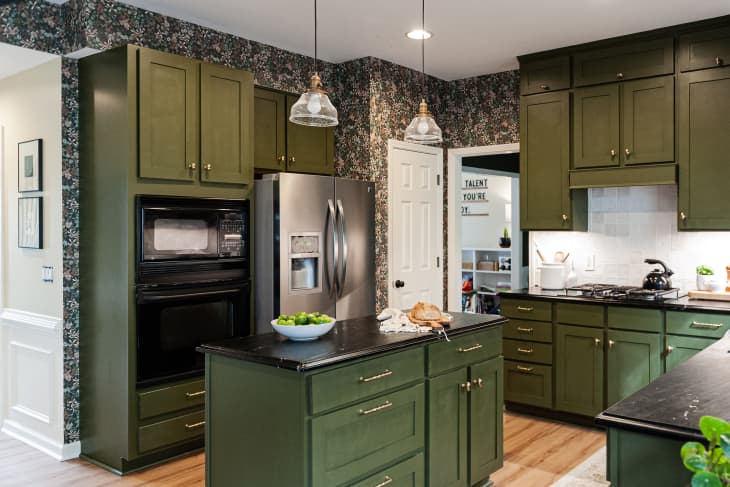
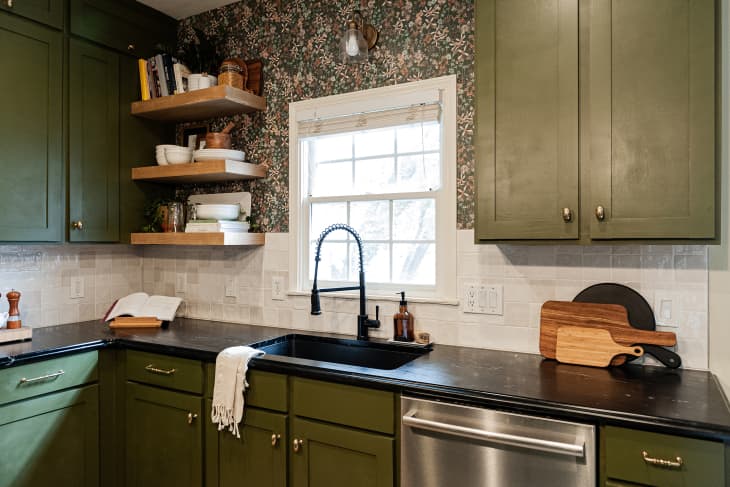
Lauren started the process by getting her design together. She knew she wanted the cabinets to be green, specifically a shade similar to Behr’s Fig Tree, which she used to paint her dining room. Lauren pinned shots of her favorite green kitchens, such as Instagram posts from deVOL Kitchens and Heidi Caillier Design. After searching, she created a mood board, bringing together all of her design wishes, such as green cabinets, soapstone counters, elegant gold hardware, and square backsplash tiles.

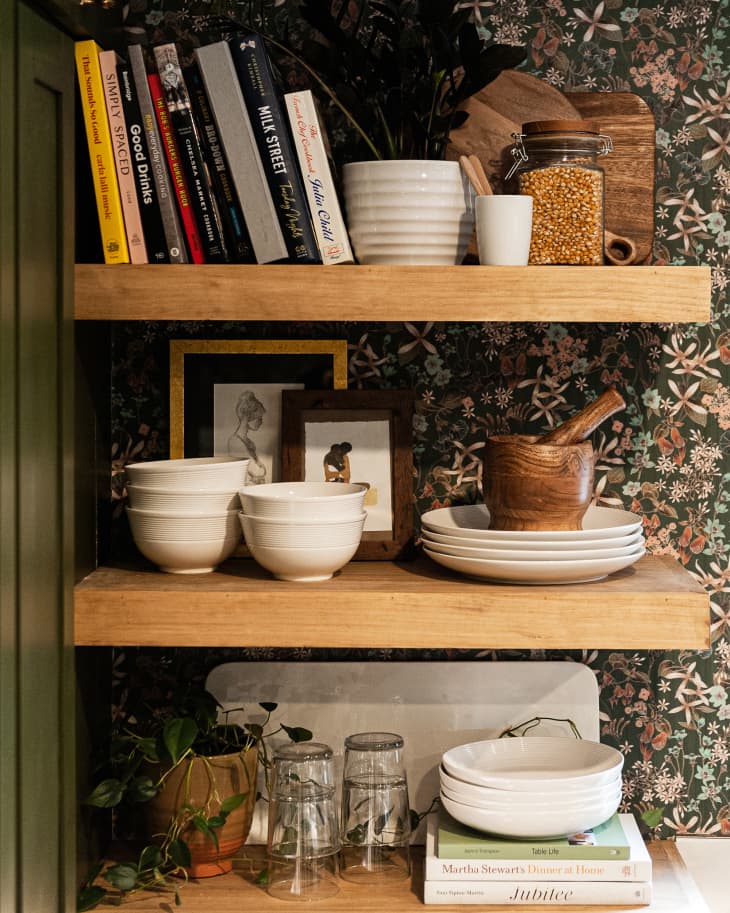
She decided to keep the kitchen’s original footprint, but make cosmetic changes to pretty much everything else. Lauren knew she wanted to extend her upper cabinets to the ceiling, install new cabinet doors, add open shelving, replace the flooring, and wallpaper the space. So, yes, she had major plans ahead!
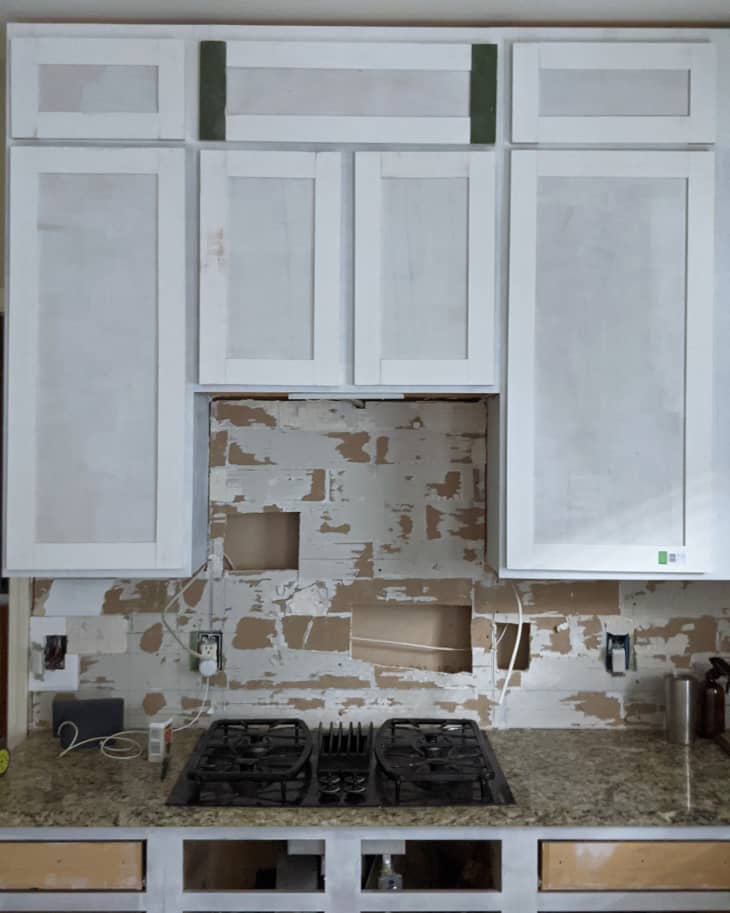
First up was demolition. In just one weekend, Lauren ripped out the white subway tile she had eagerly installed four-and-a-half years earlier. She also removed one of the upper cabinet boxes to make way for open shelving. She faced her first major issue when she went to pull up the flooring. The planks were glued to the floor. Like, really glued stuck. Lauren ended up hiring a professional to tear the flooring out, which took extra time (and money).
Lauren’s Renovation in 13 Simple Steps
- Step 1: Demo the tile and cabinets.
- Step 2: Hire a pro to demo the floor.
- Step 3: Find an electrician.
- Step 4: Build the upper cabinet boxes.
- Step 5: Install the vinyl flooring.
- Step 6: Finish the cabinet doors.
- Step 7: Put up the wallpaper.
- Step 8: Get the countertops and sink in.
- Step 9: Start on the backsplash tiles.
- Step 10: Add floating shelves.
- Step 11: Attach the under-cabinet strip lighting.
- Step 12: Install molding and baseboards around the new floors and the top of the cabinet boxes.
- Step 13: Replace cooktop glass.
Once the flooring was removed, Lauren called in a professional electrician to move the wiring (the original design had tons of can lights that felt more like stop lights). The electrician set up wiring for under-cabinet LED lights and the black chandelier Lauren chose to go over the kitchen table. “I always knew lighting was important, but I didn’t realize how important it was until mine was put in. When I turned on my lights for the first time in that kitchen, it felt like a Nancy Meyers kitchen,” she says, referring to the filmmaker known for placing her protagonists in fabulously designed dream kitchens.

While the electrician was working, Lauren got to work on the upper cabinet boxes herself. The kitchen, at that point, had upper cabinets that stopped about a foot before the ceiling. So in order to extend their heights to the ceiling Lauren built her own boxes out of pine boards she had cut at The Home Depot. Her secret to getting it done? She learned how to do it by watching hours of YouTube and TikTok.
Lauren ended up replacing her tricky wood flooring with vinyl stone plastic composite. She says, “When I went from engineered wood to luxury vinyl, some people were upset, but we have a dog and kids and we needed something that could hold up to the chaos!” Simultaneously, she also kept working on her Shaker-style cabinet doors. In total, Lauren built 42 cabinet drawers and door fronts herself!

She then hand-painted the cabinet boxes green, which she matched to her dining room using Sherwin-Williams’ color-match service. For a finishing touch, she decided to spray paint the cabinet doors and added gold Emtek pulls and knobs.

Read more about Lauren’s decision to do everything on her own:
3 Things This DIYer Would Change About Her Kitchen Renovation
Lauren had never installed wallpaper before, but with help from her dad, she was able to deck the walls in a detailed, floral Milton & King print. “He came over and showed me how to match up the seams and hide issues,” Lauren says.
Once that was done, she was able to install the countertops. Lauren dreamed of having soapstone, but when the original stone company flaked on her, she feared she’d have to give it up. Luckily, she was able to find other options at The Home Depot, and the store was able to get it delivered within five weeks … but unfortunately, it arrived broken. Because she was under a time crunch (the big reveal for her One Room Challenge was due soon) she had the broken slab epoxied by The Home Depot team so that she could get to the backsplash tile (which could only happen after counters went in). Once things settled down, she later had the countertop finished with the new, intact replacement.
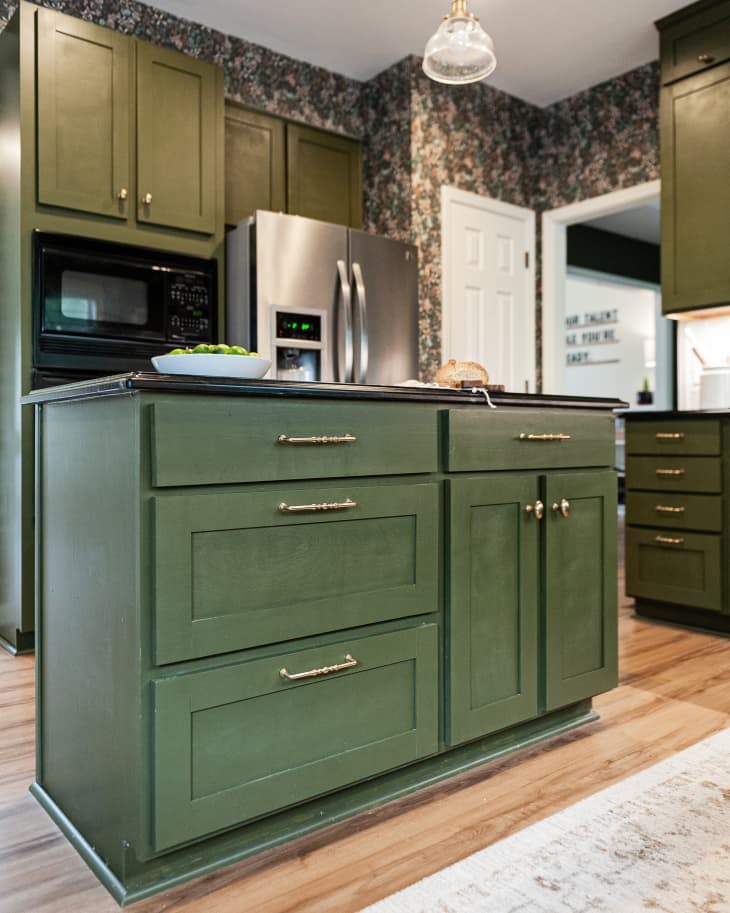
Lauren had done tiling work in her in-laws’ kitchen, so she felt pretty confident and had no trouble installing square white, glossy tiles from The Tile Shop on her backsplash. She added floating shelves, under-cabinet lighting, and a new single-bowl quartz sink from Elkay to finish off the look. After adding molding and styling, the kitchen was finally complete. And surprise — Lauren did the whole thing in just over two months!

Thanks for sharing, Lauren!
This post originally ran on The Kitchn. See it there: Before & After: A Boring, Builder-Grade Kitchen Gets a DIY Update with Nancy Meyers Vibes