
Martha Stewart’s Elaborate 6-Step Method Is the Best for Removing Red Wine Stains
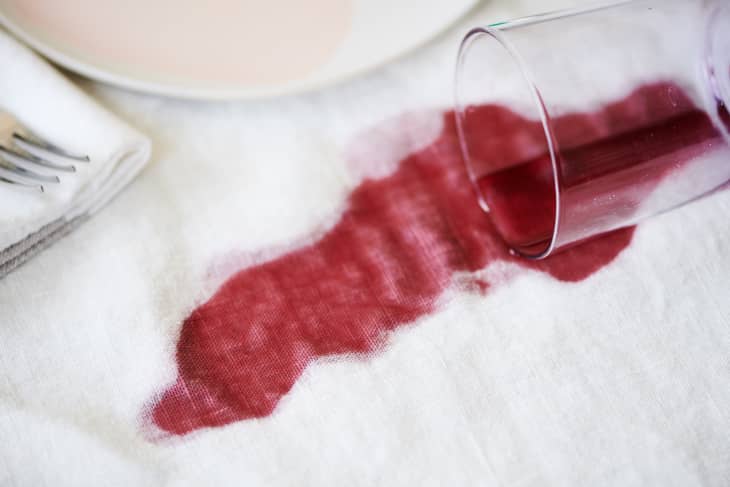
Martha Stewart is known for so many things — and she’s good at every single one of them. Why is everything she touches absolute perfection? Because Martha isn’t just a person — she’s a trusted brand, and her name equates to “perfection.” So when I set out to test the most popular red wine stain removal methods, I knew hers had to be on the list.
As I skimmed over her process for removing red wine stains from fabric in the 2006 book Martha Stewart’s Homekeeping Handbook, I noticed that there were six cleaning agents I needed to have on hand to test. I’d anticipated a pretty thorough process, but this seemed over the top — even for Martha! Nevertheless, I piled all the recommended cleaning agents into my cart and headed home to my laboratory (er, laundry room) to see how her test fared.
What You’ll Need
- Dishwashing soap
- Water
- Spray bottle
- Soft-bristled brush
- Vinegar
- Hydrogen peroxide (if needed)
- Ammonia (if needed)
- Enzyme detergent, such as Persil
- Powdered non-chlorinated color-safe bleach, such as sodium percarbonate (if needed)
How to Remove a Red Wine Stain Using Martha Stewart’s Method
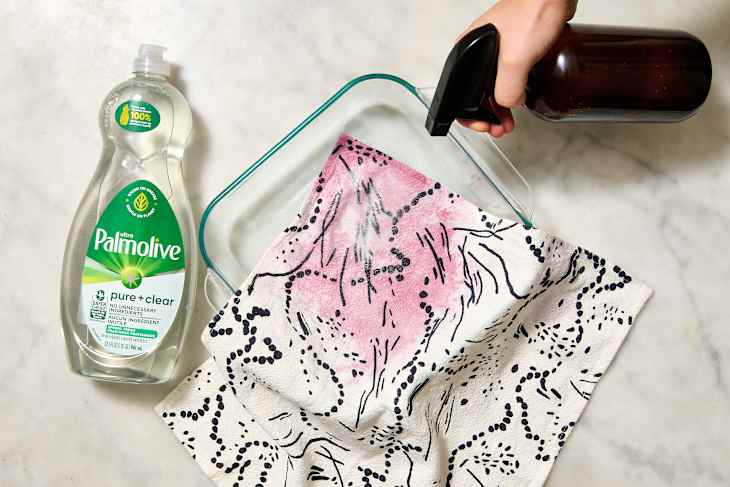
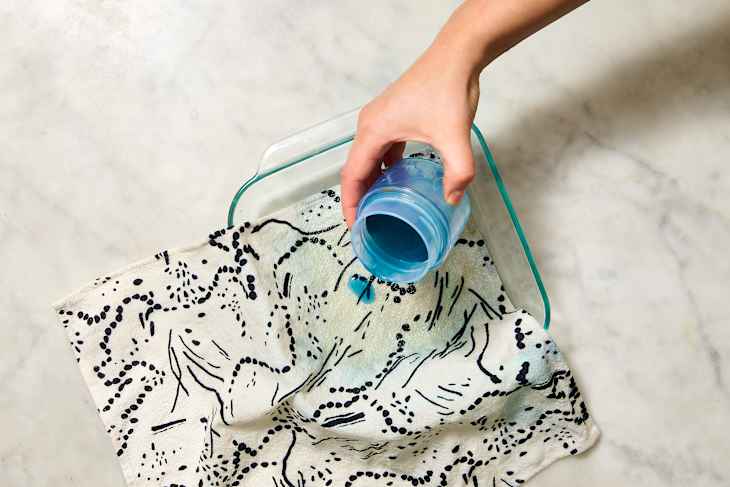
Step 1: Spray the stain with a dishwashing-soap solution.
The first step of the removal process seemed simple enough. I filled my spray bottle with exactly 10 ounces of water and measured out a tablespoon of Pure + Clear Palmolive; I sprayed the solution onto the stain and tamped with a soft-bristled brush. I then flushed with water and surveyed the stain — and I was not impressed with the results. The stain had lightened, turning a darker purple, less pink color, but it was obvious I’d be doing a lot more than spritzing water and soap to get the stain out.
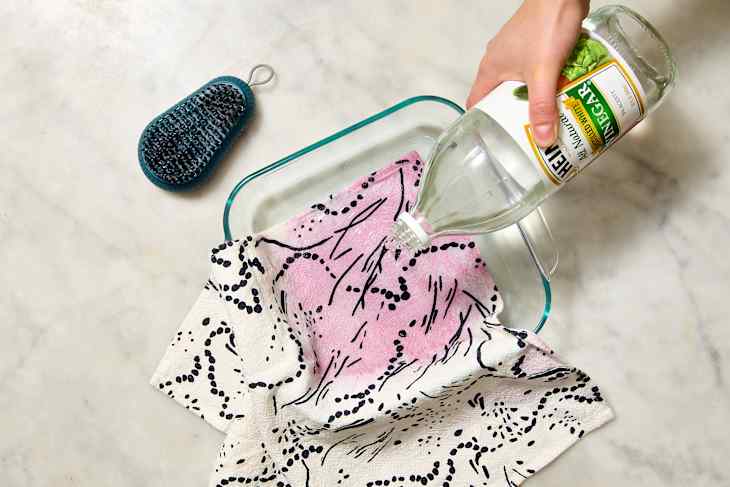
Step 2: Apply vinegar.
This next step was a bit of a head scratcher. I’ve used vinegar to remove odors from fabric, and also used vinegar to set the color when dyeing fabric. But Martha told me to, so I proceeded. I let the vinegar soak into the fabric for 20 minutes and then flushed with water. It seemed to make the stain brighter, taking it back to a fuchsia color. I was definitely going to need to proceed to the next step.

Step 3: If the stain persists, use hydrogen peroxide.
Whew, I knew hydrogen peroxide meant business. I had faith in hydrogen peroxide (and Martha) so I placed the stained fabric back in the shallow dish and poured out just enough peroxide so that it covered the stain entirely. I let it sit for 15 minutes (which might be 10 minutes too long if you’re dealing with a finer fabric) and then flushed the stained area with water, removing all the peroxide from the fabric. The stain was still there, although it was much lighter. I was going to have to go on to the next step: ammonia. Ick. I did not want to have to do this.
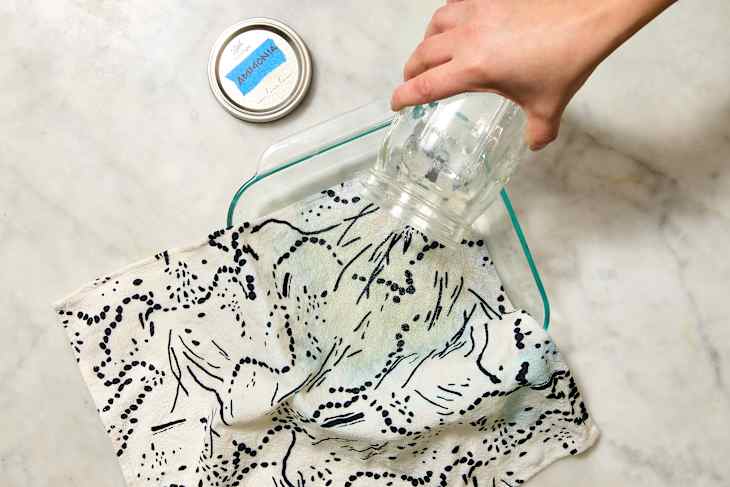
Step 4: If the stain persists, apply 1 or 2 drops of ammonia.
As I dropped the ammonia onto the stain it went from a shadowy purple color to a green, then light yellow, and eventually faded almost completely. There was a sort of shadowy fuchsia stain, but I could tell at this point the stain was well on its way to disappearing. I flushed with water.
Step 5: Treat with an enzyme detergent and launder.
I had to google “enzyme detergent” because I assumed it was something special, something my generic detergent wasn’t, and I was right — sort of. Not all detergents are equally ambitious; some have enzymes some don’t. I found that Persil contained the enzymes “lipases,” and “proteases.”
Lipases help to break down fats and oils, while proteases break down protein chains, making them the perfect enzymes to fight stains. If you aren’t sure whether or not your detergent contains enzymes, just check the label; some labels are super basic and just say “enzymes.” So I poured the liquid detergent over the stain and let it sit for about 15 minutes until I could get it down to the washing machine, where I washed it in cold water with no extra laundry detergent.
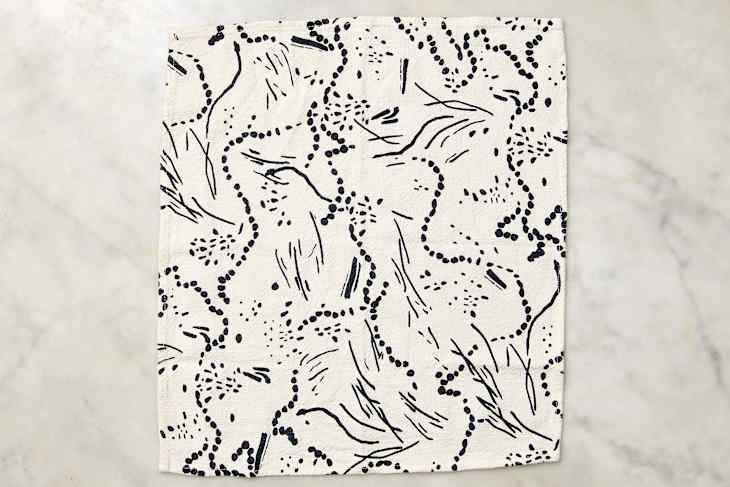
When the towel came out of the washing machine it was so bright it actually irritated my eyes to look at it. I had to bring it back upstairs and look at it in natural light so I could see if the stain had come out — and as far as my eyes could see, it had!
Step 6: Use color-safe bleach if needed.
Although I didn’t need this last step, if a shadow of color remains after washing, apply a powdered, non-chlorinated color-safe bleach (such as sodium percarbonate) and rewash.
My Honest Review of Martha Stewart’s Method for Removing Red Wine Stains
Overall rating: 9/10
This test was intense and will henceforth be known by me as “The Kitchen Sink Method.” I appreciated that she provided what seemed like every possible solution you could throw at your stain. Just reading through the steps made me fairly confident that something along the way would work. The attention to detail was impressive as well; left to my own devices I would have absolutely scrubbed the stain with a toothbrush instead of tamping it out as instructed, and probably wouldn’t have ever been able to successfully remove the stain.
I gave this method a really high score because, simply put, it works. When I stare at the dishcloth looking for the stains (both old and new) I can’t see them at all. The photo is a bit of a different story; I was surprised to find when editing the photos that you actually can see the faintest shadow, I think? Either way, this method yielded amazing results and will be my go-to method for white fabric that can handle vinegar, peroxide, and ammonia.
What to Do If the Red Wine Stain Has Already Dried
Martha Stewart’s advice is great — but what if you discover the stain after it’s dried? To find out, I consulted Jared Sarbit, CEO of Canada-based Picture Perfect Cleaning, who shared his best strategy.
Step 1: Rehydrate the stain.
“Dampen the stained area to make it easier to lift, but avoid soaking the fabric or surface,” Sarbit says. Use cool water, not warm, which can further set the stain.
Step 2: Apply a hydrogen peroxide and dish soap mix.
Create a 2-to-1 solution of hydrogen peroxide to dish soap. Blot the mixture onto the stain with a clean cloth. As you blot, the stain should begin to fade. For tougher stains, gently work the solution in with your fingers and let it sit for about 15 minutes.
Step 3: Rinse or launder.
Finish by blotting with a clean cloth and rinsing the area with cold water. “If the stain is on fabric, launder it according to care instructions,” Sarbit says. “For carpet or upholstery, blot thoroughly and let it air-dry.”
Does Martha Stewart’s Red Wine Stain Method Work on Colored Fabrics?
It can, but proceed with caution. While Martha Stewart’s six-step red wine stain removal method is incredibly effective, it’s best suited for white or very light-colored fabrics. Hydrogen peroxide has lightening properties that can fade or alter dyes, while ammonia — especially if it isn’t properly diluted — can cause discoloration.
If you’re working with colored fabric, it’s safest to stop after the dish soap and vinegar steps and reassess the stain before moving forward. Always test any stronger agents on an inconspicuous area first, since results can vary widely depending on fabric type, dye saturation, and colorfastness. And if the item is especially vibrant, patterned, or sentimental, a gentler stain-removal method may be worth trying before going full Martha.