
Before and After: $200 Goes a Long Way in This Messy Entryway Makeover
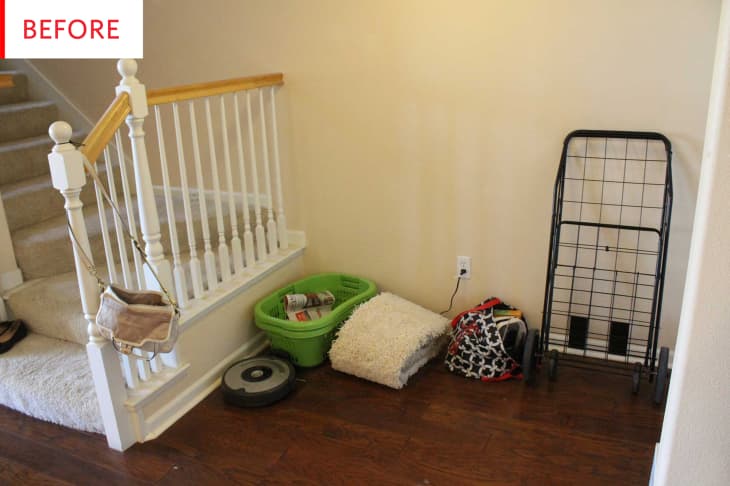
This entryway is so incredibly relatable: purse, recycling, tote bag, Roomba, grocery cart—all necessary and conveniently accessible, but perhaps a bit too visible. One impressive DIYer took $200 and totally revamped this space, making it a lot more attractive and practical.
Here’s a description of the pre-makeover entryway, plus how it affected the rest of the home:
My entryway was a complete disaster. There was nowhere to place shoes, jackets, or bags, so those things ended up splayed throughout my kitchen. A bright green laundry bin held all of the recycling, and while this was a convenient place for it, the basket was not attractive.
Coming home to a messy entryway was like being greeted with stress, which is exactly what I don’t want my home to do. Revamping it was an obvious fix.
First impressions are always important, and if every time you walk in the house after a hard day (or a fun night) you’re faced with chaos, your whole home is going to feel chaotic and stressful.
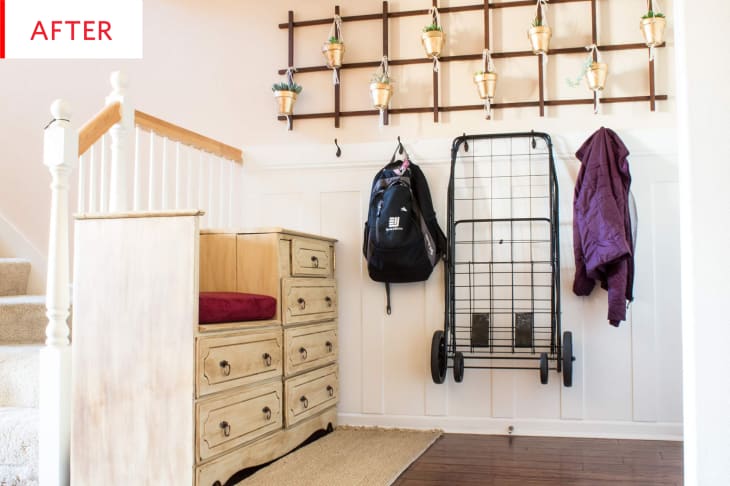
Lindsay Fay of A Butterfly House has cleverly converted a dresser—be sure to check out the amazing how-to—into a combination storage unit/shoe-application bench. The drawers can be used for recycling, as well as outdoor necessities like gloves, hats, dog leashes/bags, and so on, while the top could serve as a landing strip. The DIY chalk paint-like finish works perfectly with the pale walls, baluster, carpet, and new paneling, while the homemade cushion adds a rich splash of color.
Speaking of that paneling—wow! Again, Lindsay has a bunch of helpful information on that part of the project. I would be very intimidated to attempt board and batten, but Lindsay’s version majorly fancies up this area, while the attached hooks add a ton of utility.
I worked on the entryway sporadically over a six-month time frame, each project taking about a weekend. I spent less than $200 total, and did everything myself. In the end, I was shocked at how easy everything was. I fully expected to have more difficulties adding board and batten to the wall than I actually did.
This makeover has a fantastic effect on Lindsay’s entire home, as she says the organized spot keeps her whole condo clean. Since everything has a designated spot, she doesn’t have a random assortment of things scattered throughout the house.
If you’d like to help your home make a fresh first impression—or tackle any project you’re intimidated by—Lindsay has some advice:
Just do it. The hardest part of any project is getting started. You might think you don’t have the skills to do a DIY, but most of them are much more achievable than they seem.
Thank you, Lindsay Fay of A Butterfly House!