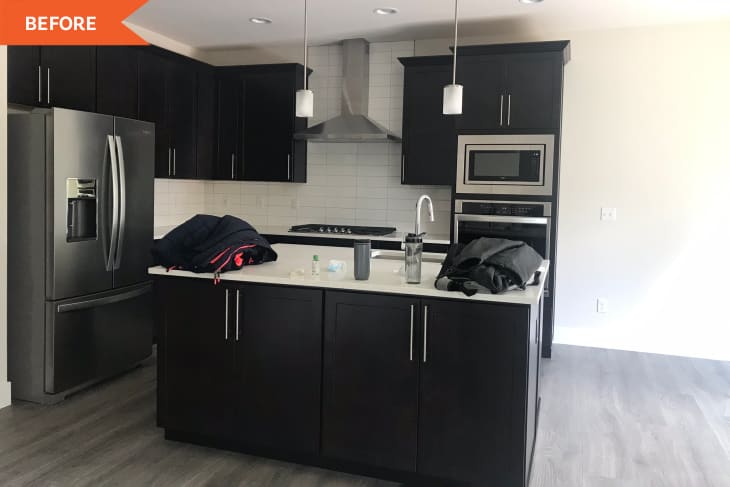
Before and After: Fresh Paint Takes This Kitchen from Cookie-Cutter to Custom in a $500 Redo

A lot of times, if you’re looking to make major change in the kitchen without spending major money or doing any major heavy-lifting, paint is the answer. Painting your cabinets can make appliances and counters and floors look completely new again, as was the case for Shweta Pathak’s (@houseofsuris) kitchen.
Her kitchen, although it was built in 2020, fell a little flat. “The kitchen had all espresso-colored cabinets — very traditional,” Shweta says. “Even with two big windows and open floor plan, the light just used to get lost, and the dark colored cabinets made it look even smaller and dull.”
Shweta lives in a rainy climate, and she says the kitchen felt especially sad on gloomy weather days. It needed a change (aka a fresh coat of white paint) ASAP. “Considering it’s a new build and also being new to the world of DIY, I did not want to take whole kitchen down and build from scratch,” she says. “Painting the cabinets was an affordable and quick solution.”
Her kitchen redo cost between $400 and $500 but took a little longer than she thought (about four months) because she and her husband worked on the cabinets after working hours and because it took a lot of coats to cover the dark cabinets with light paint.
“We sanded, primed, painted and sealed the cabinets,” Shweta says. “[The] hardest part was the dry time for each coat on each side of the cabinets, hence the four months.”
Her best painting advice is to plan with drying time in mind, and to split the work into batches. Plus, she says, you’ll need all the necessary supplies: deglosser if you’re working with pre-finished cabinets, drop cloth, tape, sandpaper, sealer, paint, plus brushes and rollers or a sprayer. One of Shweta’s favorite supplies was particularly handy for painting the sides of the cabinets, and it was only about $7 at Home Depot. She used small plastic pyramids to prop her cabinet doors up so they wouldn’t touch any surfaces during the painting or drying process.
In hindsight, the one thing she would have done differently is use a paint sprayer instead of rollers and brushes. “Spray paint if you have a big area that can be prepped well instead of brush and roller, she advises. “Brush and roller also gives a professional look, but it takes a bit more effort and time.”
Her effort and time were well-worth it, though. “I love how light and airy the kitchen feels now,” she says. “The light just bounces in all corners, and it looks so much bigger.”
Shweta and her husband selected Sherwin-Williams’ Extra White for their cabinet color. “You can never go wrong with white cabinets,” she says on Instagram. Shweta says she went darker with navy (Sherwin-Williams’ Naval) for the island to give the space a bit more contrast and to make it look more custom. Plus “a two-toned kitchen is just classy,” she says. (Agreed, Shweta! Here are five more of our favorites.)
Also classy? Her large brass pendants from Wayfair, which make a much bigger statement than the slim ones before, her “brass” cabinet hardware, which is the same from before looks totally new thanks to spray paint, her new rugs from Ruggable, and a few new accessories throughout.
“I am super proud that I was able to transform the builder-grade kitchen to a dreamy, airy, and modern look,” Shweta says. “It’s a big achievement considering it was my first ever DIY project! I made a small change but a big impact.”
Inspired? Submit your own project here.
