
See How a Stager Transformed This NYC Apartment (and Kept the Original Pink Kitchen!)
New York City staging company Urban Staging specializes, in part, in estate-condition homes — ones where the owner has died, the property has been handed over to an estate, or the home hasn’t been recently renovated after decades of use. That specialty was necessary in a staging renovation the team recently did at 875 Fifth Avenue, a two-bedroom, three-bathroom condo that overlooks Central Park. For this particular property, the previous owner had passed, so Urban Staging went to work once the home was completely emptied out.
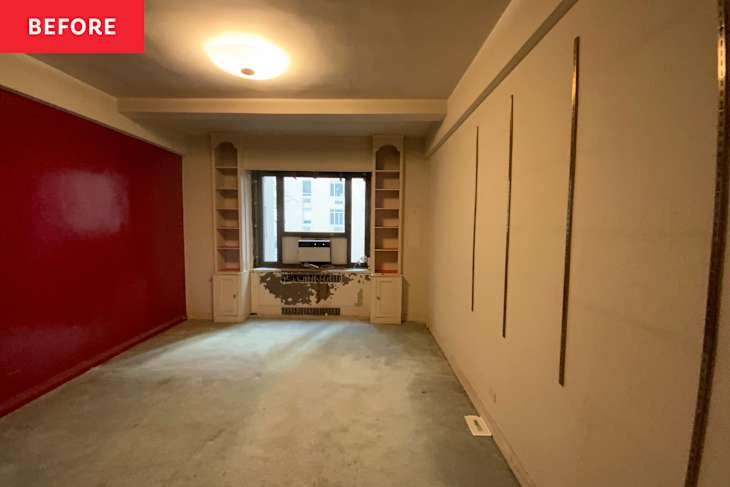
“Its location dictates the kind of client that might buy it, so we knew we had to appeal to Upper East Side buyers, and buyers with children,” says Gabrielle Hamill, creative director at Urban Staging. “We wanted to get rid of the Regency-era touches, like the dark reds throughout, and create a more neutral palette to build our design around.” Here’s what they did.

They pulled up old carpet, and found gorgeous hardwood floors.
The first step was readying the project for staging. That meant pulling up the old carpet throughout and refinishing the floors. “When we flipped the dining room carpet up, the floors were in beautiful condition!” Hamill says. “This was a welcomed surprise for the budget, since we could clearly see that there was water damage beneath the red carpet in the primary bedroom. In the second bedroom, we pulled the carpet back and revealed a strange linoleum material that our floor guys had never seen before. Luckily, when they pulled that flooring up, there was beautiful hardwood beneath.”

They maintained some original details, but made paint updates, too.
The team also needed to paint everything so it wasn’t so dark, and clean all the windows. The prep work ended up taking several months before the actual staging could even begin.

Throughout the home, minus the kitchen, Urban Staging updated all the walls to shades of white that would contrast the detailing and molding near the ceilings. Nearly all the walls received a coat of Benjamin Moore’s Dove Wing 960, and the ceilings got Benjamin Moore’s Decorator’s White. The contrast between the shades made the ceilings feel higher, Hamill says, and helped highlight the ornate wall details. The back bedroom of the home doesn’t get a lot of light, so Hamill opted for Benjamin Moore’s Cloud White 967 to make the space as bright as possible.

The kitchen didn’t get the white paint treatment — it actually went pink because the staging team expected changes to the room post-purchase. “This kitchen had an old-fashioned range, manual vent fan, and built-in paper towel and wax paper holders,” Hamill says.

“We knew immediately that the next owner would do a major renovation and probably start in the kitchen, so it wasn’t worth it to put too much of the budget into this room. We tried to spruce it up by doing a trendy color-drench, using the pink of the cabinets as our guide. A good clean helped immensely on the floor and windows, and putting some bright pieces in made the space look a little bit more purposeful, as opposed to like a Band-Aid.”

They created a dining space.
When the home came to Urban Staging, the kitchen dining area was a maid’s room with an en-suite bath. The team opted to create a dining area instead of a home office or third bedroom.

Hamill says that staging it as an eating area just made more sense because there wasn’t a wall between the kitchen seating area and the cooking space — all that’s there are a few overhead cabinets that created a pass-through.
They showed off the oversized bedrooms.
In one of the bedrooms, Hamill chose to stage it as an elevated kid’s room with a larger bed and a desk. “A bigger bed shows how large the room is, so potential buyers know that there is room for either a twin or queen bed,” she says. “The queen bed also appeals to those who don’t have children but want an extra bedroom for guests. By using a queen-size bed and a full-size desk, we showed that the room is large enough to serve multiple purposes.”

As for the decorations and accessories throughout the home, Hamill and her team relied on BluDot and Hay Design for side and coffee tables; Revival, Target, and BluDot for rugs; and The Poster Club for artwork, though they do have an artist on staff to create custom pieces as needed.

“Because good listing photos are integral to getting people to come see the space, it’s most important to design with the camera in mind,” Hamill says. “You want to put plants in corners that will look empty, or arrange accent chairs in a way that won’t block the other decor pieces in the room. Larger coffee tables allow for more decor vignettes, with books, candles, and plants, that will exude a certain lived-in warmth and elegance. The more a buyer can aspire to live in the space you’ve created, the better you’ve staged the room.”
When the home finally hit the market, it lasted only eight days and sold for $300,000 over the asking price, for $1.85 million.