
I Sent a Pro Organizer a Picture of My “Chaotic” Bedroom Closet, and Now It’s Fully Organized
Although I write about organizing all the time, sometimes I need to consult a professional. I saw the effects of this firsthand when I finally tackled my under-stairs storage closet and transformed it from a jumble of cleaning supplies and tools into an organized oasis of utility items (with floor space!).
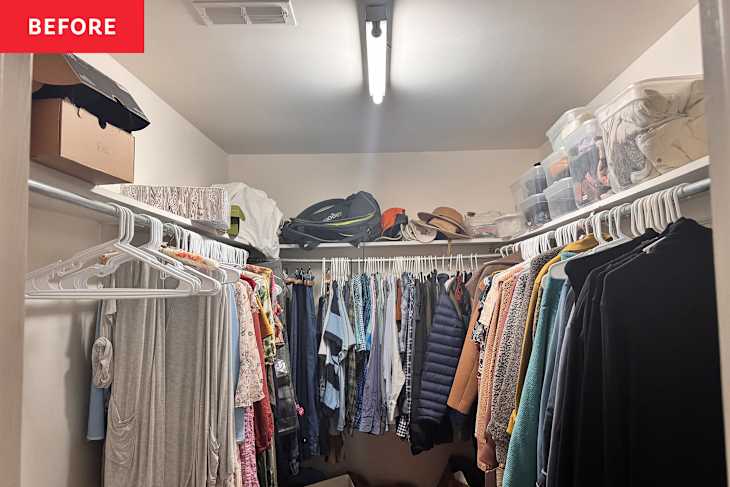
The closet in my primary bedroom was similarly chaotic, and I knew something had to change. I hated starting and ending my days confronted by messes on the floor, and no matter how many times I picked up my clothes, the closet would devolve quickly. (I’m pretty sure it’s in large part because I had messes that weren’t dealt with and the “broken windows theory” was coming into play.)
So I reached out to Kim Jones of Lock and Key Home, who provided me with the big-picture overview as well as small tweaks to give me the organized closet of my dreams. Here’s how.

Step 1: Empty and categorize.
Jones told me to start my big closet overhaul by emptying it out completely. “Pull every single thing out and categorize,” she says. Often, when I’ve tried to organize my closet in the past, I’ll straighten a few things out, get rid of some stuff, and maybe move a few things around. But this time was different. This was the first time this closet has been empty since my family moved in three years ago, and although this step was intense I knew it would give this project the fresh slate it needed.
Categorization was easy. I categorized items as I took them out of the closet. For instance, I put all the dresses in one pile, and all my husband’s shirts in another. Jones recommended that the categories be detailed. “Keep casual short sleeves, long sleeve work, casual short dresses versus fancy long dresses, etc.” she says.
Step 2: Declutter and swap hangers.
Once everything was out of the closet, it was time to pare down. “It is much easier to declutter when you can see exactly what you have and if you have duplicates of something and didn’t even know,” points out Jones. She also recommended swapping out my plastic hangers to slim flocked hangers. “It will give the closet a uniformed look, but also saves a ton of space over the plastic hangers.”
I decluttered my clothing categories as I swapped hangers. I kept in mind things like how long it had been since I’d worn the item, whether it fit, if I’d buy it again now, and whether I had something else that was similar. I ended up donating a huge garbage bag full of items.
A note on the hangers: I’ve tried flocked hangers in the past and hated them. But I trust Jones and I decided to give them a try again. She was so right about how much space they saved! I also appreciate how our clothing won’t slip off the hangers like it sometimes did with the plastic hangers. This itself will keep the closet more orderly.
Step 3: Put clothing back in the closet.
Before putting the clothes back in the closet, Jones suggested mapping out what would go where. For my closet, she recommended I create a “his” and “hers” zone — specifically a “his” area on the left side and a “hers” area in the back and to the right. In addition to zones, Jones said to think about where I put which types of garments. “Pick the category of clothing that you use the most and then strategically give it a home with the best real estate,” she says. She wanted me to be as detailed with the categories as possible, separating clothes by sleeveless to long sleeved and casual first, then dressier items, cardigans, and dresses in the back. She also said things can be organized by color, in rainbow colors, which is what I did anyway and I was happy to keep this up.
Step 4: Maximize vertical space.
“When everything is hung, let’s look at the next largest category for her,” continues Jones. “There is a lot of open vertical space being wasted right now above the hanging clothes, so let’s maximize it.” The shelving above the clothing rods is ideal for stashing purses, some travel items, and extra bags.
In general, Jones recommends storing really nice shoes and purses in shoe boxes and stacking them all the way to the ceiling to maximize “all the space possible.” She suggested keeping clutches separated in compartment holders and stuffing larger purses and organizing them in a storage bin. Duffel bags, overnight bags, beach bags, and other large bags should be separated by category with the smaller ones nested into the larger ones.

I did not want to purchase too many additional items for our closet at this time, so I used some plastic bins we had in the attic as well as some covered bins I was already using in the closet to separate and organize the items that go on the upper shelves. I also put my nicer purses in their dust bags and put them on the shelves. I placed them diagonally on the shelves so they would fit but I could still access each one without moving the others.
One of my favorite tips from Jones was to keep a step stool in the closet. This will make it easier to both access and put away items that go on the shelves. It’s such a simple tip, but will help so much with functionality and maintaining organization!
Step 5: Organize shoes.
Jones recommended categorizing shoes by type as well. “There is usually open space under the hanging shirts, so I would suggest using these shoe containers to maximize all the space,” she says. Detailing exactly how to organize them, she adds, “Count all shoes before buying any containers so that you know exactly what is needed. When placing shoes in slots, keep the right shoe facing forward and the left one facing back so you can see the heel and back of the shoe as well.” These are the kinds of detailed insights a professional organizer has to offer, and they are so helpful.

Step 6: Evaluate what doesn’t fit in the closet.
The last step of your closet makeover is dealing with what’s not going back in the closet. Maybe it’s items that don’t belong in the closet in the first place, or it could be items that don’t fit. “If there are extra items, first evaluate the space. Would it look crowded and cluttered to add these items back in? If so, then it may be a good idea to find another home for those items,” she says. If the closet is beginning to look cluttered, Jones suggests swapping out seasonal clothes and placing them in another storage spot, including under the bed if necessary.
I had a few bins of items in my closet that were travel items that don’t belong in the closet. I kept them outside of the closet so I can go through them later and find an appropriate home for them. The rest of the items I put in bins and on the upper shelves.
Final thoughts
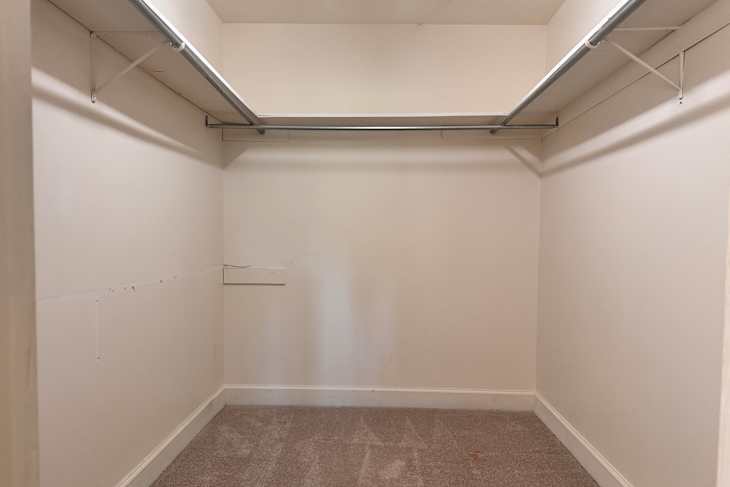
In all, my closet overhaul took about six hours total. I think pulling everything out and starting fresh is the best way to accomplish a thorough cleanout and makeover. Additionally, I can’t believe how big of a difference I made in the overall look and feel of the closet — even without remodeling it or making any major purchases.
Getting everything off the floor according to Jones’ recommendation had a huge impact on how organized the closet looks and feels. I love that maximizing the vertical space is what made this possible. The step stool tip is the key to making this change as functional as possible. I’m a new fan of flocked hangers and have discovered that when the hangers are difficult to slip into a garment (such as with a hooded sweatshirt), you can slip the hanger in from the bottom.
I’m so thankful to Jones for her expert insight and the role she played in giving me a closet that makes me feel calm and peaceful at both the start and end of my days.