My Kitchen Went from Drab to Fab — And Got Super Organized Along the Way

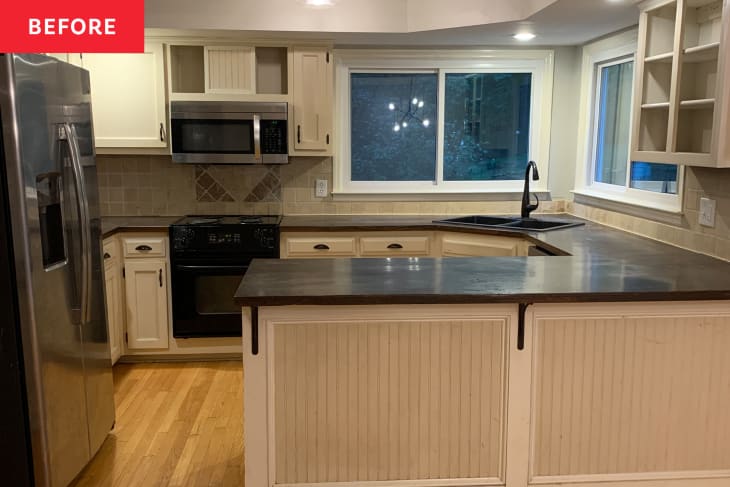
When my husband and I bought our house, we knew the kitchen was not forever, but there were a few things I hadn’t noticed before signing on the dotted line.
Those butcher-block counters? Turns out, they were just planks of lumber made to look like the real thing. Then, there was the electric stove — touted as a space-saver — that was barely big enough for a Thanksgiving turkey. By the end of its service, it had just two working burners! So, after seven years of plenty of everyday cooking (including two-plus years of living intense pandemic life), we bid adieu to the original floor plan, cabinets, and appliances to renovate the kitchen of our dreams. Ready for the big reveal?
Ta-da! Major change, right? Before the dumpster even arrived, I had considered where pots and pans, knives, and measuring cups would go — and dreamt of what an organized kitchen would look like. See, as a professional recipe developer, my kitchen is also my office. Efficiency and practicality were especially important as I worked with Thiago Lima of T&L Kitchen and Bath to design my new space.
First off, I prioritized drawers. There is a single column of drawers within arm’s reach of where I set up my cutting board, and the top drawer has become the perfect place for knife storage. Rather than a wall-mounted magnetic rack, I decided in-drawer knife blocks were the smart solution here. I secured the blocks with Museum Putty to stop the shifts that usually occur from frequent opening and closings of the drawers.
When it came time to put everything back in my brand-new cabinets, I felt compelled to refine my list of equipment first. (It is the first step of organizing, after all.) No mismatched Tupperware, extra pot lids, or cheap commemorative cups would have a home in this kitchen. I also lined my drawers and cabinets with no-skid shelf liner to keep the cups and bowls in place and to protect drawers from being scuffed by pots and pans. Last, I upgraded from a dollar-store plastic bin to a mesh food storage organizer to contain lids and smaller plastic storage containers.
I got an updated pantry, too. The original pantry door opened onto a narrow hallway, with flimsy wire shelves and no lighting. At the recommendation of one of the subcontractors, I decided to flip the pantry door to open into the dining room. A coat of fresh white paint and simple wood shelves created a blank canvas for more organizing!
I realized visibility of pantry items and function are way more important than a Pinterest-worthy appearance. The neat rows of matching containers are appealing, but it doesn’t work with my real life. I turned to OXO cereal dispensers because the cereal stays fresh, and I also know my family is likely to finish a box before buying another when we can all see how much supply is remaining. But that doesn’t mean you’ll find me decanting every box of crackers into new clear containers.
Here’s what I did: I picked up stackable clear bins from The Container Store to corral breads and tortillas and pastas and gnocchi in their original packaging, but traded flimsy bags of rice for storage in simple glass jars. I also reused storage containers that I’ve had for years, like an old desk organizer, to hold a variety of vinegars.
Heavy-duty restaurant containers are my go-to for storing bulk pantry ingredients, such as big bags of bread flour and oats. And nothing beats the neatness of an expandable riser for storing pantry supplies, including spices, canned goods, and buttermilk pancake mix. To finish it all off, I took the clever advice from a former Kitchn staffer and placed my Instant Pot and air fryer on rolling plant stands to utilize the pantry’s floor storage space without scratching my newly refinished floors.
The organizing accomplishment that I show off with the most pride is the corner cabinet with a built-in lazy Susan. I never realized how much real estate I devoted to storing baking supplies in my old pantry. In the new space, I filled clear, wedge-shaped bins with extracts, sugars, starches, and more. The ingredients are all organized by type: for example, cocoa and chocolate in one wedge, syrup in another, and sugars in a third.
The wedge-shaped containers are labeled and easy to remove if I need to search for a specific ingredient. Plus, they keep any accidental spills contained. The wedges aren’t a perfect fit in the lazy Susan, but the ingredients I reach for with greatest frequency (all-purpose flour, granulated sugar, and brown sugar) slide perfectly into the open space.
Before & After of the Day: Your Daily Makeover Inspiration
Get all the latest home makeover inspiration each day with our Before & After of the Day newsletter.
I happened to be lucky enough to have gotten a brand-new kitchen, which is what spurred this organizing streak, but I will say — I absolutely could have just done this in my old space. I could have taken everything out and started from scratch, putting things back in smarter systems and cutting things I don’t need. My point? You don’t have to wait for a renovation in order to get your kitchen in order.
Are you inspired by the organization of this kitchen redo? Tell us in the comments below, and send in photos of your remodel.
This post originally appeared on The Kitchn. See it there: Before & After: A Recipe Developer’s Kitchen Goes from Drab to Fab — And Gets Super Organized Along the Way
