Before and After: I Made My Plain Rental Dining Room Look Seriously High-End

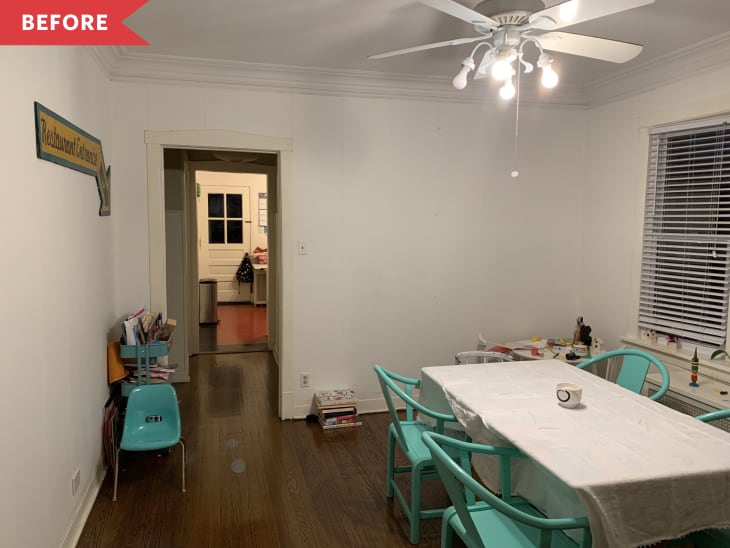
Sometimes it’s nice to start your home with a blank slate. Shortly after my family of three moved into our 100-year-old-plus rental, we painted the beige dining room white; I wanted to start with a clean canvas so I could take the design in any direction I wanted. Three years later, the dining room… was still white. I wanted the space to be colorful, warm, and cheerful, but I was stuck. And since this is a rental, I had to be careful about making sure whatever I did was reversible when we moved out.
I’d painted the rest of our home shades of pinks and greens, but I couldn’t get past these dining room walls. At some point in the past 100 years, paneling had been installed over what was presumably cracked plaster walls—but years of painting over it had filled the negative spaces just enough to make it look like less of a design detail and more of an accident. I knew painting the walls would only draw attention to this issue, so I decided to wait it out until I had the perfect solution.
Finally, it hit me: removable wallpaper! After looking at dozens of different wallpaper patterns, I chose a chinoiserie in canary yellow from Graham & Brown that incorporated every color in our home. I love seeing variations of the same bright colors flow from one room to the next, so even though this was a bold pattern I knew it would fit in perfectly with our other decor. While this paper is removable, it’s not peel-and-stick: Instead, you put paste on the wall before hanging the paper. When you’re ready to take it down, you peel off the paper and wash away residue with warm, soapy water. The install process was more time-intensive than peel-and-stick paper, but I was looking for a super thick paper to hide the paneling—and this paper more than did the job!
I didn’t want to wallpaper all four walls, but I also didn’t want to leave one wall totally blank and boring. I loved the way board-and-batten looked, but I couldn’t put hundreds of nails into the wall of my rental. That thought led me to my solution for everything in an apartment with plaster walls: Command strips! My temporary board-and-batten the project cost me around $50 to complete. I hung a few of my favorite pieces of art on the wall when I was done: two vintage photos of my dear neighbor from her hippie days in the 60’s, a tiny hand-cut paper silhouette of my daughter from Master Scissor Artist Karl Johnson, and two larger silhouettes I created using leftover wallpaper remnants.
So often, renters assume they aren’t allowed to make any changes to their space. Depending on the relationship you have with your landlords, it can be as easy as just asking if you can paint a wall, or change out a fixture. We’ve been in our current place for three years and plan to be here for quite a while longer. We also have an excellent relationship with our landlords, so my request to change out the ceiling fan in the dining room with the new chandelier was granted without issue. We carefully removed the ceiling fan and safely packed it away, to be reinstalled when (if ever) we leave this apartment; then, we replaced it with the Orion chandelier from Sazerac Stitches, a company I’ve followed (and drooled over) on Instagram for forever. I was able to request custom pink shades that complimented the wallpaper perfectly. I screamed when I opened the package—it was that exciting!
For the table, I chose a 60-inch oval tulip table from Poly and Bark. I love how it breaks up the room and helps tie in the white board-and-batten wall. I kept my Paola Navone Ming chairs, a gift from the thrifting gods that I scooped up for the shockingly low price of $30! I loved the turquoise color and thought they looked good with the yellow wallpaper, but wanted them to stand out against the jade green rug so I re-painted them pink. My turquoise rug is from the Flower Home line by Drew Barrymore.
I kept our sideboard, and hung a medium-sized vanity mirror above it. On either side, I added pink lamps I scored at a thrift store a few months ago. I accidentally bought the wrong type of lampshade to go on top, but in a stroke of genius I was able to hack my lamps to make the new shades work.
My only regret in doing this project is that I didn’t do it sooner. I know this room is a lot, visually, for most people—but it makes my family so, so very happy. I love being greeted by this sunny, cheerful room every morning. The dining room is in the center of our home, and we don’t have an eat-in kitchen, so we spend probably 70 percent of our time at the table—eating together, playing cards, and working on art projects—so it was important that we make it feel homey, cheerful and welcoming.
