
This Simple, Stylish DIY Pendant Lantern Hack Costs Less Than $150 and Will Brighten Your Fall

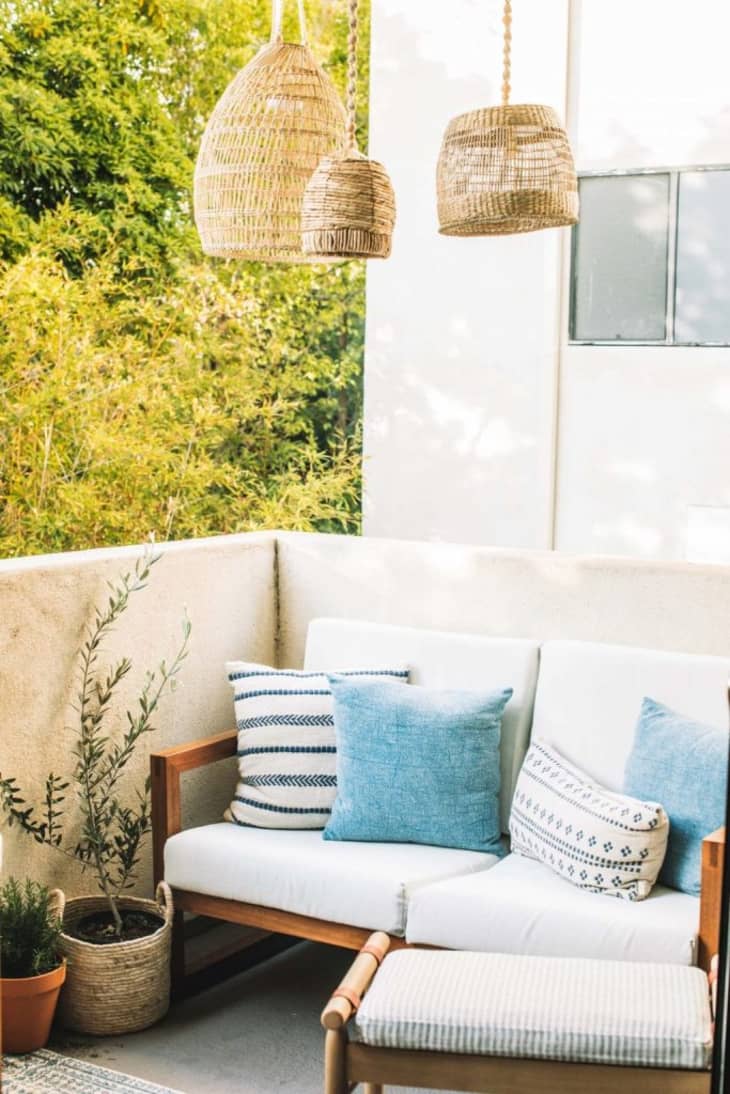
Elizabeth Van Lierde, influencer behind The College Housewife and author of “Everyday Entertaining,” knows a thing or two about designing a stylish, welcoming outdoor space. She even helped her friends Sierra and Evan bring theirs to life this past summer. One of my favorite features of the fabulous balcony Van Lierde helped transform for her pals? The woven hanging lanterns, which add a touch of coastal glam to the space and look seriously luxe. Little did I know these were actually a budget-friendly and very easy DIY hack that’s incredibly easy to replicate! I spoke with Van Lierde to get the lowdown on how she made these stunning light fixtures, so you can make one, too. Best of all? They’re just as great indoors as they are outside, especially if you like the woven look.
While working on Sierra and Evan’s balcony makeover, Van Lierde knew she wanted to incorporate wireless lighting in the space and was inspired by the beautiful woven basket fixtures many brands had in their 2021 collections. Seeking to save major cash, Van Lierde decided to take matters into her own hands, and she ultimately put together three hanging lanterns for just $150 total.
First, Van Lierde purchased baskets from World Market, which she ultimately used for the structure of her lanterns. “Only one of the baskets was an actual ‘lantern,'” she explains. “The small and medium baskets were actually waste baskets!” To make the fixtures wireless, she ordered battery-operated puck lights from Amazon and used one to two for each lantern, depending on its size. “They are totally wireless and even come with a little remote,” Van Lierde notes. “I love these for rental friendly projects — they’re perfect for inside an indoor sconce that you don’t want to hardwire as well.” If you want a breakdown of her step by step, you’ve come to the right place, as Van Lierde has outlined her process below.
First, measure your desired distance between the ceiling and the top end of each basket. Prepare your hanging strings in three various lengths based on these measurements. Each of the ones Van Lierde used were between six to 12 inches long, but you can stagger the lamps however you see fit.
Next, shift gears to prepping your baskets. If needed, poke a small hole in the center of each piece. Weave the corresponding cut hanging string through each and knot off each of the ends with a wooden bead to hold the string in place. Tie a gold metal loop to the top end of each strand, trimming any remaining rope off.
Next comes the puck lights, which you’ll want to make sure are ready to go with batteries and functioning correctly with the remotes. Once you’ve checked that the lights work, place one end of the velcro circle sticker onto the back of each puck light and place the other on the flattest, smoothest surface area of each individual basket. Van Lierde used one or two lights per basket, but larger “fixtures” could certainly accommodate more.
For installation, measure the space in the ceiling where the lights will be hung and screw in an eye hook for each basket. Hang each light from the metal rings, and there you have it! Wireless lantern baskets wherever you want — no plugs or electrical needed!
Van Lierde is extremely pleased with the final product. To get the final length of each lantern just right, she experimented a bit indoors first. “We actually hung them in my living room for a few days to get a feel for how staggered we wanted them to be or if they should all be the same length,” she reflects. “We found varying lengths gave the best visual appeal!”
Don’t let chillier days prevent you from getting started on this simple project either; you’ll be able to enjoy the results all season long, even if you live in a cooler climate. “The lanterns will for sure stay up through the fall season,” Van Lierde says of hers. “They are great to click on for an evening cocktail or for outdoor movie nights.”
Design Defined
Never miss the style inspo and recommendations you crave with Design Defined. Follow along each week as our Home Director Danielle shares the best style advice, latest trends, and popular decor finds you just can't miss.