
See How a Pro Organizer Transformed the Most Chaotic Spot in My Kitchen
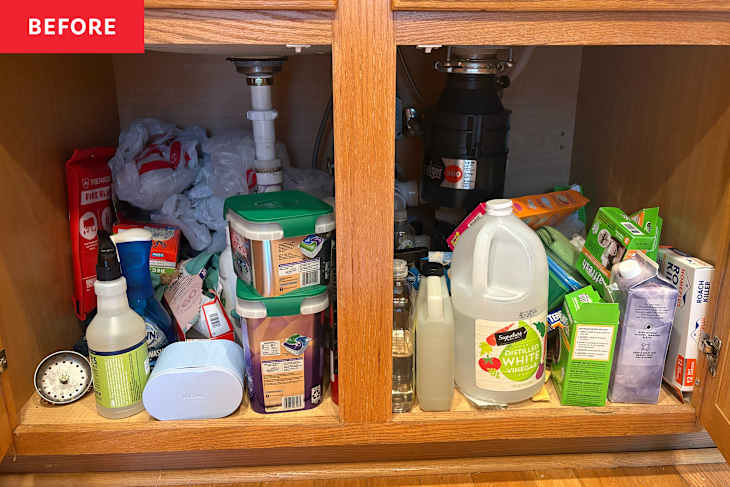
I am the queen of hiding my clutter. My life changed when I swapped a TV console with open shelves for one with doors — suddenly, no more staring at our cable box. From that point on, storage consoles, cabinets, and closed drawers became little safe havens for my messes. Out of sight, out of mind … right? Well, that works until the moment you actually need something and can’t find it. For me, the biggest offender was underneath my kitchen sink.
Mine was a chaotic pile of plastic bags, detergent pods, and cleaning supplies stacked on top of one another with no real system. I knew it needed help, so I reached out to professional organizer Rebecka Jodeit, co-founder of Graceful Spaces, to tackle the space with me. With her guidance, I learned that organizing under the sink is far more doable than it looks — and the results were almost instant. Here’s exactly how she helped me fix it.
Step 1: Take everything out and categorize.
“The space under the kitchen sink is one of the most used — and most neglected — areas in the home,” Jodeit says. In busy households, this high-traffic zone directly impacts daily efficiency, which is why the goal isn’t to see how much can fit, but to create a breathable, organized space by limiting storage to true kitchen essentials.” The first step? Taking everything out. “Start by removing everything from under your sink,” Jodeit instructs. “Group like items together into categories: daily cleaning products, dish products, trash bags, sponges, tools, etc. Take inventory of what’s staying, what can be tossed or donated, and where you’re low on stock.”
As I sorted through my things, I was shocked by how much went straight into the trash or recycling. I found empty garbage bag boxes, nearly empty detergent containers, and an embarrassing number of plastic bags that had been shoved to the back instead of dealt with. I filled an entire garbage bag without even trying. One piece of advice that really stuck with me was to move rarely used items elsewhere. “Only products you use daily or weekly should live under the sink,” Jodeit recommends. “Seasonal or occasional-use items should be relocated to a utility closet, laundry room, or garage.” She also suggests holding off on buying any organizing products until this step is completely finished.
Step 2: Measure the space and choose the right organizers.
Once I knew exactly what I was keeping, I measured the cabinet and headed to Target for organizing supplies. “With your inventory and measurements in hand, select the right organizing products to maximize the space,” she says. “Focus on stackable options to make the most of vertical space.” My final categories included all-purpose cleaners, trash bags, dishwasher detergent pods, sponges, and garbage disposal tablets. After a quick Pinterest scroll for inspiration, I chose a simple setup that felt realistic for daily use.
While Jodeit often recommends going to The Container Store, I opted for Target’s stackable Brightroom bins that fit my measurements perfectly. Taking measurements beforehand is key; there’s nothing worse than getting excited about a system that doesn’t fit once you’re home. “Place your organizers in the space and adjust until everything fits comfortably and functions beautifully,” Jodeit advises. This step can feel like Tetris, but my setup was simple enough that everything fit without a problem.

Step 3: Put everything back — then label.
“Load your edited inventory into your organizers,” Jodeit says. “Under-sink storage is all about finding and creating vertical space; stackable drawers are a game-changer when plumbing allows.” Putting everything back was surprisingly straightforward. On the right, I stacked sponges and disposal pods into small drawers. On the left, I added two drawers — one for trash bags and one for detergent pods. On top, I placed a large open-front bin for taller items like counter spray, dish soap, and extra hand soap.
The final step? Labels. “Finish with clear labels using a label maker or vinyl labels,” Jodeit recommends. “Labels make it easy to maintain the system and help you quickly identify when inventory is low.” I’ll admit, I used to skip this step. Labeling felt unnecessary — until I tried it. Labels remove all guesswork, clearly define where things belong, and make upkeep effortless. I’m officially converted and love my label printer.
Now, every time I open the cabinet doors, I feel genuine relief. Organizing projects like this always remind me that the mess is rarely as bad as it feels. From decluttering to shopping to setting everything up, the entire process took about two hours — and the payoff was immediate. Investing time in home organization is absolutely worth it. The peace of mind that comes from a calm, intentional space? Priceless. Happy organizing!