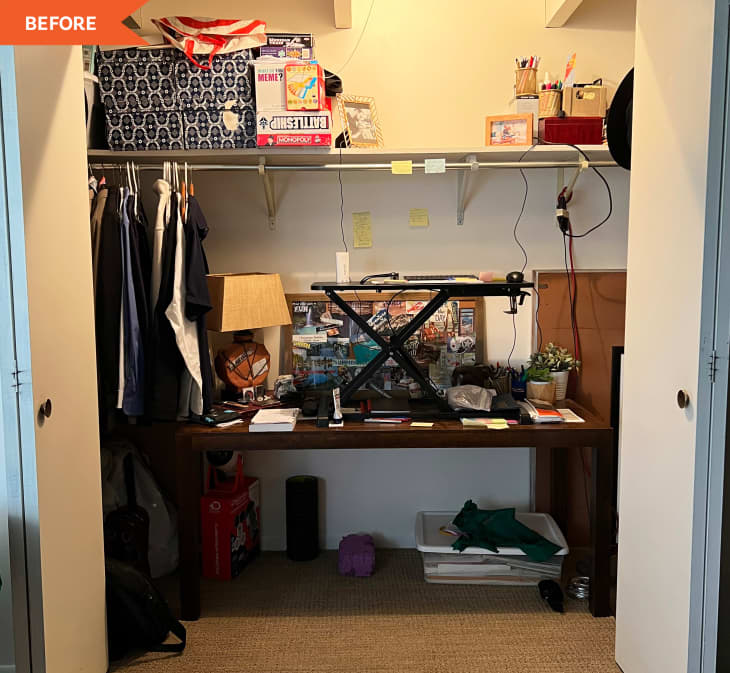
Before and After: $800, 4 DIYs, and 1 IKEA Hack Turn a Cluttered Closet into a Sophisticated WFH Spot

There are definitely benefits to working from home, but actually getting work done in your house or apartment can be difficult without a designated spot in your home where your work lives — especially if that corner is tiny and cluttered.
For blogger Natasha Holland Hayes’ husband, Billy, the designated WFH spot was, unfortunately, a closet, and it wasn’t conducive to working.
It “stored our miscellaneous items such as seasonal clothing, workout gear, games, photo albums, and in the midst of it all: my husband’s work from home office,” Natasha explains. “We knew a change was needed when my husband started working from home four to five days a week. He had no place to put files and organize projects, and the clutter was such a distraction.”
The couple considered dedicating a spare room to Billy’s work projects and calls, but that was where their toddler liked to spend time — not exactly the ideal environment for productivity. Then Natasha realized that the closet space actually had potential if the winter wear, workout gear, games, and albums could find a home elsewhere in the house. By decluttering and adding shelving to the closet, the couple “could create a dream office and study in the full closet itself,” she says.
After clearing out the closet, Natasha began sketching. “Since this space would ultimately be for my husband, I wanted to create a built-in library look that had a masculine vibe with a mix of Old-World and modern elements,” she says.
Natasha spent some time researching furniture construction, came up with a plan for a desk, and got started with a solution involving new construction and a bit of IKEA hacking. The first step was placing IKEA IVARs on the sides of the closet; these serve as the main desk support and provide storage for Billy. Next, Natasha framed around them, “creating a built-in look and the strength needed to hold the desktop,” she explains on Instagram. She also added a long 2×4 to the back of the closet to help support the 13-foot desktop, which was fashioned out of maple.
“I finished by securing the desk top with metal supports, giving [the desk] a custom, modern-made feel without the bulky look of legs in front,” Natasha says. She painted the whole thing a vibrant green shade (Sherwin-Williams’ Grandview) that echoes the look of copper patina.
And the desk is just one impressive DIY element of this project. Natasha also made her own wallpaper out of book pages. “My husband loves to write in his free time, and I was looking for a way to add a bit of contrast to the left side that originally was just a white wall,” she says.
For lighting, she added wall-mount sconces — but because she didn’t want to deal with electrical wiring in the closet, she adhered battery-operated push lights instead of bulbs to the insides.
“Lastly, I added shelves and decorated with personal items and thrifted decor,” she says. Some spacious wicker baskets added the old world sensibility (and storage!) Natasha sought, and artificial plants and the golden sconces added a modern touch.
Four months of conceptualizing and carrying out the substantial renovation was no easy feat for Natasha, who says she’d never used power tools prior to this undertaking. In the end, she’s glad she went for it and advises others contemplating their own DIY projects to do the same. “My husband gained double the storage, and we were able to store a lot of the items originally in the closet into storage boxes on the top shelf,” she says. “I love projects that reflect the personality of our family, but it’s such a win when the space thrives organizationally as well.”
Inspired? Submit your own project here.
