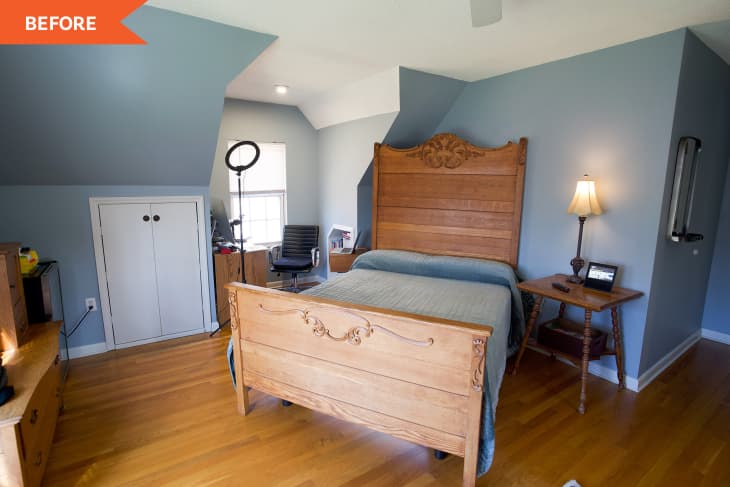
Before and After: A 130-Year-Old Furniture Set Looks New Again in a DIY-Filled $1000 Bedroom Redo

For quite a few years now, the consensus among stylists, stagers, and designers is largely that matching bedroom sets are a design trend of the past — but almost every “rule” in interior design gets broken in the best way now and again.
Designer Michael Carr’s (@michaelcarrdesign) One Room Challenge bedroom redo is here to prove that even a 130-year-old antique bedroom set can still look “contemporary and functional,” as he puts it, with the power of DIY.
“It doesn’t look like a ‘set’ anymore,” Michael says of the trio in this once-blue-walled bedroom. He paid about $134 to refurbish the pieces — a full-sized bed, gentleman’s wardrobe, and wash stand, all red oak, circa 1890 — and spent $1,000 redoing the whole bedroom.
Michael’s vision for the space was more organic and modern than the blue and brown before; it included a black antique headboard, layers of off-whites, calming greens, pops of coral, natural wood tones, and floor-to-ceiling drapery for the windows.
The bedroom, as was it was before, was stuck in the ’80s. The furniture had last been refinished in 1984 in varnish, and Michael’s goal was to give it a more 2022 look and paint the pieces different colors to make the trio look less “set”-like. “I wanted to reduce the ‘orange’ tone of woods in the room,” he says.
To take the furniture from ’80s orangey-brown to contemporary, he first removed the tops from the wardrobe (now located in the corner with a handmade live-edge lamp on it) and the wash stand (now used as a nightstand to the left of the bed) to give them sleeker silhouettes. Then he had to sand, strip, bleach, and paint the furniture.
“Assume you will have to bleach red oak furniture if you want to get the red tone out,” Michael advises future furniture flippers. He used Citristrip gel and Zinsser wood bleach to get the blonde wood look he was after on the wardrobe and wash stand and sealed them with a water-based polyacrylic finish. He painted the sides of the pieces a matte forest green (Velvet Finishes’ Alluring), and added pulls from a local surplus store.
“I originally tried to just paint the sides without stripping the original finish in the hopes it would be enough,” Michael says. “It wasn’t, and I really knew this before I started, so I wasted a little bit of time here.”
For the bed, there was no bleaching necessary: Michael stripped and painted that in Velvet Finishes’ Luxurious to get the inky black look he was after.
The most time-consuming of the pieces was the wardrobe. The drawers were in such bad condition that Michael had to disassemble them, glue them, and reassemble. He also lined the drawers with peel and stick carpet tiles to help cover imperfections.
“Understand that you will probably have a lot of repair to furniture that is 130 years old, not just refinishing,” Michael advises.
As for the rest of the space, Michael added a desk and TV to up the room’s multi-functionality. He painted the walls white (Sherwin-Williams’ Midsummer) and hung elongating curtains to get the layered and cozy off-white look he was going for. He says the paint color “reminds [him] of white clay [and is] an amazing neutral … and looks great under sunlight, cool LED light, and warm LED light at night,” and he’s proud that he found the curtains (originally from Pottery Barn) for $10 each on Craigslist.
They were more plain-looking than he preferred at first, but he sewed pleats at the top and hems at the bottom to make them look more elevated. “The extra work for adding the pleats and hemming them is a small price to pay for quality lined curtains,” he says on his blog.
Other installs to note in the space are the woven pendant lights, which Michael bought from Amazon and then whitewashed with the wall paint mixed with water, and the new fan, a $197 Wayfair find that looks much more modern (and more expensive) than the old white one.
According to his blog, Michael’s design philosophy is that the budget is a helpful, necessary tool that helps focus the scope of the project, and that DIYing and shopping secondhand are the secrets to staying within the budget while still getting the look you’re going for. The budget finds and DIYs in this bedroom certainly prove it; only $1,000 later, the space has gone through a total change.
This project was completed for the Spring 2022 One Room Challenge, in partnership with Apartment Therapy. See even more of the One Room Challenge before and afters here.
Inspired? Submit your own project here.
