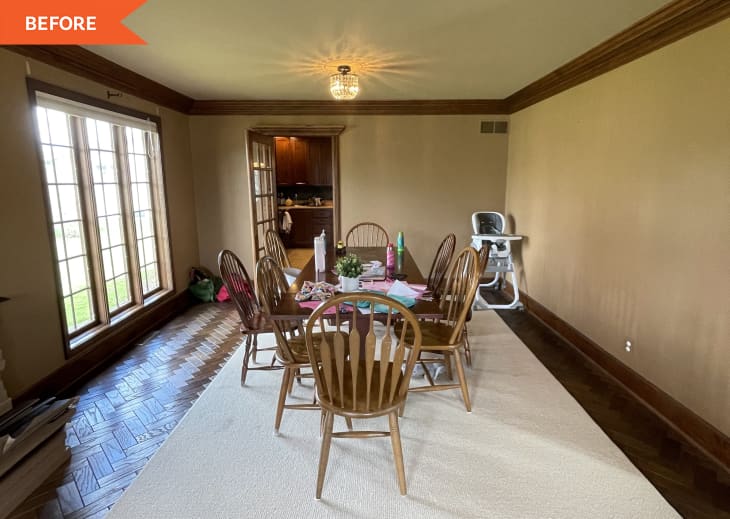
Before and After: A Dark, Dull Dining Room Gets a Room-Brightening Redo with a Surprising Pop of Color

Dealing with a dark space due to dark walls or a lack of windows? Try these 10 tricks for making a room look brighter. Then, check out DIYer Alyssa Yost’s (@alyssayosthome) One Room Challenge dining room redo for inspiration on how to take a room from “dark even during the day” to “rarely needing to turn the lights on.”
Before, Alyssa’s dining room had dark brown trim, grasscloth wallpaper that was painted beige, and overhead lighting that wasn’t cutting it. But it was a large space with 50-year-old-floors that were still solid, both of which were pluses. In its old layout, a dining table took up one end and two blue-gray armchairs sat on the other. “It is one of the first spaces people see when they come in the house and you can also see through the windows from the sidewalk,” Alyssa explains.
She wanted to give the room a brighter, cheerier look while keeping the layout and floors the same (just sprucing the latter up a bit and ditching their “orange undertones that made them feel very outdated”).
Alyssa started her eight-week, $3,000 redo by tearing down the grasscloth wallpaper and the underlying glue layer (her 4-year-old helped with this, too!). Then, she patched and repaired any existing dings and dents.
Once that step was done, she had a professional flooring team come in and sand and re-stain the home’s original herringbone floors. “I had never used a floor sander before, and it just wasn’t worth the risk of messing it up,” Alyssa says. “They had everything done in a few days and was completely worth having them do it.”
With the floors refurbished, Alyssa turned her attention back to the walls. She painted them a crisp white (Benjamin Moore’s Simply White), using an eggshell finish on the main walls and a semi-gloss finish for the crown moulding and baseboards. Alyssa followed that with box trim for more architectural interest in the room. “Getting used to using the miter saw and installing the box molding was overall much easier than I anticipated,” she recalls.
Her favorite detail in the space? “I love how the gold pin stripe on the wall molding gives it that little extra detail and adds depth to the walls,” she says. She used gold leaf Rub N’ Buff to create the pinstripe. While she had initially wanted to re-stain the trim around the windows, she “ultimately wasn’t getting the result [she] wanted and painted the window trim white,” she says.
Besides the wall moulding, the other big project in the space was tackling the furniture, Alyssa explains. Their Amish-made dining table needed a bit of TLC after two years of kids using it. “I sanded down the table and bench and used a black stain on the bench and bottom of the table, and used a white stain on the table top. I wanted to show off the grain of the wood while keeping it light and the white stain was the perfect thing,” Alyssa says. “My dad helped with some of the sanding of the table bench and my husband put the table back together after I finished staining it.”
Alyssa initially planned to re-stain the chairs and paint them black, but she wasn’t having a ton of luck with sanding and staining, so she decided to spray paint them instead. “I surprised everyone with the color I chose for the chairs,” she says. “The pink was not part of my original design, but I love how fun they are, and they ended up being the perfect color.” Now, they’re even a conversation piece for neighbors walking by who catch a glimpse of the pink chairs through the dining room window, Alyssa adds.
Alyssa also used spray paint to spruce up the legs of her armchairs and the bottom of the coffee table between the two. Her advice for anyone revamping a room in their home is to “look at your space and see what items can still be used, either as they are, or with some modifications.”
Alyssa added new accessories to the space, too. She laid a vintage-looking blue rug overtop the herringbone floors, hung a new curtain rod and white drapes (a great room-brightening choice!), and installed two larger light fixtures with the help of her husband and dad. Her last step was painting the frames around the windows black to make them pop a bit more.
Looking back, Alyssa is proud of how many DIY firsts are in the space. This was her first time hanging a curtain rod, using a miter saw, and adding box moulding. “Don’t be discouraged if the first box isn’t perfect,” she says. “There was definitely a learning curve, but I would consider myself a little bit of a DIY newbie, and I figured it out.”
Mostly, Alyssa’s proud of executing the vision in her head. “My three goals were to make the room fancy, fun, and functional and I believe that I achieved all three,” Alyssa says — the perfect trio for a formal-meets-family-friendly dining room.
This project was completed for the Spring 2022 One Room Challenge, in partnership with Apartment Therapy. See even more of the One Room Challenge before and afters here.
This piece is part of Color Month, where we’re showing you the best ways to inject more color into your home and life. From paint color combos to vibrant house tours, head over here to see it all.
Inspired? Submit your own project here.
