
Before and After: This Chic Kitchen Redo Is a Prime Example of How to Renovate in Stages
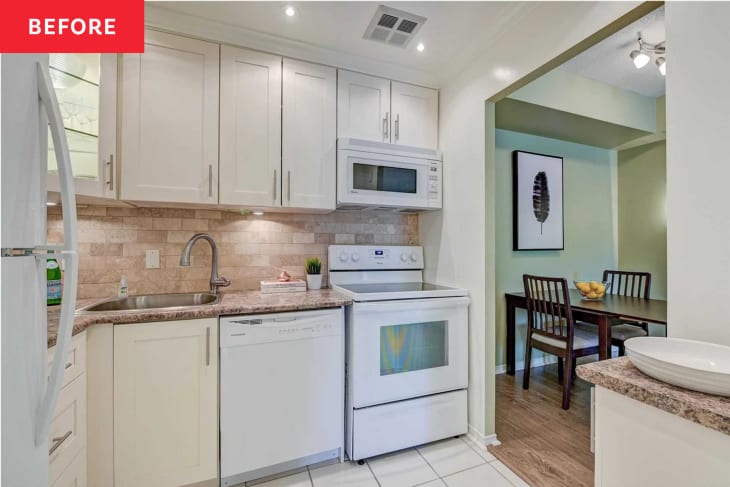
While they can be efficient and functional, small kitchens often come with a few problems, such as a lack of countertop space, slim storage options, and too-tight walkways. That was definitely the case in Kyra Petticrew’s condo kitchen before she — and her brilliant design mind — moved in.
“My parents used to flip houses when I was younger so I’ve grown up around renovation and DIY my whole life and have luckily picked up a few skills from them,” Krya explains. When she moved into her condo in 2020, it felt a bit “clinical and cold,” she says, but she could see the potential.

“The kitchen was various shades of white, beige, brown, and cream and didn’t really have much personality or warmth to it,” Kyra says. “Plus, with so little counter space available and minimal bottom storage, I really wanted to find a way to make it functional but more open to the rest of the space.”

In her 600-square-foot condo, “it seemed silly to squish the kitchen into a tiny room when it could be more open to the dining room and living room so I could more easily converse with guests when they’re over,” Kyra says. Initially, she envisioned adding an island for more counter space and storage, but in the end, she decided she’d rather have a bit more open space. Kyra’s kitchen redo consisted of several medium-sized projects that made a more-than-medium-sized difference.
“Since this was my first place I owned, I wanted to make the entire space feel like me,” she says. “I’ve always lived with roommates or family and have never really been given the opportunity to design a space from beginning to end, and this condo was that opportunity.”

First, Kyra updated the countertops with help from her dad, Shaun; he also helped her replace the sink and faucet. She removed the blah tan backsplash and replaced it with a vertically stacked blue artisan tile (inspired by a restaurant Kyra had visited in California). “This was the first time I ever tiled or did backsplash, but I watched several YouTube videos, bought the required supplies, and managed to figure it out,” she says. She used a scoring tile cutter and a jigsaw with a diamond blade for tiles that needed to be cut around my outlets and light switches.
Next, with the help of her mom, Pam, Kyra painted her cabinetry the same color white as the walls (Benjamin Moore’s Simply White) “It made the space feel bigger within the room,” she says. “I think I successfully managed to find a way to balance both neutrals and brighter colors so that it doesn’t feel overwhelming, but instead calming.” After painting, she swapped out the cabinet pulls for sleeker gold ones.

Kyra says keeping the cabinets was a great way to save money on her kitchen remodel — as was sourcing her butcher block countertops and sink from IKEA and her faucet from Amazon. “These are great places to find alternatives to expensive items, especially in a small space that’s not your forever home,” she says. “These are still great quality items that don’t break the bank.”
Nine months later, with a bit more money saved up, Kyra addressed the layout of the space. She removed much of the wall between the kitchen and dining room, lifting the archways closer to the ceiling and opening up the side walls to frame the kitchen. “My dad helped me rewire the light switches into a neighboring wall and helped me drywall the new wall edges,” she explains. Now, her kitchen and dining area (painted Farrow and Ball’s Calke Green), are more seamless.
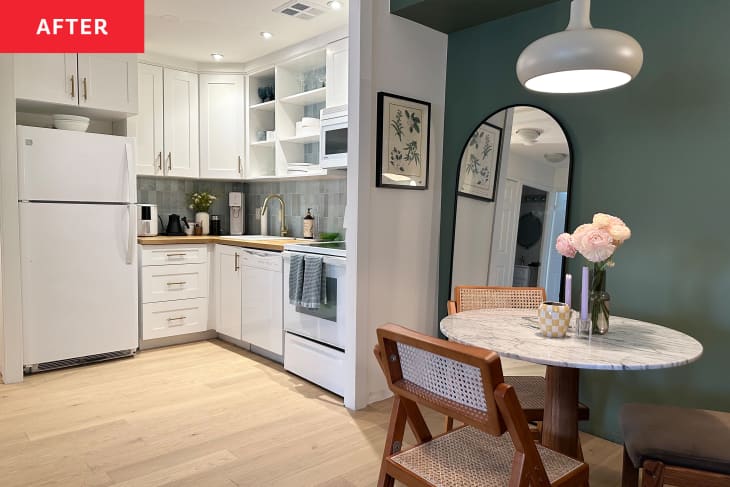
With the layout the way she wanted it, Kyra could turn her attention to the floors, using a chisel hammer to lift the terracotta tile and mortar throughout her entire apartment — the most labor-intensive part of the project. “The tiles often chipped in small chunks, and the mortar was incredibly strong, meaning it took a lot of effort and strength to get each tile up,” she explains. “However, the new floors were worth it, because I find it helps add dimension to the space contrasting against the white, where with the old tile everything blended together.” Kyra chose engineered hardwood for the new floors. Excluding the floors, the redo cost about $1,000.
“At this point, I thought I was finished with the kitchen makeover, until this past fall,” she says. “I have always dreamed of having open shelving to showcase my glassware and dishes and help brighten the space. But I didn’t want to remove the existing upper cabinetry. Instead I did a DIY hack, where I removed the cabinet doors, filled in all of the holes with wood filler, painted the insides of the two cabinets white, and then tiled the back of the cabinets with the same tile I used for the backsplash to make them look like built-in shelves.” (Renters could use this same hack with a peel-and-stick backsplash!)

Kyra filled her new open shelving with thrifted bowls and glassware, and local ceramics to add little one-of-a-kind splashes of fun among the dishware and open shelves. Because she eliminated two cabinets worth of closed storage, Kyra painted the corner cabinet door a solid white (it used to be a glass panel) to give herself more storage for pantry items.“Having a small kitchen has encouraged me to be very critical about what I need in the space and utilize the storage I have to the best of my ability,” she says.
What she loves most about her kitchen “after” “is that the flow of movement within the space is much better, it gets natural light from the patio door, and feels brighter.” She loves that she can have friends over and cook in the kitchen while guests sit at the dining table or in the living room on the couch. “I can still feel like a part of the conversation,” Kyra says. And the cherry on top? When she doesn’t have friends over, she can watch TV while she cooks. Kyra’s reminder for future kitchen remodelers out there is that her kitchen remodel didn’t happen overnight; it happened in phases.
“Take your time curating the space,” she says. “I spent a lot of time diving into Pinterest sourcing inspiration and ideas and finding ways to DIY or hack something to get what I wanted for less. This also applies to executing your makeover. When you’re doing it yourself, it can be discouraging how much longer it’s taking you to accomplish than others, but once you’re done, it’s so satisfying to know that you did it yourself.
Her other advice is to work on upgrades over time. “My kitchen has gone through several iterations since purchasing my condo three years ago: from tile floors, to removing walls, to new floors, to open shelving. It didn’t happen all at once, I really took my time and did what I could as I could do it or afford it.”
Inspired? Submit your own project here.