
FINALLY Organize Your Spices & Make Your Own Magnetic Spice Rack
The paradox of learning how to cook is that the more competent you become, the less competent you feel, because you end up with a jumble of spices cluttering up your kitchen cabinets. Every new, exciting, unfamiliar spice you acquire — sumac, amchoor powder, fenugreek — translates into less space in your designated spice shelf, which then makes any given spice harder to find. Those little bottles seem determined to descend into chaos, and there’s only one force in the universe strong enough to stop them: magnetism.
A magnetic spice rack solves most of the organizational problems associated with owning a sizable spice collection. By sticking your spices to a magnetic board affixed to the inside of a cabinet or pantry door (or, if you have enough space, the side of your fridge), you free up cabinet space and make all of your spices visible at once, which makes it much easier to locate the one you need at any given moment. With a magnetic rack, alphabetizing spices and keeping them alphabetized, is a cinch. And if done right, a magnetized spice rack can extend your spices’ lifespans by keeping them protected from heat, light and air.
Curiously, almost none of the prefab magnetic spice racks on the market are geared toward people who already have a large spice collection. Kamenstein offers sets of 6 and 12 magnetized spice tins that arrive already filled with spices — great if you’re starting out, but a nightmare if you’re already drowning in spices. Gneiss sells a set of 24 similarly spice-filled hexagonal jars with magnetized lids for $135, and that’s not including a stainless steel wall plate to affix them to. There are a few other magnetized spice tins listed on Amazon, and elsewhere, but they tend to be expensive, be sold in modest sets of six or 12 and to have glass or plastic lids that allow in light.
Luckily, it isn’t hard to build your own magnetic spice rack. I know this because I made my own a couple months ago, even though I have no creativity, handiness or home repair skills to speak of. After consulting a couple of Instructables (here and here), I realized building a magnetic spice rack would not require much ingenuity, only a handful of easily ordered components and a few menial steps spaced out over a couple of days. Here’s how I did it (and how you can, too!).

What you need
- Food-safe metal spice tins. Finding the right tins was, weirdly, the hardest part of building my own magnetic spice rack. I was looking for small, airtight, opaque, food-safe, reasonably priced tins. There were plenty of cheap tins on Amazon, but whether they were food-safe was unclear, and most of them let in light in one way or another, or had lids that didn’t seem to form a very tight seal.
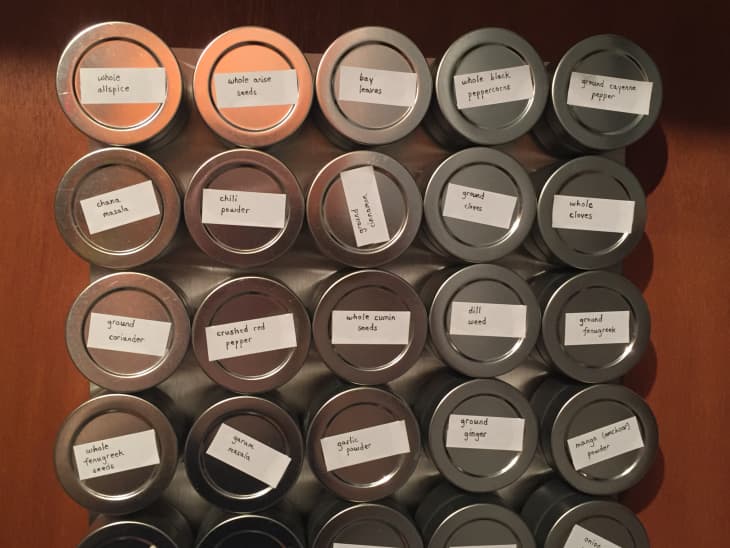
I settled on an item called “Deep Tin Container with Twistlug Cover” from a godsend of an online industry supply store called Specialty Bottle. Even though I had to pay $13.95 for shipping, since I wasn’t ordering in bulk, I’m happy with my choice. I don’t know exactly what “twistlug” means, but the lids twist on and off securely, which means I’m never worried that they’re going to fly open and unleash a turmeric explosion on my apartment. I ordered 40 3-ounce tins and three 8-ounce ones for irregularly shaped spices like cinnamon sticks — enough for my existing collection of 37 spices, with a little room to grow.

- Blank sticker labels. I have a package I ordered to label files several years ago, and it’s shaping up to be a lifetime supply.
- Scissors.
- A pen or Sharpie.
- A stainless-steel wall plate. I ordered mine from Amazon for $19.99. (It now costs $27.99.) The only tricky part is making sure it’s big enough to fit all your tins, which requires a little math. (Divide the length of the plate by the diameter of your chosen tins, then divide the width of the plate by the tin diameter, round those two numbers down to the nearest integer, then multiply them together — that’s how many tins your plate will fit.)
- Duct tape. Just in case.
- Magnets. You’ll want one magnet per tin if your tins are small, two if they’re large. I ordered magnets that came with double-sided adhesive dots, which ended up being sort of a hassle, which is why I recommend …
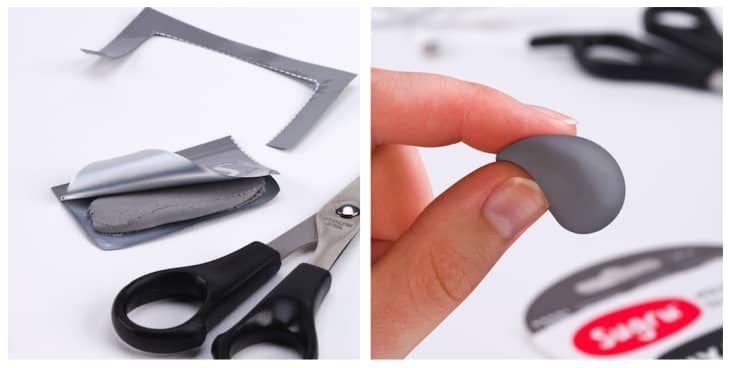
- Sugru. You know about Sugru already, yes? It’s a Play-Doh-like material that can be molded into any shape and then hardens into a strong, flexible, rubber-type finish. It’s great for repairing frayed laptop and phone chargers, and it’s also great, it turns out, for affixing stainless steel plates to walls and magnets to spice tins.
- Coarse sandpaper. I’ll tell you why in a minute.
Instructions
First, rinse out your new spice tins just to be safe, and let them dry thoroughly. Then transfer your spices into them. The contents of a 2-to-3-ounce bottle of spice will fit easily in a small tin. To avoid confusion, it’s best to label your spices as you go — cut out a rectangle of sticker label that will fit on the lid of the jar, write the name of the spice on it, and stick it on there. You might need to wipe down the closed tins with a damp rag or paper towel if any spice gets on the outside of the tin while you’re working.
Once you’ve done this, you can throw all the little glass or plastic bottles your spices were sold in into the recycling bin, which feels great.
Next, attach the stainless steel plate to the vertical surface of your choosing, be it a wall or the inside of a door. If you want to put your spices on the inside of a cabinet door to keep them out of the way, one factor to consider is how much space exists between the door and the contents of the cabinet it encloses, since you don’t want your spice tins to bump into any shelves or prevent the door from closing. I decided to put my spices on the inside of the door to a closet next to my kitchen sink.
If you’re not terrified of boring holes into permanent fixtures of your home, you can definitely use a hammer and nails to attach the plate to the door or wall. I used Sugru, which doesn’t do any permanent damage. (You can cut it off and wipe off the residue when you don’t need it anymore.) I needed more Sugru then I expected. First I spaced nickel-sized blobs of Sugru a few inches apart from one another along the edges of the back of the plate and pressed it firmly against the door, but after a few minutes it fell off, making a heart-stopping clatter that almost certainly terrified my downstairs neighbors. So I added more blobs, more tightly spaced, along the entirety of the back of the plate and pressed it back on. For good measure, I stuck long, perpendicular strips of duct tape over the board to keep it in place while the Sugru cured. After 24 hours, I pulled off the duct tape and found that, thankfully, the plate was quite securely stuck to the door.
Step three is possibly the most fun part: Adhere the magnets onto the bottom of the spice tins. This is where the sandpaper comes in: According to handyman-type people who write how-to guides on the internet, you need to rub sandpaper against both the bottom of the tins and the side of the magnet that’s going to stick to the tin in order to create shallow crevices for the glue (or, in this case, Sugru) to grab onto. Is this step really necessary? I have no idea, but I didn’t want to risk having the magnets fall off, and it felt a little like a good luck charm, so I did it. It turned out to be fun to deliberately mar something smooth and flawless, like diving into a pristine snow bank or stabbing a fork into a perfectly plated $35 entrée at a fancy restaurant.
After roughing up the bottoms of the tins and magnets with sandpaper, it’s time to put them together. As mentioned above, I bought magnets that came with a few similarly-sized adhesive circles, and it turned out to be an enormous pain to peel the backing off each side of the circles. So I switched to Sugru, dividing it into tiny balls, putting each ball into the center of a magnet, and smushing it down into the center of the bottom of the tin. As with the stainless steel plate, the Sugru will need 24 hours to harden on the bottom of the spice tins.
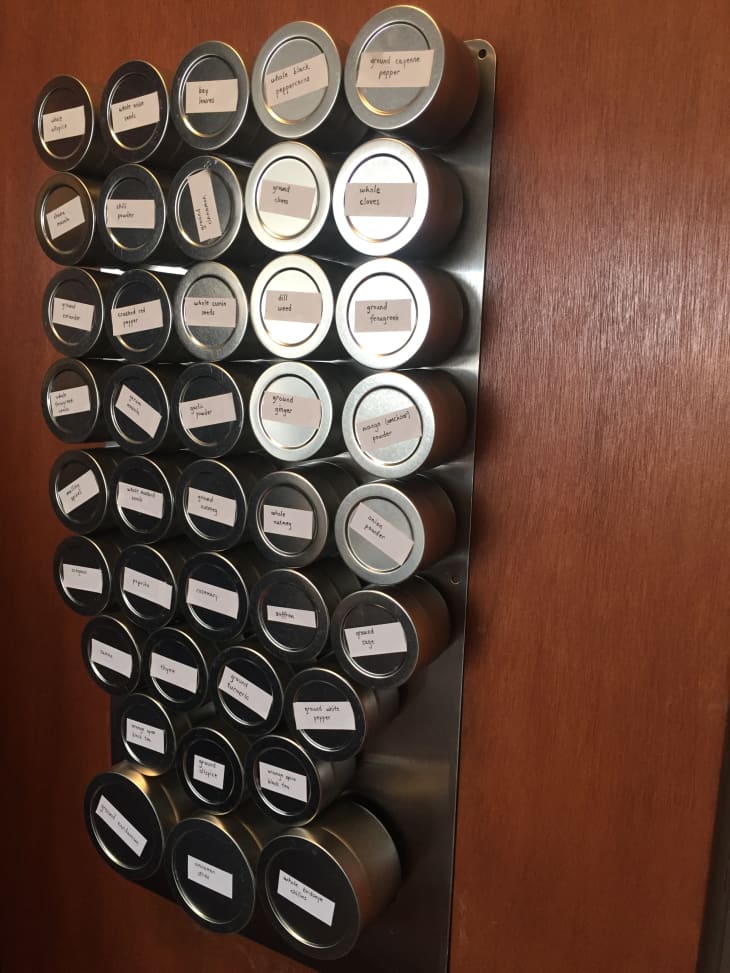
Once it’s hardened, clack your magnetized spice tins onto your stainless steel plate and behold the fruits of your labor: all your spices perfectly arranged in rows and columns, each one ready to be plucked from its designated spot when you need it. Imposing order on your chaotic spice collection will cost only about $100 and a couple of evenings spent doing fun, easy, crafty things at home. Best of all, it will make you feel competent and even accomplished, which will start to erase some of the psychic damage years of wrestling with your spice collection did to you.
L.V. Anderson is a writer and editor living in Brooklyn.