
Teal Walls Made This Kitchen Feel Dated — 3 DIYs Changed Everything
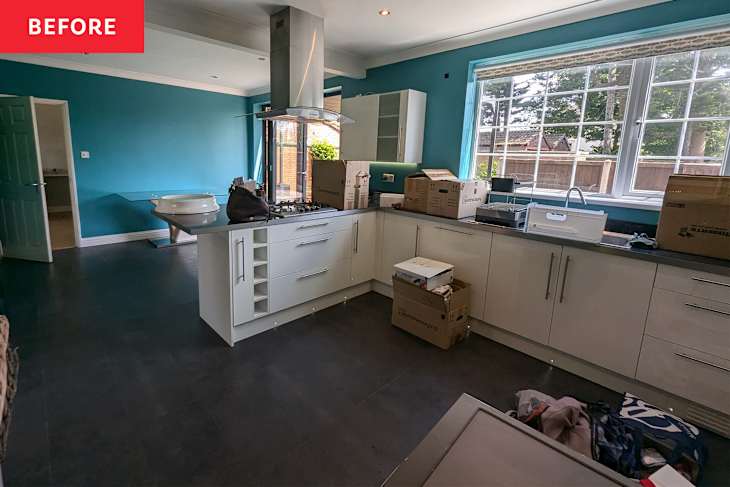
When Orima Kamalu describes the former kitchen in her colorful, DIY-filled house, it’s hard not to wonder why she wanted to make any changes at all.
“The original kitchen was always a lovely, large open space with plenty of storage and room to move around. The units were all gloss-white with chrome-effect bar handles,” she explains.
A Kitchen Redo Was Their Top Priority Because It Wasn’t Their Style
However, while the kitchen (which Orima thinks was last updated in the early 2000s) was functional, it wasn’t exactly their style. After moving into their new home, Orima and her husband, Joel, wanted to make changes that reflected their tastes — and the kitchen was their top priority.


Online Researched Helped Her DIY a New Design Style
“I had seen a number of kitchens on social media with black cabinets, and having had a lovely sage green kitchen previously, I was keen to try out a new style,” Orima says. “I also love Shaker-design cabinets, and brass hardware was a must, given my other style preferences!”
Orima began the process by designing a future kitchen on an app called HomeByMe, then turned to content creators (specifically @charnwoodtowers) to learn tricks for modifying their cabinets to a Shaker style and updating their counters without replacing the existing material.

They Did Everything Themselves — Including Painting the Countertops
Once there was a makeover plan in place, it was time for Orima and Joel to get their hands dirty. They painted the walls with Valspar’s “Stormy Day” (a cool green), then removed all the kitchen cabinets, sanded them, installed new MDF pieces, painted them black, and drilled holes for new hardware.
During the research period, Orima discovered a countertop painting kit from Andrews Aerosols, which they applied and waited to dry — it was so simple. The last piece the couple did themselves was tiling the island and backsplash with green porcelain subway tiles.
While most of the project was DIY (costing around $680 USD or £500), the couple agreed it was best to hire a professional to replace the floors. The contractor installed parquet luxury vinyl tiles (LVT) throughout the kitchen and the nearby living room.

The Kitchen Took 6 Months to Complete, and It Was Worth Every Penny
It took about six months in total to create their dream kitchen, but it was worth every moment and every penny. It’s also a proud reminder for Orima of what people can do with creativity and research.
“I love the color and feel of the new kitchen, which is so much more our taste and style. And most of all, I love that we completed it by hand ourselves at a fraction of the cost of a new kitchen,” Orima shares. “The tiled peninsula is a real highlight, and I love to demonstrate to others how satisfying it is to learn a new skill and implement it in your home.”
To see how other projects in Orima’s home panned out, visit the full House Tour. Inspired? Submit your own project here.
This post originally appeared on The Kitchn. See it there: Black, Bold Cabinets and Dramatic Green Tiles Refresh This 2000s Kitchen

