I Love These Artisan Block-Printed Textiles From India, And Here Are 3 Ways to Style Them
When people ask me what I like to do for fun, I don’t know how to say, “Look at pictures of strangers’ homes on the internet” without sounding a little like Joe from the Netflix show “You.” But truthfully, that is what I like to do for fun and where I get a lot of decorating inspiration for my own home.
My online interiors voyeurism hobby is how I discovered and fell in love with beautiful, artisan-made, block-printed textiles from India. Although more of an art form than a design trend — these ancient textiles are on display at The Metropolitan Museum of Art! — I believe we’ll begin to see more block-printed fabrics in people’s homes, and that you’ll want to incorporate them into your home style, too.
While the beauty of these block-printed textiles is a recent discovery for me, the art of block printing is far from new. Most commonly thought to have originated in the Rajasthan region of India, and traced back to at least the 12th century, the techniques and traditions of block printing have been passed down for generations, continuing into the modern day. Talented artisans carve a design onto a block of wood by hand, which acts as a stamp to create the pattern on the fabric (this is where the term “block print” originates). The carved block is then dipped into dye and firmly pressed onto the fabric, which is repeated over and over until the fabric is completely covered in the design. Each step of the entire process requires incredible skill and a steady hand.
When incorporating these textiles into your own home, be sure to choose pieces that are handmade directly in India, rather than a replica — the latter may have a similar pattern, but it will likely be machine-made and mass-produced. Having a unique, handmade item to act as a piece of art in your home honors the traditions of the communities that developed this practice, while supporting the families that still work with the technique today.
If you’d like to incorporate block-printed textiles in your home, here are three ideas to consider:
As a Blanket in Your Living Room
Etsy is a great place to find block-printed textiles that are created in and shipped directly from India. If you gravitate toward neutral home decor, block-printed throw blankets or quilts can add pattern and interest within a subdued palette, especially in a living room. Try draping one over a sofa, an ottoman, or the side of a basket, like I did in my home below!
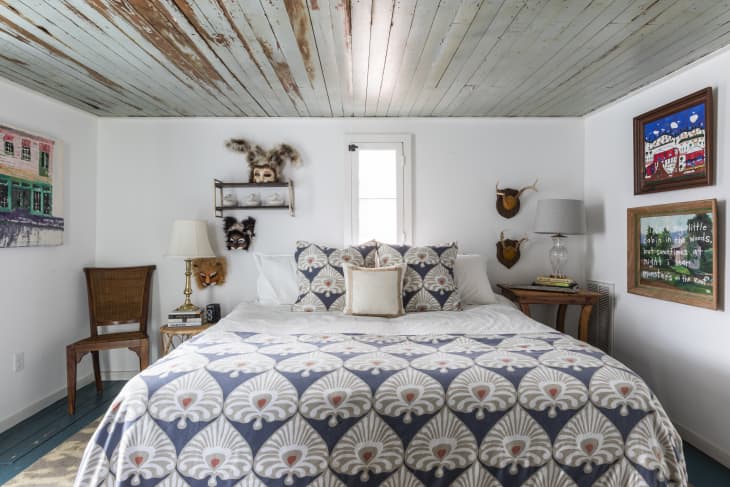
As a Quilt in Your Bedroom
Here’s more pattern-mixing inspiration, but this time for the bedroom. The bold pattern on this block-print quilt is a welcome change from the usual white duvet covers I see so often in my ”online interiors voyeurism” hobby. This is a true work of hand-made art.
You might be surprised to learn that if you use very specific search criteria, you can also track down handmade items on Amazon, including some block-printed quilts from India! The deep indigo color of this quilt is so striking, it’s hard to believe something so beautiful and unique is available with Prime shipping.
As a Tablecloth in Your Dining Room
When artisans change the dye color and block pattern during the fabric making process, it can drastically alter the style of the textile. The classic blue and white color combination of this block-printed tablecloth feels timeless, and has a completely different vibe from the textiles above, proving that block-prints can look beautiful in any design style.