Before and After: A Small Bathroom Gets a Lively $350 Redo Featuring a Cool and Copy-able Mural Idea

Main-level bathrooms typically get a ton of foot traffic in a house, so it’s nice when they look nice — for guests and for everyday use.
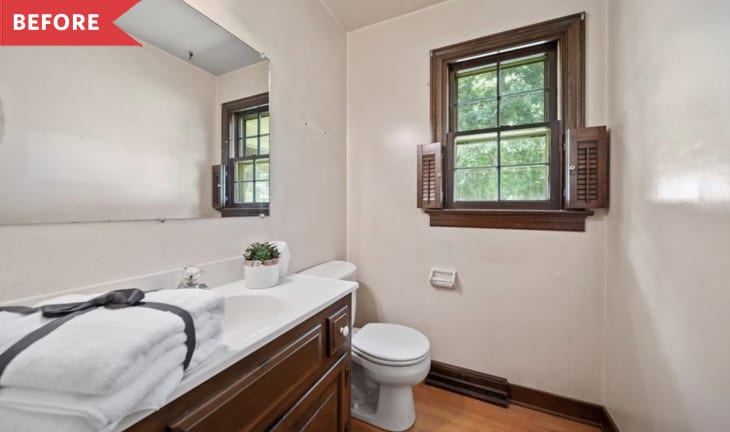
Emily Parlove’s only bathroom on the main level was one that was frequently used, but its look was more run down than Emily and her husband would have liked.
“The prior owner was a smoker, so all of the walls were yellowed and even had stained outlines of old picture frames,” Emily says. “[There was] a lot of dark wood, which we’d normally love, except it was glossy and not quite the ‘in’ style.”
Emily says many of the rooms in her 1970s house needed TLC when she and her husband, Court, moved in, but this bathroom was first on the list. “All guests inevitably make their way to this room, which bumped it up on the priority list,” she explains.
She and Court planned their redo and waited for the items they’d been eyeing online to come in stock to begin. Once everything was ordered and delivered, the reno took a week of DIY work. “For the most part, it was just a lot of paint and small plumbing updates,” Emily says.
Because of the small square footage in the room, the couple took turns actually working in the space. Emily taped everything off for painting, then Court came in with the sprayer. Emily touched up the paint with brushes and rollers, and then she installed the faucet — her first solo plumbing project. “Court was called in for his strength when I couldn’t get something unscrewed or tightened properly,” she says.
One hiccup they experienced was that the hole for the faucet in the existing countertop was smaller than width of the new faucet they’d ordered. “We had purchased a faucet with standard dimensions and didn’t even consider the possibility that it wouldn’t fit,” Emily recalls. “We couldn’t find a fixture with the measurements we needed, so we panicked, thinking we’d have to resort to our old fixture or get a new pricey countertop.”
However, after a bit of online troubleshooting, research showed that a $6 grinding drill bit would open the hole a bit — no new countertop necessary.
At first, Emily was a bit worried that the old off-white countertop wouldn’t match the new white paint in the space, but now she can’t imagine anything different. “I think it’s a perfect fit in the room, especially with the gold fixtures that bring in some warm tones,” she says.
Emily and Court added brassy warmth to the space through new hardware and a hex-shaped mirror from Amazon. “We were also very particular about our gold-shades, so we had to do a few rounds of shopping before everything matched right,” Emily recalls.
Where possible, they opted for used or open box items to keep their total budget under $350.
They painted the existing vanity a light-blue color (Valspar’s New Day), which is much brighter and airier in the space than the dark wood from before. “The vanity is a custom-built piece and really well built, so even though replacing it would’ve been out of budget, it was something we didn’t want to completely do away with anyway,” Emily says.
Although she would have liked to replace the hinges in the vanity, for now, she and Court decided to paint over them with the light blue paint. They also painted over the bathroom doorknobs, which saved them about $40. “[It] isn’t a lot in the grand scheme of things, but it all adds up,” she says.
Emily’s advice to future DIYers is to plan and budget carefully. She’s pleased with how she and Court managed to keep their own costs low. “We knew our budget and had a good idea of what we could do realistically with that money,” she says.
Emily says another one of her main takeaways from the bathroom redo is to embrace imperfection. “The number of times I’ve already heard, ‘How did you get the decals on the wall so straight?’ is the best proof,” she says, admitting that the DIY wall mural she and Court installed is actually not perfectly straight. “They are FAR FROM perfect, but no one will notice but you,” she says.
The accent wall — a three-hour project made using vinyl triangles cut with a Cricut cutting machine — is her favorite element of her refreshed bathroom.
“We toyed with wallpaper for the sheer ease of it, but nothing really piqued my interest, and the few options I found that I did like would’ve cost $200-plus for just that one wall,” she says.
At just $36, her Cricut decals added a pop of fun color and pattern for much cheaper than wallpaper, a testament to Emily and Court’s budget-conscious planning and execution. Their redo is certainly one for the high-impact, low-dollar-sign inspiration books.
Inspired? Submit your own project here.
