Before and After: A Shabby, Barely-There Bathroom Gets Its Due

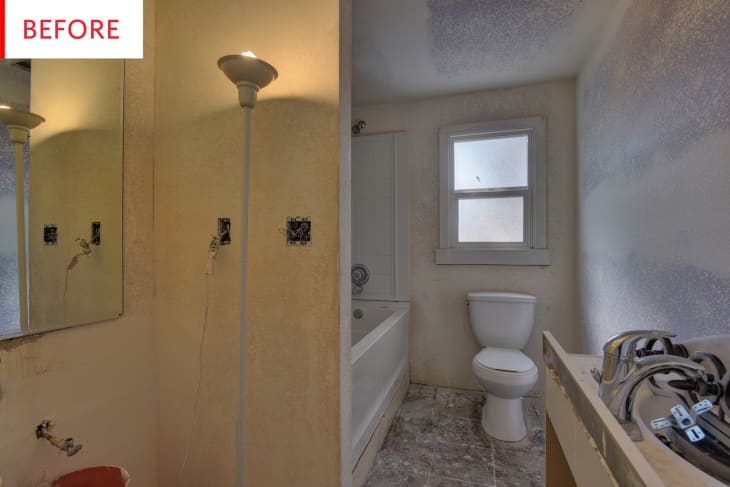
This bathroom was an afterthought—the cottage didn’t have a bathroom for decades!—and it’s finally gotten the love and attention that every room should have. Watch it go from “the cheapest materials available,” exterior paneling (!), and a very casually laid linoleum floor to a bright, inviting room full of mid-century modern charm . . .
It’s so cute now! The white walls and floor really make the most of the daylight coming through that little window, and the wood and gold accents have so much style and personality. I especially love the rich rust of the towels and the way they coordinate perfectly with (but don’t match) the rug. This bathroom belongs to Dani Padgett, who did an impressive amount of the renovation work.
Here we have a better view of the sink nook. The history of this room is absolutely fascinating:
Our little cottage was built in the ’50s and did not originally have a bathroom. Some time a couple of decades ago, the bathroom was built as an add-on, complete with the exterior house paneling showing on the bathroom wall. Right before we moved in, sheetrock was put up and the bathroom was furnished with the cheapest materials (vanity, mirror, light, etc) available and with linoleum only laid enough to barely obscure the raw concrete floor.
We never loved the shabby “unfinished” status of our bathroom and always planned to remodel it to our taste. We slowly shopped for our dream fixtures (including a repurposed vintage cabinet) and studied up on installation skills.
I used to live in a house that was built room-by-room, and the odd juxtapositions, unfinished areas, and questionable materials described certainly ring a bell — I hope Dani found the rehabilitation process as satisfying as I did!
This wall was just aching for an upgrade, right? Better than no bathroom at all, of course, but still not great. I certainly relate to Dani’s desire to renovate, and I admire the fact that she took her time getting started, which allowed her to learn crucial, money-saving skills:
Once we began demolition, the process took about 5 days and the cost was around $1,800 (free labor included!). We rented a tile saw and were definitely surprised by the challenge of that process. Hexagon tile is a challenge for experienced tile layers, let alone first-timers (us). There were definitely surprises, like finding poorly patched holes in the unfinished sheet rock behind the vanity mirror and that the tile mortar didn’t set for four days!
That all sounds terrifying, and you’d never guess from the finished product that the process was anything but smooth and simple.
Here’s a closeup on the lovely and unique light fixture, mirror, and towel bar. I love that light! It has a fabulous shape, and I bet the light it provides is quite flattering. The gold adds warmth in a quite white room, but these accessories can be relatively easily replaced if Dani’s taste changes.
Here’s a little more insight into this major makeover process, including advice for would-be renovators:
We used various resources on DIY blogs to research how to lay tile and also talked with our neighbor, who used to own a tiling business. For mortar, grout and other supplies, we just went to Lowes. For the fixtures, Build.com and we found the vanity cabinet at a local thrift store.
Plan, plan, plan. Similar to measure twice, cut once; measure twice, then shop. Get all of your materials prior to tearing anything out. From our experience, it’s not a project unless you have to make at least 3 emergency runs to the hardware store, so if you can try to avoid having to run out because you ran out of grout while almost done with the floor.
That last bit is so key! If your hardware store has an accommodating return policy, treat yourself to any extra container of grout (or any other key ingredient), and then return whatever you didn’t need as soon as your project is complete. It will save you headaches and heartaches.
This photo gives us the chance to properly ogle this incredible piece. It’s so gorgeous! It fits absolutely perfectly into the spot, it adds storage and style, and and provides just enough space on either side of the sink to hold essentials without attracting vast amounts of clutter. I am envious of Dani’s luck in finding it and the vision necessary to look for such a piece in the first place. The floor looks great, too (hexagonal tile is a classic), and the room as a whole is completely lovely. Here’s how Dani feels about it — and the entire project — now:
Walking into our new bathroom every morning is like walking into a dream. It’s light and airy and inspires a feeling of pride because we did it ourselves. If we could do it again, we’d definitely consider the temperature for setting mortar (probably not use premixed mortar) which would also not have left us without a toilet for a few days (don’t worry, we live next door to family).
Well-deserved pride indeed!
Thank you, Dani!
