
This Simple 3-Step DIY Artwork Uses Things You Probably Already Have

Finding the right art for your home can be a tricky prospect. It can be expensive, for one, and often takes a lot of digging to find something that’s the right style, colors, and dimensions to fit the designated spot. Luckily, there are plenty of ways to make your own art, from framing dried flowers to crafting textured pieces on canvas or wood.
Here’s one more DIY idea to add to the list. When interior designer Courtney Scott repeatedly scrolled by a popular art project on Pinterest, she had an idea for making it her own. “I kept seeing these vintage paintings with ornate framing that had been painted over on the bottom portion. I thought to myself, ‘Wouldn’t it be cool if I applied the same technique to a mirror?’”
So she continued to scroll — this time on resale sites, looking for an ornate mirror to repurpose. She came across a gold option in just the right size on OfferUp for just $50. After she brought it home, Scott went to work adding touches that would match the rest of the bold shades inside her fun guest bathroom redo.
“What I love most about this project is that I was able to create a-one-of-a-kind piece for very little time and money,” she says. “I love the extra pop of color that it adds to the space as well as the light it reflects from the window.”
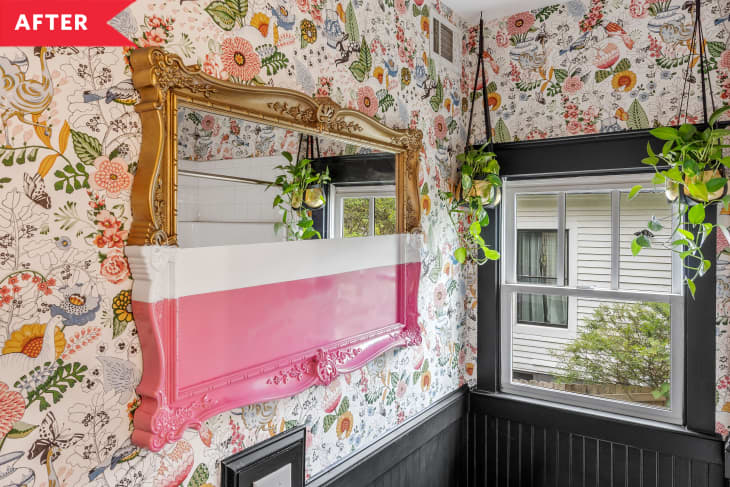
Using plastic bags, painter’s tape, a level, and two cans of spray paint in pink and white, Scott completed the job in a handful of steps. To get started, she taped down where she wanted the white paint to begin and ensured it was level. Scott then covered the portions she sought to exclude with taped-down plastic bags, and painted everything below that point white.
Once the white paint had a chance to dry overnight, Scott repeated the process for where she wanted the pink line to start. She laid down a strip of painter’s tape, covered everything she didn’t want to paint with plastic bags, and filled the area completely. “I proceeded to spray the bottom portion of the mirror pink, painting over the previously sprayed white,” she says. “I would also recommend not doing this on a windy day!”
It all took about two days to complete, accounting for the time that passed between coats. The biggest challenge was taping over the mirror’s crevices and curves, which Courtney worked around by cutting smaller pieces to fit those tricky areas. And the other major challenge? Well, that can be overcome with patience — and some more scrolling.
“Ornate, gold mirrors can be costly, even on resale sites and apps,” she says. “I would advise against spending too much for a piece that you will eventually DIY. Instead, hold out until you find one that is appropriately priced.”
Another option? Shop what you have, or post in your local buy nothing group to see if anyone has a mirror that they’re willing to give up. With a little time invested, you might be able to pull this DIY off for only the cost of materials.