
She Added Curtains to Her IKEA BILLY Bookcase — And the Clutter Vanished
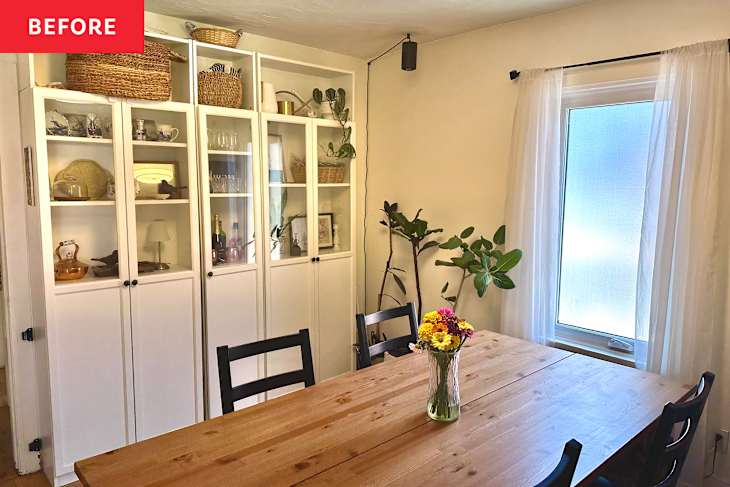
I’m always on the hunt for clever storage tricks that maximize every inch of space in my 1,100-square-foot, early 20th-century bungalow. Like many homes of the era, built-in closets are notoriously absent from our floor plans, so most of our storage lives in wardrobes, wall shelves, and, yes, bookshelves.
In our dining room we have a wall of IKEA BILLY bookshelves I installed a few years ago to replace an old sideboard, hoping it would give us more storage for essentials (table linens, servingware, out-of-season decor, and more). I scoured Facebook Marketplace and scored all the pieces for my bookshelf wall at a pretty hefty discount, including two standard-sized BILLY bookcases, one slim unit, and matching OXBERG panel/glass doors. Plus, I even found height extenders for the tops of each bookcase.


Somehow, Though, I Ended Up Squandering My BILLY’s Storage Potential
My vision was for the bottom half of the bookcases to serve as hidden storage, while the top portions could display a curated selection of seasonal decor to impress guests. It sounds fun, right? I’m not going to lie: Styling my shelves each season made me feel like a real adult and was a total thrill … until it wasn’t anymore.
Recently, I started eyeing my bookshelves and realized how much storage I was really wasting by dedicating half this space to bitsy decor. I realized I couldn’t sacrifice the valuable real estate anymore. In a house where every inch matters, it just doesn’t make sense. So I went on the hunt for creative ways to use the entire bookshelf for storage while concealing any visual clutter, and I’m absolutely in love with the solution I landed on: DIY BILLY bookcase curtains.

My DIY BILLY and OXBERG Curtains Require Zero Power Tools
I wish I could take credit for this ingenious idea, but Pinterest and TikTok had my back on this one. Nevertheless, I made it my own with a few simple tricks and kept the entire process extremely quick (like less than an afternoon!). If making your own curtains and installing them inside a bookcase sounds intimidating, hear me out before you check out. You do not need any power tools, a sewing machine, or even screws to bring this simple DIY to life.
To re-create my stylish, clutter-concealing curtains you just need some cable clips (I used Command’s cord clips), thin dowel rods, fabric glue, and a large piece of fabric of your choice. I upcycled an older bedsheet from the Beautiful by Drew Barrymore x Walmart collection, but you could also repurpose old curtains or buy new fabric. Because I sew regularly, I used a sewing machine to create rod pockets on the top and bottom of the curtains — but most of the published tutorials covering ingenious IKEA BILLY upgrades recommended fabric glue. If I were to do this project again, I’d use this as well; it’s perfect for those who don’t have a sewing machine on hand.

3 Tips to Re-Create This Look Seamlessly
A couple of quick tips I’d share for those interested in re-creating my DIY curtains: First, cut twice the width of your window so the curtain gathers nicely when installed (that ruching is so chic!). And second, be aware of the placement of the bottom rod on the inside of your door in relation to the middle shelf of the BILLY, which can’t be moved. This also means you’ll probably want to make your curtains a bit longer than you think, to accommodate the placement of these bottom cord clips.
When I first installed the cord clips and rods, I installed the bottom rod just under the bottom of the glass, as I did with the top rod right above the glass. But when I went to close the door, the rod hit the middle shelf of the bookcase; the door wouldn’t shut all the way. Then, when I tried to move the rod down slightly so it would sit under the shelf, I realized the curtains themselves weren’t quite long enough to make that happen easily. That’s a mistake that you can avoid by following these three tips clearly.


My Verdict? These Curtains Are Stylish, Easy, and Totally Clutter-Concealing
I’m an avid DIYer, and I’ve tackled a lot of home DIYs in my time — but I’d definitely put this one at the top of the list, thanks to how easy it is (and the difference it makes!). In total, it took me just under 90 minutes to complete all the curtains, and that includes the shelf and rod debacle I experienced. So it should be much faster if you heed my warning! Keep in mind, I had to create and install five separate curtains, so if you’re only doing one bookcase, it should take a fraction of the time.
I seriously love the result. The curtains not only hide the clutter and double the storage space I previously had, but they also soften the space and offer a fun way to incorporate color, pattern, and texture into the room. Plus, they’re easy to swap out or remove entirely if I change my mind. I give this simple DIY a 10/10!