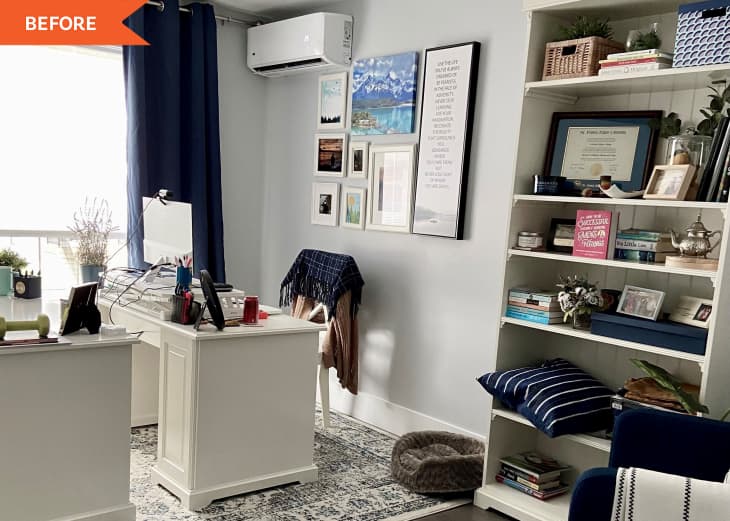
Before and After: A Basic Blue and White Office Space Gets a Luxe-Looking Redo That’s Actually IKEA

A trendy and enviable feature of the dreamiest, most layered-looking living rooms and home offices out there these days? Wall-to-wall built-ins. They’re ideal for displaying book collections, travel tschotchkes, frames, and photos. Although custom built-ins can be expensive, clever DIYers have shown us that it’s possible to modify big box shelving to get the same look.
Take Sanda Stojakovik’s royal blue bookshelves in her living room, which are made from IKEA BILLY bookshelves, for example, or Sahana Begum’s combo of $65 Menard’s cabinets and $35 IKEA shelves that transforms a drab living room wall. If you’re looking for workspace inspiration, look no further than Michael and Nicole Francis’ home office redo — another blue BILLY bookcase win — or Van Tuyet’s office refresh, which blends basic bookshelves into the wall with paint.
Next on your inspiration board should be this gorgeous home office transformation by LeeAnne Mullins (@lifewithleeanne), which includes an approximately $1000 IKEA hack.
Before, LeeAnne’s home office “had no storage space [and] messy bookshelves” she says. It was a blue and white room with two desks.
“It was originally intended to be an office space for two people, but I am the only person who works from the home office,” LeeAnne explains. “It made me feel cramped to be there with all that bulky furniture and not making use of the space in the room.”
LeeAnne’s main goal in her redo was to make her workspace more functional and inspirational. “I work from my home office space full-time, and the space wasn’t being utilized very well,” she says. “For starters, I would sit in my home office and stare at an empty desk all day!”
In addition, two of the wall outlets were inaccessible from the desk, her desk chair was pushed all the way up to the wall, and some of the furniture had seen better days.
“The furniture had moved around to four or five different addresses over the years, and while we tried our best to keep it in good shape, it was all a little lopsided, rickety, and damaged in spots,” she says. “It was time for a change!”
Her office redo took about eight weeks to complete.
“I started by painting the entire room white, just to have a blank canvas,” she says of her process. “My next step was to assemble a number of pieces of IKEA furniture that would come together to create the built-in cabinets.”
LeeAnne combined three HAVSTA cabinets and six BILLY bookcases to create her built-in look. She bought the tallest HAVSTAs available because she knew she wanted to maximize vertical storage.
She cut out the wall’s existing baseboard so her shelving would be flush to the wall and then mounted her shelves. She actually mounted the BILLYs upside down “so there wouldn’t be a gap between the cabinets and bookcases due to the toe-kick,” she explains. That toe-kick at the ceiling is now covered with trim.
Trim, wood filler, and caulking are the keys to making the units look seamless, according to LeeAnne. She added vertical trim to the front of the IKEA furniture to make it “look more like a single unit instead of nine different pieces” and then filled cracks, seams, and the adjustable bookcase holes inside the units with wood filler and caulking for a smooth finish.
Making everything look smooth and seamless in the end is more important than making sure your cabinets are the same size at the beginning, per LeeAnne. “HAVSTA and BILLY don’t naturally go together because BILLY is a little less wide and less deep than HAVSTA,” LeeAnne explains. “But that’s exactly what I wanted! The upper bookcases are a bit inset from the cabinets themselves, which I think contributes greatly to the look of being built in.”
Also helping to reinforce the built-in look is the matching gray-green paint for the walls and shelves. It’s LeeAnne’s favorite shade, Behr’s Incognito. The finishing touch on the shelves? Battery-operated picture light fixtures at the top. They were originally a shiny gold, but LeeAnn sprayed them with an antique gold spray paint to tone them down a bit.
LeeAnne says some of her favorite parts of the shelves are the parts you can’t see. Her printer is now tucked away in the cabinets, and she cut holes in the backs of the cabinets to thread and conceal cords and access outlets via the cabinets.
“Once the built-ins were complete, I installed a wall mural on the entire back wall of the office, which gives it a textured look,” LeeAnne says. “It’s peel-and-stick, so that wall mural is renter-friendly! I put up new window treatments and updated the overhead lighting. My last step was to add some gorgeous new decor and furniture like a desk, mirror, rug, artwork, and flowers!”
LeeAnne says she loves everything about the “after.” “It feels inviting, bright, and spacious in this room and it’s a delight to get to work from here every day,” she says. “Sometimes I can’t believe it’s my office and I get to use it!”
Inspired? Submit your own project here.
