
This Stylish Hack Turned a Cheap IKEA Dresser into a Designer Dupe That Costs Thousands
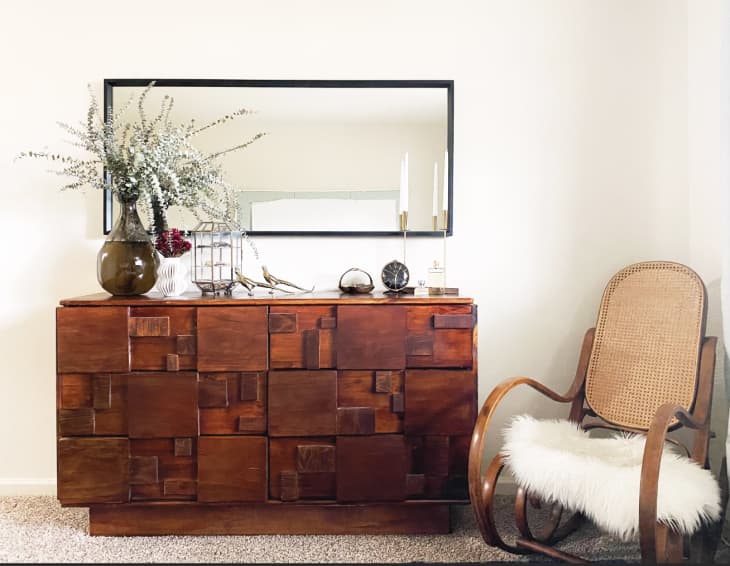
Designer Jess Goodwin had long lusted over Lane Furniture’s Brutalist sideboard—which comes in a number of finishes and can cost up to $8,000—before eventually deciding to take matters in her own hands in the form of a stunning IKEA hack. “I had a photo saved of the sideboard forever but didn’t have the budget to buy the real thing,” Goodwin says. “Whenever I can’t afford something, I make it myself.”
Goodwin was familiar with other hacks involving IKEA’s TARVA dresser, which she used for this project, and her home features many other DIY pieces. In fact, she says that this project was relatively easy compared to the other items she’s tackled. What struck me about this project is that it isn’t just your typical paint or temporary wallpaper IKEA dresser or cabinet hack; Goodwin took things a step further, creating an upscale Brutalist mosaic-front dresser with additional lumber and wooden cutouts.
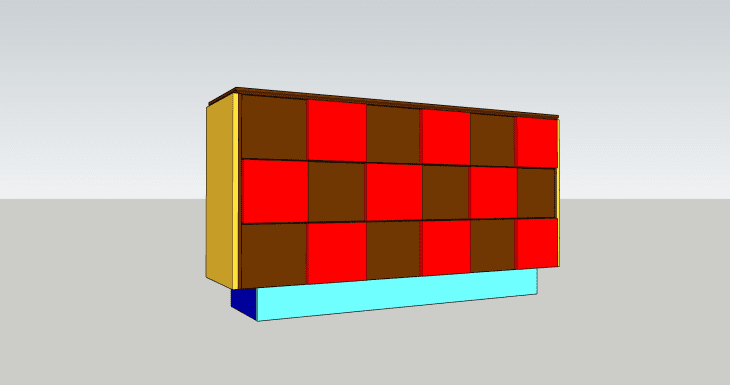
Before gathering her building materials, Goodwin conceptualized the design using an online 3D modeling program called SketchUp. “I always like to draw everything up in SketchUp before starting a new project,” she notes. “This also helps me with figuring out how much material I need to get.” If you don’t have a fancy program, no worries. A simple drawing done on graph paper can help you visualize a project and make supply estimates, too.
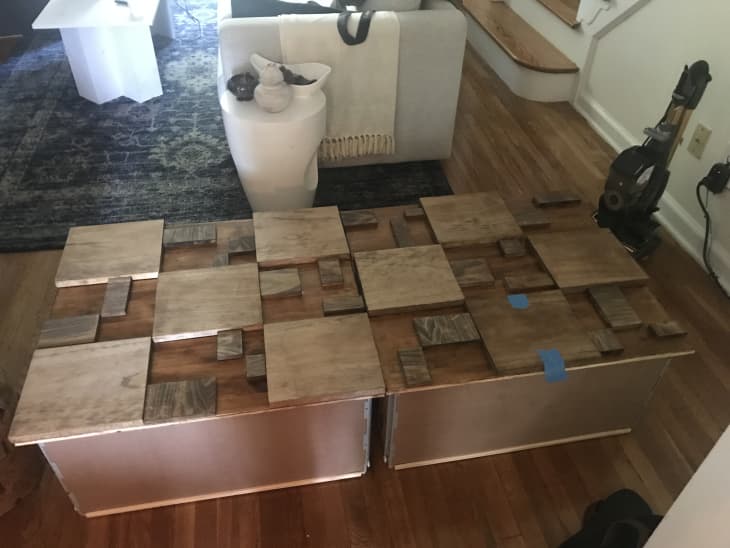
After mocking up the design, Goodwin then headed to Lowe’s to purchase the various components she needed to execute her hack, including unfinished 1/2-inch thick pine boards, which was her material of choice for all of the wooden elements she added to the the TARVA. Once home, Goodwin measured and cut down all of the wood pieces she planned to apply to the dresser, using both a circular saw and miter saw. Per her design, she needed square pieces to recreate the tone-on-tone, checkerboard effect on the dresser drawer fronts and an assortment of smaller rectangles to create the block forms in between those square pieces.
She also needed pieces to create a base for the dresser and two larger panels to finish off the sides. “Once everything was cut down, we sanded all of the edges so they still were squared off but soft enough so one wouldn’t get hurt accidentally banging into the dresser,” she says. After the sanding, she laid out all of smaller front pieces to determine their best placement on the dresser, using the Lane piece for guidance. “I made sure to take photos for reference once I found what I liked,” Goodwin adds.
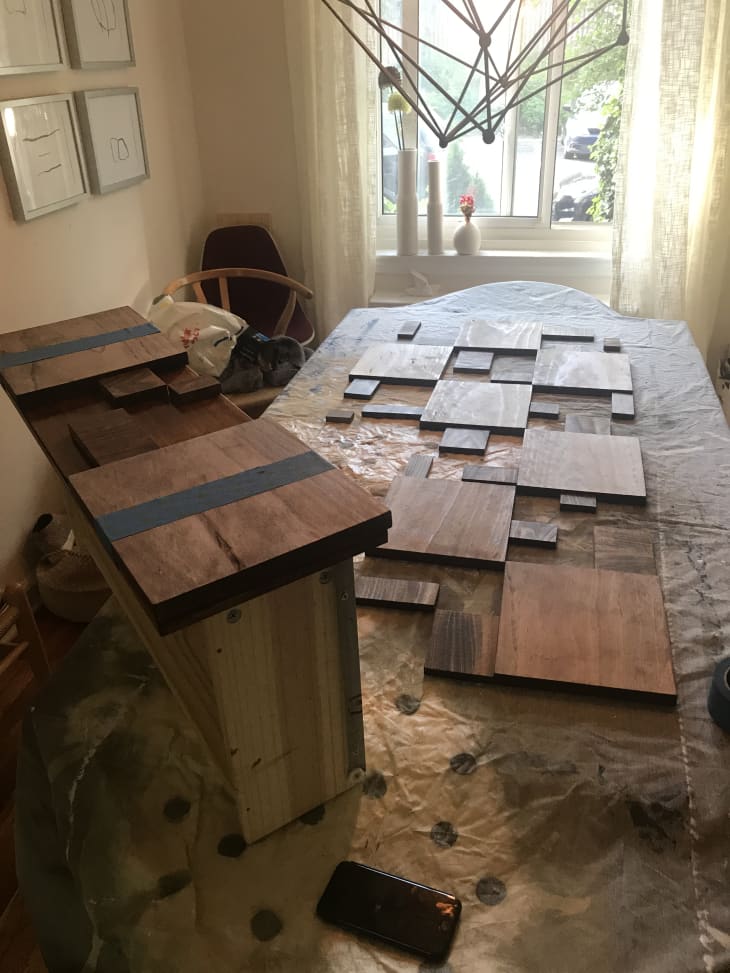
Next came the staining, which Goodwin advises doing before gluing anything down. She stained the original TARVA dresser, too. Once everything had dried, she used painter’s tape to hold pieces in place before gluing them.
While the drawers dried, Goodwin turned her attention to making a dresser base. “We used a Kreg Jig to make pocket holes,” she says. “If you’ve never used a Kreg before, it’s really easy, and watching a simple YouTube video can show you how it works.” She began this process by making two pocket holes in each of the side pieces in order for the base to screw into the front piece, and then she added additional pocket holes where needed on both the sides and the front of the dresser. She then screwed together the base and made sure it was centered correctly on the dresser before securing it in place with a drill.
It was then time to insert the dried drawers into the dresser and align the larger square side panels Goodwin had cut for the sides of the dresser. “The backs of these pieces should align with the back of the dresser, but the fronts should align with the original drawer front,” Goodwin notes. “The original Brutalist mosaic sideboard by Lane Furniture has very thick sides, so [the side panels] helped give the dresser a more finished look and not as much of the ‘IKEA dresser’ look.”

Once the side panels were clamped on, Goodwin drilled one inch screws from the inside to hold them into place. As a final step, she applied a coat of Minwax’s Matte Polycrylic Protective Finish to seal and protect the dresser. While the piece is completely functional as is—Goodwin simply uses the various smaller blocks she glued onto the drawer fronts as handles—she notes that adding push-to-open latches to each drawer can make them even easier to open, if your budget allows for it.
Then came the best part: styling out the piece. Currently, she’s using the dresser, which she paired with a mirror, candles, and greenery in a vase, as a storage console. With this IKEA hack, Goodwin definitely proved it’s possible to make a big box piece look like a one-of-a-kind, pricey vintage find, and you can use more than just paint or wallpaper to hack an IKEA classic.
Get all the IKEA UPDATES
Sign up for The IKEA Edit, our twice-weekly newsletter with the latest IKEA finds, deals, and hacks.