
They Put a Wall in the Middle of Their Open-Concept Layout — Now They Have So Much Storage
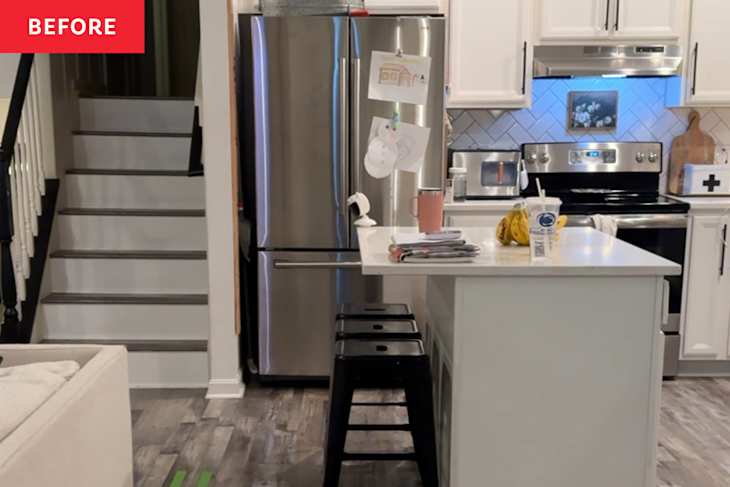
Open-concept living rooms, dining rooms, and kitchens have dominated home construction since the ’90s. But when DIYer Molly Miller moved into her new build in 2018, her family actually wanted more separation between the home’s main living areas.
Everything was “lumped together in one large space,” and it made it difficult to have a functional kitchen with the limited storage. “Even if we wanted to add more cabinets, we didn’t have anywhere to put them — we needed wall space,” Molly explains.
They Decided to Split the 800-Square-Foot Space in Half
The obvious solution? Adding a wall to separate the living room from the kitchen and dining space. Molly and her family had roughly 800 square feet between all three spaces to work with, which meant each side could still be large enough to enjoy and be functional. While creating the wall, they also took the opportunity to remodel the kitchen and dining area, ultimately adding cabinetry and organizational opportunities to each.


They DIYed Most Everything, but It Took Longer Than Expected
The first step was building the wall. Molly and her husband started by taping out where they wanted it to be and then framed it. The couple did everything themselves — adding electrical outlets, casing the doorways, and eventually installing the baseboard and painting. Molly did hire a professional to hang the drywall, though, to ensure it was up to code and safely secured.
“The hardest thing about doing most of the work yourself is finding the time to do it with an already busy schedule and life,” Molly explains. “This definitely made the project take longer than we initially thought.”
Because of their family’s busy schedule, they had started the wall in January but weren’t able to finish until April. Then they turned their attention to renovating the kitchen. The first step there was removing the existing cabinets and flooring.


The New Wall Became a Run of Cabinets for Extra Pantry Space
Molly had decided to add cabinets along the new wall as a pantry, so she focused on that portion of the project after demo. Her husband and dad had experience with installing cabinets, but it was Molly’s DIY first, so they guided her through the process.
“When [the pantry] was finished, we felt more confident and comfortable tackling the rest of the kitchen,” Molly shares.
Molly and her husband continued to do most of the renovation themselves — adding plumbing for the pot filler above the stove, installing a new sink and appliances, adding new flooring, and finishing the room off with crown molding and baseboards.


Her Favorite Features Are the Separate Spaces and Built-in Coffee Bar
Despite the kitchen renovation taking roughly seven months — which meant a long time without countertops and only a subfloor, Molly’s family was able to adapt because “it was all worth it in the end.”
Now, Molly’s favorite part of her new space is the built-in coffee bar in the dining room because it adds a layer of coziness and tons of storage space.
She’s also so happy with how the kitchen and dining room are now visually separate from the living room without feeling totally disjointed. The secret to creating that division without disconnection? Molly and her husband made sure the two new doorways were extra wide. This detail creates sight lines that allow both a visual and literal “natural flow from one space to the next,” Molly says. “It keeps it from feeling stuffy.”
Inspired? Submit your own project here.
Shop This Before & After


- Products
- Loloi Skye Blush/Grey Rug from Amazon
- Weston Shaker Cabinets in “Sand” from RTA Cabinet Store
- Forno Pozzo Dishwasher in “White” from The Home Depot
- Forno Paolo Electric Range in “White” from The Home Depot
- Forno Moena French Door Refrigerator from The Home Depot
- Forno Capoliveri Built-In Microwave Drawer in “White” from The Home Depot
- Mikayla 5×5 Glossy Ceramic Tiles in “Olive” from Edward Martin
- Jonathan Y Stella Moravian Star Pendant in “Gold Leaf” from Amazon
- Pinehurst Solid Wood Counter Stools in “Dark Walnut” from Overstock