
I Added Peel-and-Stick Wall Molding to My Bedroom, and It Looks Like Custom Millwork
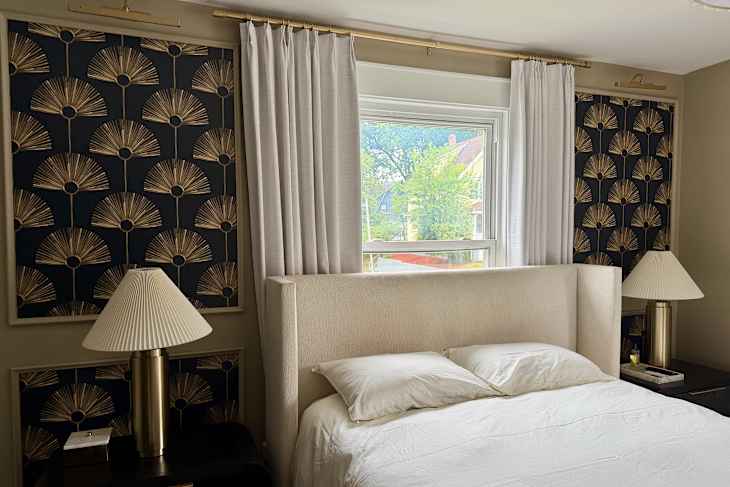
When I started planning a major design overhaul of my primary bedroom, one idea kept popping up on my vision board: wall molding. I loved the classic architectural detail and character it could bring to a room that, quite frankly, was feeling a little generic and boring to me lately. The only problem? Our bedroom has a pretty awkward layout, with oddly placed windows on both main walls. To make our ideal furniture arrangement truly work, our statement wall would have to be interrupted by a large window behind our bed.
I had a hunch that adding tall, dramatic wall molding to the narrow wall spaces flanking our bed could make a big impact without overwhelming the room. Part two of my master plan was to install peel-and-stick wallpaper inside the molding to create the look of oversized, framed artwork. I loved the idea, but after watching more than a few DIY wall molding tutorials, I quickly realized that all that measuring, cutting, and nailing was a little more work than I wanted to sign up for. Can you relate? Thankfully, I stumbled upon the Luxe Architectural Two Piece Self-Adhering Wall Moulding Kit, and suddenly my dream design felt a whole lot easier to pull off.
What Is the Luxe Architectural Removable Wall Molding Kit?
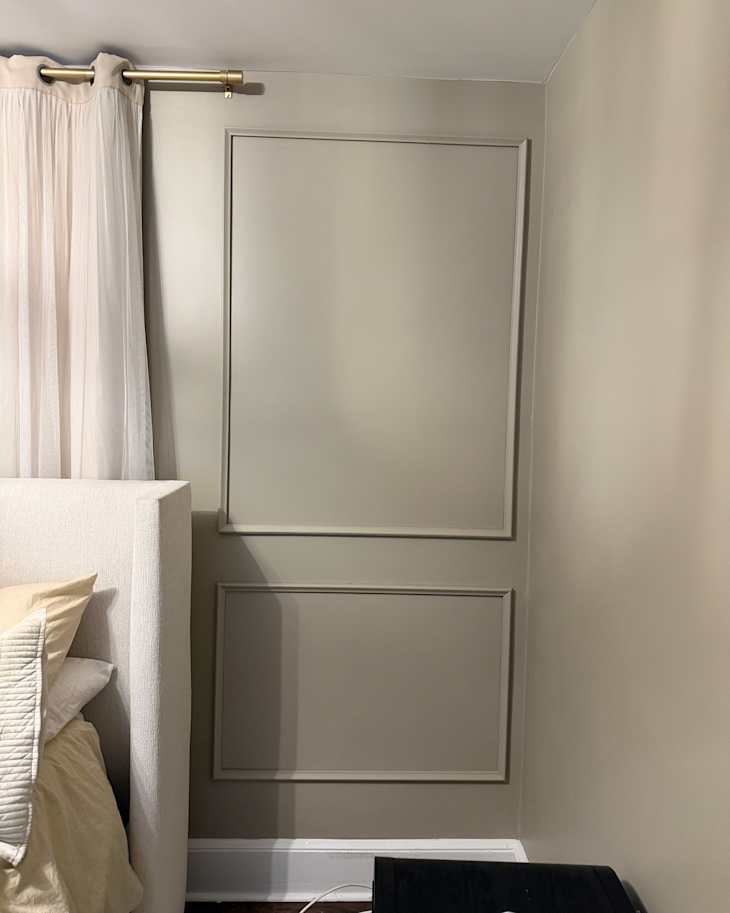
The Luxe Architectural wall molding kit is essentially a shortcut to the look of custom millwork, without the tools or complicated installation. Each kit comes with two fully assembled, real wood molding frames designed to create a classic raised-panel look. They’re handcrafted in the U.S., which I love, and feature a self-adhesive backing, so you can simply peel, position, and press them onto your walls. No saws, nail guns, or complicated measurements required. Clearly I’m 100% Team Anything No Tools, baby!
The two-piece kit is designed specifically for rooms with standard 8-foot ceilings, and each set includes a taller 48-inch frame and a shorter 24-inch frame. Widths range from 12 to 54 inches, which makes it easy to customize the look to fit any space. There are also three finish options, including a budget-friendly DIY primed version, a stain-grade poplar option, and a finished primed version that’s ready to paint without any additional prep. I ordered two kits in the 36-inch width with the finished primed option, which turned out to be just right for the narrow spaces on either side of our bed.


How Easy Is It to Install Removable Wall Molding?
I’ll admit that even though we own our home, we’re not particularly enthusiastic about putting unnecessary holes in our walls when a peel-and-stick option exists. This is partially my fault because I have a serious case of decor commitment issues and have been known to change my mind about a design decision after just a few months. So, the promise of beautiful wall molding without nails or power tools was especially appealing. When our kits arrived, just a few days after ordering, I was immediately impressed. Everything was carefully packaged and arrived in excellent condition. Each piece looked and felt like the real wood molding you’d expect to see installed by a professional carpenter.
Although the frames were beautiful right out of the box, we decided to paint ours Benjamin Moore’s Pashmina to match our bedroom walls. Painting all four frames took us about an hour, and we let them dry overnight before installing them the next day. Even with a little excess paint around the edges, the adhesive backing peeled away easily. From there, we simply positioned each frame on the wall, made adjustments to get the spacing just right, and pressed firmly along the edges to secure it. We were even able to lift and reposition the frames as we worked, which was a huge relief. My biggest tip? Use a laser level. It made lining up the upper and lower frames and matching the placement on both sides of the bed so much easier. Once we were happy with the positioning, the frames didn’t budge.

Can You Use Peel-and-Stick Wallpaper Inside Wall Molding?
Absolutely, and this was my favorite part of the entire project! My original vision was to use the molding to frame a bold, patterned wallpaper, creating the illusion of oversized artwork without actually hanging any. After installing the molding, I carefully applied our Mitchell Black black-and-gold Art Deco-inspired peel-and-stick wallpaper inside each frame. The contrast between the dramatic wallpaper and the soft, warm greige molding was exactly what I’d been hoping for.
I was initially a little nervous that working with the super-sticky wallpaper might pull at the molding or loosen the adhesive, but that wasn’t an issue at all. The frames stayed firmly in place throughout the process, even as I adjusted and smoothed the wallpaper inside them. The finished look is easily one of my favorite details in our entire bedroom makeover. What was once an awkward stretch of wall now looks intentional and full of personality. We even hung brass wireless picture lights above each set for extra drama at night. And I’d like to think that because the molding matches our wall color, the wallpaper really gets to shine.

Is the Luxe Architectural Wall Molding Kit Worth It?
If you’re looking for a way to add architectural character to a plain wall without committing to a full DIY project, I’m genuinely impressed with these kits. Depending on the size and finish you choose, they can certainly be pricier than purchasing molding from a home improvement store and cutting and installing it yourself. But I’d say the convenience, quality, and professional-looking results make the investment worthwhile. There’s something pretty satisfying about getting the look of custom millwork without having to pick up a single power tool.
The self-adhering design also makes this an appealing option for renters, although I’d recommend checking with your landlord and testing the adhesive on your wall finish before committing. Strong adhesives can sometimes damage paint during removal, so I wouldn’t assume the frames will come off without a trace. But for homeowners and renters alike, the ease of installation is a major selling point. In fact, by the time we finished our bedroom, I was already mentally mapping out all the other places in our home where we could add these molding kits. I currently have sets in my cart for our entryway and guest bedroom, and I’m not even pretending to resist. Once you see how much personality these little gems can add to a room, it’s hard not to get hooked.