Before and After: A $300 Renter-Friendly Kitchen Redo Has a “Jaw-Dropping” DIY Floor

There are plenty of beautiful kitchen redos out there, but it can be discouraging as a renter — or simply someone with a tight budget — to know that it often takes a lot of money and time to make major changes in the kitchen. Tile, plumbing, and appliances have a high price tag — and in a rental space, they can’t really be changed.
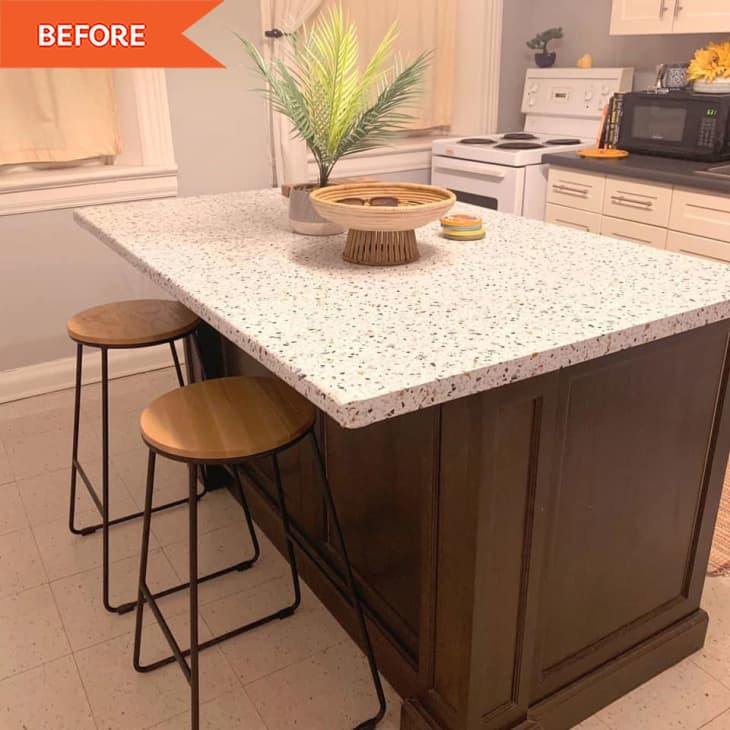
But one renter, Cyeira Carriere, proves that upgrades to a dated kitchen don’t have to be expensive, nor do they have to be permanent. Overall, the kitchen before was “begging for an upgrade,” Cyeira says. It “had minimal updates that were likely done quite some time ago,” and “the walls were typical ‘renter gray.'”
Cyeira wanted something that better matched her personality. “I do a lot of cooking, so making it a space I was excited to be in was essential,” she shares. “I knew I wanted to give it a comfortable and practical look: modern-meets-retro.”
She worked on the DIY upgrades while staying home during the pandemic, and the redo took about two weeks to complete. “I had nothing but spare time and ideas waiting to be executed,” she says.
To achieve her vision, she painted the walls a fun, retro-looking green (Behr’s Sweet Grass). Her backsplash, which looks like pink tile, is actually a white peel-and-stick option painted light pink (Behr’s Flamingo Feather.)
“Paint solves everything” is Cyeira’s DIY motto. “If you don’t like something, paint it!” she says. She applied that same mentality to her floors, which she says were an “intense labor of love.”
Cyeira’s first step was cleaning the floor so that her chosen contact paper would stick to it. After giving the floors a thorough mopping, she laid her new floor covering. “I laid down about three rolls of plain white contact paper to ensure that when my time was up in this apartment, I could peel off my weeks of hard work,” she says.
With the contact paper in place, Cyeira could still make out the lines from the old laminate tile underneath, so she used them as a guide to create her new checkerboard look. “I knew I wouldn’t have enough paint to lay down a base coat of white, so I painted every other square with white, going over the line into the soon-to-be black squares,” she explains. “From here, I carefully taped off what would be the black squares and painted them in.”
She used Behr’s Polar Bear for the white squares and Carbon for the black squares. Then, she added a few finishing coats of a water-based polyurethane in a satin finish. Cyeira says the seal gave a “nice slight shine” that reminds her of a classic diner.
Cyeira added several other rental-friendly and space saving solutions to her space, too, like the terrazzo peel-and-stick cover for the counters, the butcher block peel-and-stick cover for the island, the magnetic knife strip above the sink, and the compact spice rack hung between the windows. But her favorite part of her kitchen is her new, custom floors.
“Having company over is a huge ego boost with all of the compliments I get on the space,” Cyeira says. “I’m incredibly proud of the painted floor, especially, because I can say, ‘It’s rental-friendly!’ and watch everyone’s jaws drop.”
The best part? The floors have held up well over time. “It’s held up amazingly through cat claws, spills, vacuuming, and mopping, and I don’t see it needing any touch ups any time soon,” Cyeira says. “All in all, a very rewarding project that had a huge impact and went much more smoothly than I could have hoped.”
Inspired? Submit your own project here.
This piece is part of Money Month, where we’re covering everything from side hustles to down payments to a beginner’s guide to investing. Head over here to read more!
